Prig(PRototyping jIG) is a framework that generates a Test Double like Microsoft Fakes/Typemock Isolator/Telerik JustMock based on Unmanaged Profiler APIs. This framework enables that any methods are replaced with mocks. For example, a static property, a private method, a non-virtual member and so on.
As of Dec 20, 2015, Released V2.1.0.
Let's say you want to test the following code:
using System;

namespace QuickTour
{
    public class LifeInfo
    {
        public static bool IsNowLunchBreak()
        {
            var now = DateTime.Now;
            return 12 <= now.Hour && now.Hour < 13;
        }
    }
}
You probably can't test this code, because DateTime.Now returns the value that depends on an external environment. To make be testable, you should replace DateTime.Now to the Test Double that returns the fake information. If you use Prig, it will enable you to generate a Test Double by the following steps without any editing the product code:
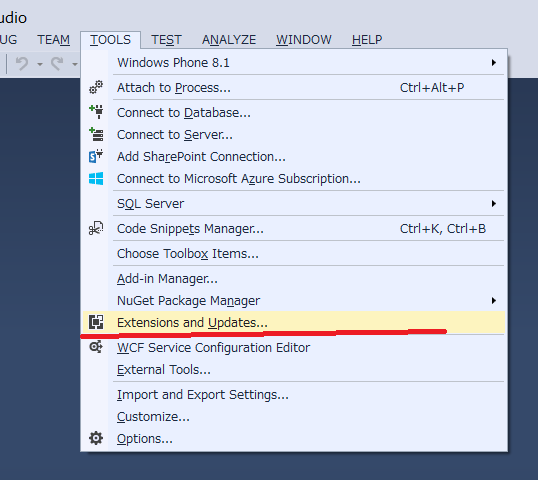
Run Visual Studio 2013(Community or more, 2015 is also supported) as Administrator and choose TOOLS - Extensions and Updates....
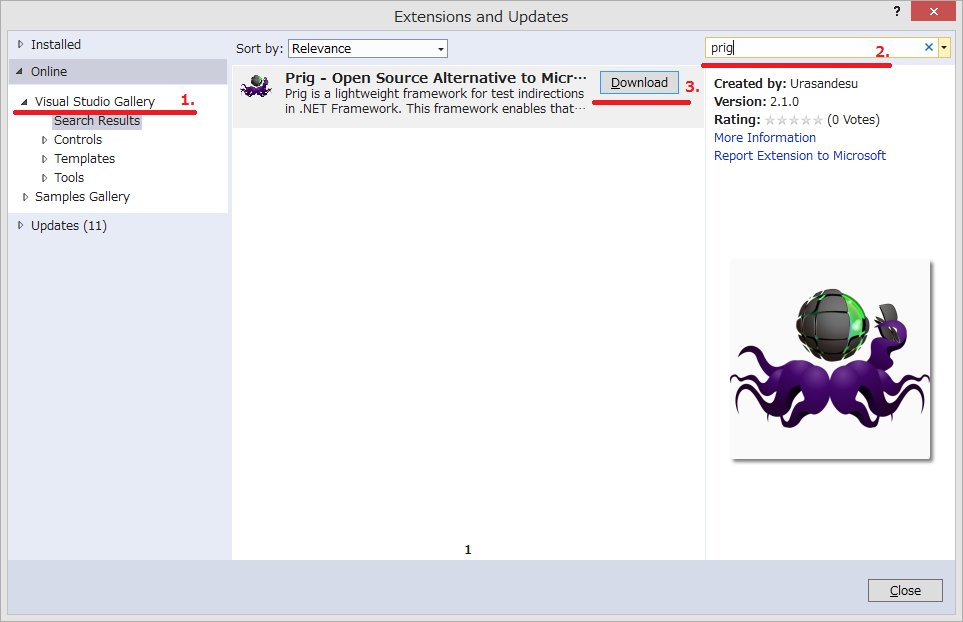
Now in the Extensions and Updates window, take the following steps:
- On the left side, ensure
Visual Studio Galleryis selected underOnline. - In the search box in the upper right corner, type
prig. - Select the
Prigpackage, and clickDownload.
NOTE: Prig requires PowerShell v3.0+. If you want to use Prig in Windows 7, please install Windows Management Framework 3.0+ beforehand. See also this issue.
Once restart Visual Studio, you can find PRIG in the menu. Choose PRIG - Register Prig (Needs Restarting).

Finally restart Visual Studio then you are now ready.
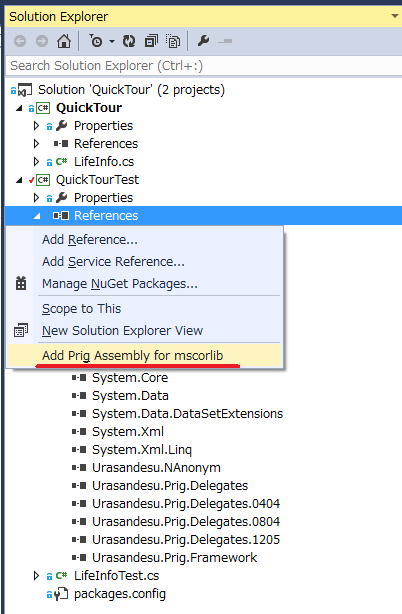
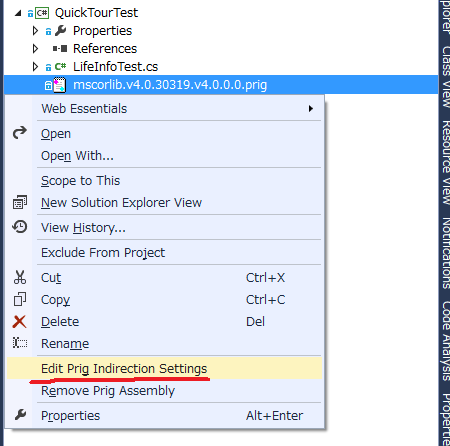
Add test project(e.g. QuickTourTest). Then, right click References and choose Add Prig Assembly for mscorlib:
You can find the Stub Settings File <assembly name>.<runtime version>.v<assembly version>.prig in the project(in this case, it is mscorlib.v4.0.30319.v4.0.0.0.prig). So, right click the file and choose Edit Prig Indirection Settings:
Then, Prig Setup Session will start:
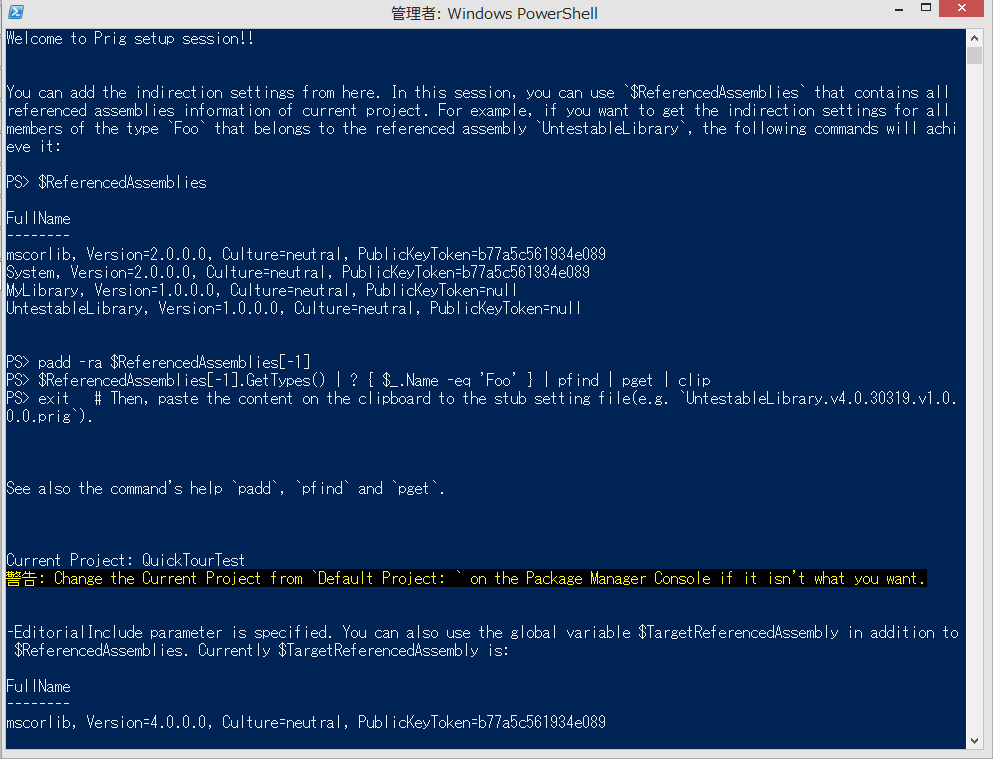
Welcome to Prig Setup Session!!


You can add the Stub Settings File from here. In this session, you can use `$ReferencedAssemblies` that contains all
referenced assemblies information of current project. For example, if you want to get the indirection settings for all
members of the type `Foo` that belongs to the referenced assembly `UntestableLibrary`, the following commands will achi
eve it:

PS> $ReferencedAssemblies

FullName
--------
mscorlib, Version=2.0.0.0, Culture=neutral, PublicKeyToken=b77a5c561934e089
System, Version=2.0.0.0, Culture=neutral, PublicKeyToken=b77a5c561934e089
MyLibrary, Version=1.0.0.0, Culture=neutral, PublicKeyToken=null
UntestableLibrary, Version=1.0.0.0, Culture=neutral, PublicKeyToken=null


PS> padd -ra $ReferencedAssemblies[-1]
PS> $ReferencedAssemblies[-1].GetTypes() | ? { $_.Name -eq 'Foo' } | pfind | pget | clip
PS> exit   # Then, paste the content on the clipboard to the Stub Settings File(e.g. `UntestableLibrary.v4.0.30319.v1.0.
0.0.prig`).


See also the command's help `padd`, `pfind` and `pget`.


Current Project: QuickTourTest
WARNING: Change the Current Project from `Default Project: ` on the Package Manager Console if it isn't what you want.


-EditorialInclude parameter is specified. You can also use the global variable $TargetReferencedAssembly in addition to
 $ReferencedAssemblies. Currently $TargetReferencedAssembly is:

FullName
--------
mscorlib, Version=4.0.0.0, Culture=neutral, PublicKeyToken=b77a5c561934e089


PS 01.QuickTour>
Now, we want to get the indirection setting for DateTime.Now. In this case, execute the following commands and copy it to the clipboard:
PS 01.QuickTour> $TargetReferencedAssembly.GetTypes() | ? { $_.Name -eq 'datetime' } | pfind -m 'get_Now' | pget | clip
PS 01.QuickTour> exit
Exit the Prig Setup Session, and paste the copied information to the Stub Settings File:
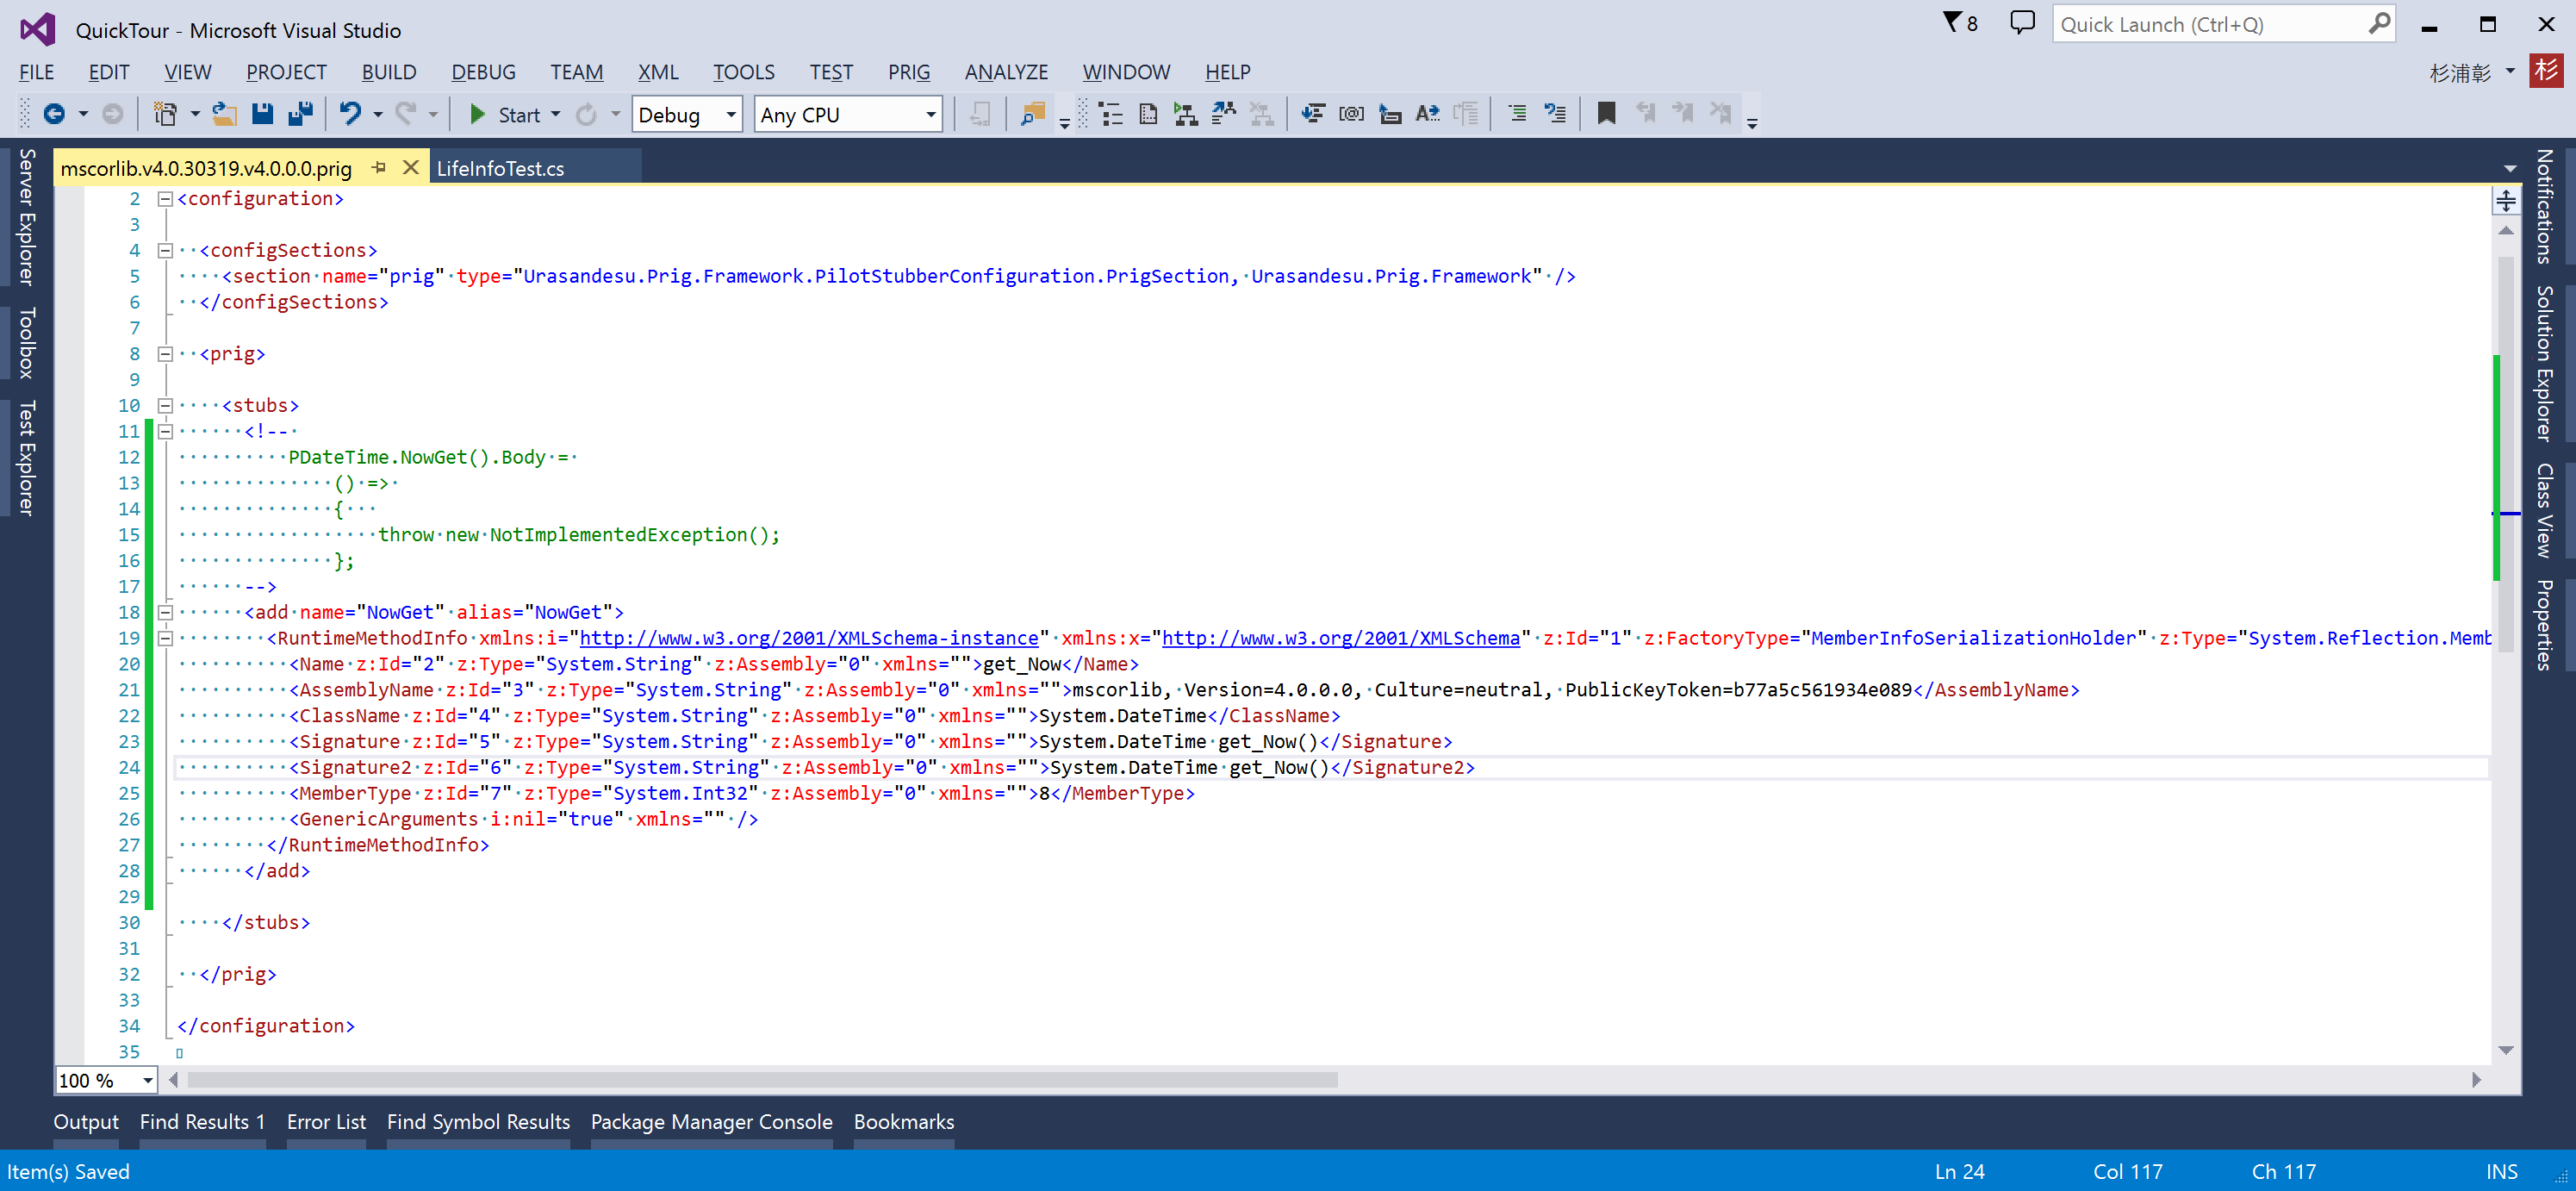
<?xml version="1.0" encoding="utf-8"?>
<configuration>

  <configSections>
    <section name="prig" type="Urasandesu.Prig.Framework.PilotStubberConfiguration.PrigSection, Urasandesu.Prig.Framework" />
  </configSections>

  <prig>

    <stubs>
      <!-- PASTE HERE -->
      <add name="NowGet" alias="NowGet">
        <RuntimeMethodInfo xmlns:i="http://www.w3.org/2001/XMLSchema-instance" xmlns:x="http://www.w3.org/2001/XMLSchema" z:Id="1" z:FactoryType="MemberInfoSerializationHolder" z:Type="System.Reflection.MemberInfoSerializationHolder" z:Assembly="0" xmlns:z="http://schemas.microsoft.com/2003/10/Serialization/" xmlns="http://schemas.datacontract.org/2004/07/System.Reflection">
          <Name z:Id="2" z:Type="System.String" z:Assembly="0" xmlns="">get_Now</Name>
          <AssemblyName z:Id="3" z:Type="System.String" z:Assembly="0" xmlns="">mscorlib, Version=4.0.0.0, Culture=neutral, PublicKeyToken=b77a5c561934e089</AssemblyName>
          <ClassName z:Id="4" z:Type="System.String" z:Assembly="0" xmlns="">System.DateTime</ClassName>
          <Signature z:Id="5" z:Type="System.String" z:Assembly="0" xmlns="">System.DateTime get_Now()</Signature>
          <Signature2 z:Id="6" z:Type="System.String" z:Assembly="0" xmlns="">System.DateTime get_Now()</Signature2>
          <MemberType z:Id="7" z:Type="System.Int32" z:Assembly="0" xmlns="">8</MemberType>
          <GenericArguments i:nil="true" xmlns="" />
        </RuntimeMethodInfo>
      </add>
      <!-- PASTE HERE -->
    </stubs>

  </prig>

</configuration>
Were you able to build successfully? OK, now you're ready to test them.
In the test code, it becomes testable through the use of the stub and the replacement to Test Double that returns the fake information:
using NUnit.Framework;
using QuickTour;
using System;
using System.Prig;
using Urasandesu.Prig.Framework;

namespace QuickTourTest
{
    [TestFixture]
    public class LifeInfoTest
    {
        [Test]
        public void IsNowLunchBreak_should_return_false_when_11_oclock()
        {
            // `IndirectionsContext` can minimize the influence of the API replacement.
            using (new IndirectionsContext())
            {
                // Arrange
                // Replace `DateTime.Now` body. Hereafter, `DateTime.Now` will return only `2013/12/13 11:00:00`.
                PDateTime.NowGet().Body = () => new DateTime(2013, 12, 13, 11, 00, 00);

                // Act
                var result = LifeInfo.IsNowLunchBreak();

                // Assert
                Assert.IsFalse(result);
            }
        }

        // In the same way, add the test case to cover other branches...
        [Test]
        public void IsNowLunchBreak_should_return_true_when_12_oclock()
        {
            using (new IndirectionsContext())
            {
                // Arrange
                PDateTime.NowGet().Body = () => new DateTime(2013, 12, 13, 12, 00, 00);

                // Act
                var result = LifeInfo.IsNowLunchBreak();

                // Assert
                Assert.IsTrue(result);
            }
        }

        [Test]
        public void IsNowLunchBreak_should_return_false_when_13_oclock()
        {
            using (new IndirectionsContext())
            {
                // Arrange
                PDateTime.NowGet().Body = () => new DateTime(2013, 12, 13, 13, 00, 00);

                // Act
                var result = LifeInfo.IsNowLunchBreak();

                // Assert
                Assert.IsFalse(result);
            }
        }
    }
}Before running tests in Visual Studio Test Explorer, you have to install a Test Adapter. Currently, Prig supports the following Test Adapters: NUnit, MSTest, xUnit.net. As the above described sample, let we use NUnit. Now, in the Package Manager Console, change the Package source to Prig Source, the Default project to QuickTourTest and execute the following command:
PM> Install-Package NUnitTestAdapterForPrigNOTE: Unfortunately, you can't use official NUnit Test Adapter because it doesn't support any configurations like prime NUnit which is supported, e.g. NUnit Gui Runner's Settings and NUnit-Console's Settings.
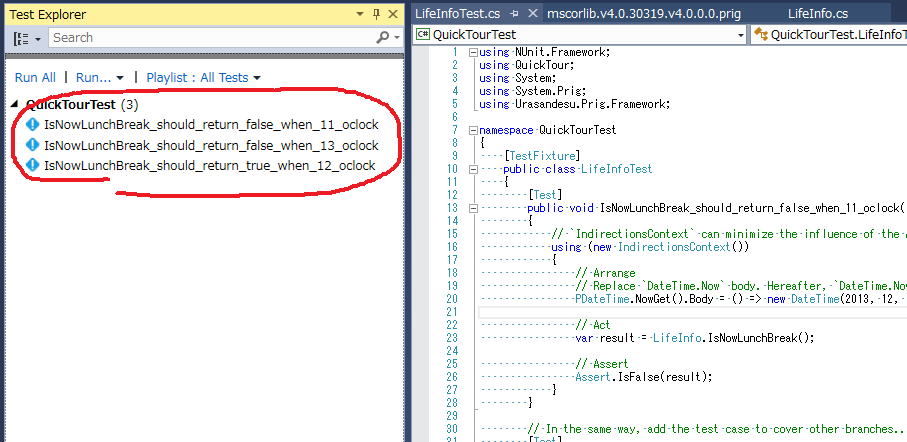
After install, build the test project and choose the menu TEST - Windows - Test Explorer. Then, you can find runnable tests in the Test Explorer.
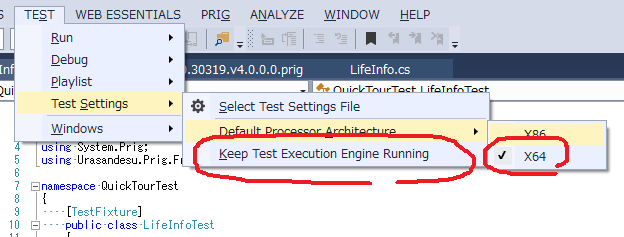
When Test Adapter was installed successfully, you can also modify the Test Settings. As the following image, change Default Processor Architecture to x64 and uncheck Keep Test Execution Engine Running:
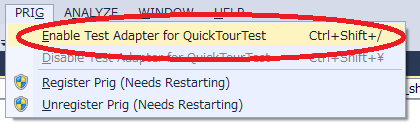
In fact, to enable any profiler based mocking tool, you have to set the environment variables. Therefore, such libraries - Microsoft Fakes/Typemock Isolator/Telerik JustMock provide small runner to satisfy the requisition, also it is true at Prig. Choose the menu PRIG - Enable Test Adapter for ConsoleApplicationTest:
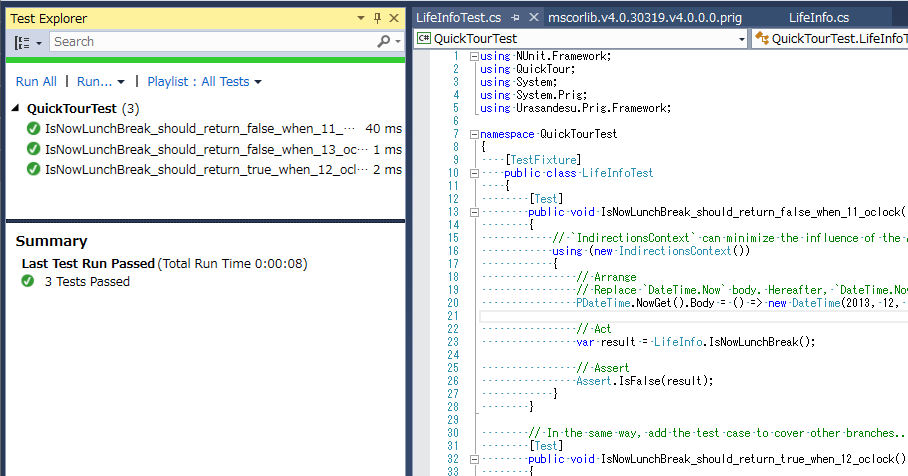
Then, execute TEST - Run - All Tests, you can get test results in the Test Explorer.
If tests have been created, you can refactor illimitably! For example, you probably can find the result of refactoring as follows:
using System;

namespace QuickTour
{
    public class LifeInfo
    {
        public static bool IsNowLunchBreak()
        {
            // 1. Add overload to isolate from external environment then call it from original method.
            return IsNowLunchBreak(DateTime.Now);
        }

        public static bool IsNowLunchBreak(DateTime now)
        {
            // 2. Also, I think the expression '12 <= now.Hour && now.Hour < 13' is too complex.
            //    Better this way, isn't it?
            return now.Hour == 12;
        }
        // 3. After refactoring, no longer need to use Prig, because you can test this overload.
    }
}
As just described, Prig helps the code that depends on an untestable library gets trig back. I guarantee you will enjoy your development again!!
For more information, see also Prig's wiki.
To build this project needs the following dependencies:
- Visual Studio 2013(more than Professional Edition because it uses ATL. Also, you can use Community Edition)
- Boost 1.55.0
Extract to C:\boost_1_55_0, and will build with the following options(x86 and x64 libs are required):
CMD boost_1_55_0>cd
C:\boost_1_55_0

CMD boost_1_55_0>bootstrap.bat
Building Boost.Build engine

Bootstrapping is done. To build, run:

    .\b2

To adjust configuration, edit 'project-config.jam'.
Further information:
...

CMD boost_1_55_0>.\b2 link=static threading=multi variant=debug,release runtime-link=shared,static -j 4

Building the Boost C++ Libraries.

Performing configuration checks
...

CMD boost_1_55_0>.\b2 link=static threading=multi variant=debug,release runtime-link=shared,static -j 4 --stagedir=.\stage\x64 address-model=64

Building the Boost C++ Libraries.

Performing configuration checks
...
- Google Test 1.6
Extract to C:\gtest-1.6.0, and upgrade C:\gtest-1.6.0\msvc\gtest.sln to Visual Studio 2013. Choose theBuildmenu, and openConfiguration Manager.... OnConfiguration Managerdialog box, in theActive Solution Platformdrop-down list, choose the<New...>option. After theNew Solution Platformdialog box is opened, in theType or select the new platformdrop-down list, select a 64-bit platform. Then build all(Debug/Release) configurations. - NUnit 2.6.3.13283
Install using with the installer(NUnit-2.6.3.msi). - Modeling SDK for Microsoft Visual Studio 2013
Install using with the installer(VS_VmSdk.exe). - Microsoft Visual Studio 2013 SDK
Install using with the installer(vssdk_full.exe). - NAnt
You can also install in accordance with the help, but the easiest way is using Chocolatey:choco install nant.
Run Developer Command Prompt for VS2013 as Administrator, and execute the following commands:
CMD Prig> cd
C:\Users\User\Prig

CMD Prig> powershell
Windows PowerShell
Copyright (C) 2014 Microsoft Corporation. All rights reserved.


PS Prig> .\Build.ps1
...

Chocolatey v0.9.9.1
Attempting to build package from 'Prig.nuspec'.
Successfully created package 'Prig.2.0.0-alpha04.nupkg'
PS Chocolatey>
NOTE: It takes somewhere round 30 minutes.
After preparing all dependencies, you can build this project in the following steps:
- Run Visual Studio as Administrator, and open Prig.sln(This sln contains some ATL projects, so the build process will modify registry).
- According to the version of the product to use, change the solution configuration and the solution platform and build.
- The results are output to
$(SolutionDir)$(Configuration)\$(PlatformTarget)\.
If you built Prig by PowerShell script, Prig nupkg will be output to <top level directory you cloned>\Chocolatey directory. So, run PowerShell as Administrator from the directory, and execute the following command:
PS Chocolatey> dir


    Directory: C:\Users\User\Prig\Chocolatey


Mode                LastWriteTime     Length Name
----                -------------     ------ ----
d----        2015/05/27     22:11            tools
-a---        2015/05/30     17:18    4143089 Prig.2.0.0-alpha04.nupkg
-a---        2015/05/27     22:11       5477 Prig.nuspec


PS Chocolatey> choco install prig -s "$pwd;https://chocolatey.org/api/v2/" -pre -y
Chocolatey v0.9.9.1
Installing the following packages:
prig
By installing you accept licenses for the packages.

Prig v2.0.0-alpha04
   Renaming 'C:\ProgramData\chocolatey\lib\Prig\tools\NUnitTestAdapterForPrig.2.0.0.nupkg.hedge' to 'C:\ProgramData\chocolatey\lib\Prig\tools\NUnitTestAdapterForPrig.2.0.0.nupkg'...
   Renaming 'C:\ProgramData\chocolatey\lib\Prig\tools\NuGet\Prig.nuspec.hedge' to 'C:\ProgramData\chocolatey\lib\Prig\tools\NuGet\Prig.nuspec'...
   Creating the nuget package 'Prig'...
   ...


 prig has been installed successfully.

Chocolatey installed 1/1 package(s). 0 package(s) failed.
 See the log for details.
PS Chocolatey>
Unregistration operation is similar in the registration. Run PowerShell as Administrator and execute the following commands:
PS Chocolatey> choco uninstall prig -y -f
Chocolatey v0.9.9.1
Uninstalling the following packages:
prig

Prig v2.0.0-alpha04 (forced)
   Uninstalling Prig.vsix...
   Uninstalling the all package...
   Unregistering the profiler 'C:\ProgramData\chocolatey\lib\Prig\tools\x64\Urasandesu.Prig.dll' from Registry...
   Unregistering the profiler 'C:\ProgramData\chocolatey\lib\Prig\tools\x86\Urasandesu.Prig.dll' from Registry...
   ...

Chocolatey uninstalled 1/1 packages. 0 packages failed.
See the log for details.
PS Chocolatey>
NOTE: You have to run PowerShell as a different process from the registration time.