This is a fork of NintendoSpy. NintendoSpy provides a general solution for live-streaming your controller inputs while speedrunning, or recording inputs for tutorials on how to perform tricks. It supports tying in to NES, SNES, Nintendo 64, and GameCube controller signals to get a live view of them, as well as any gamepad connected to your PC for use with emulators. XBox 360 controllers are supported with a skin out of the box, but other gamepads will require creating a skin. My fork allows for the support of Atari/Commodore joysticks, Sega Genesis controllers, SMS controllers, the Atari 2600 Omega Race Booster Grip, Turbographx-16/PC Engine controllers and PSX controllers. Additionally, it adds full support for the Super Gameboy SNES cartridge, which wasn't correctly supported in the original NintendoSpy.
The following documentation is in addition to the original NintendoSpy documentation found here. These instructions borrow heavily from evilash25's awesome NintendoSpy build guide, which can be found here.
The general design of RetroSpy involves splicing the controller wire, and attaching the appropriate signal wires to an Arduino. Then you just need to install the Arduino firmware packaged in the RetroSpy release, and run the viewer software.
- Arduino Uno. You might be able to find this cheaper elsewhere. A clone such as Funduino works just as well.
- USB cable to connect the Arduino to your computer
- Controller extension cable (NES, SNES, N64, or GCN)
- (optional) male/female connectors with 5 pins minimum for easy controller switching
- Wires to solder into the controller extension cable to go to the Arduino (the Arduino sockets are very small, so you will need some smaller gauge wire to fit, so it might be best to pickup some wire after you see the socket size)
- Wire cutters/strippers
- Exacto knife or box cutters
- Soldering iron and solder
- Electrical tape
- Digital multimeter or a cheap continuity tester
- Atari Controller extension cable
- Wires
- DB9 Male to 2 Female Splitter Cable
- DB9 Male Breakout Board to Screw Terminals
- (optional) Shield Stacking Header Set for Arduino UNO R3
- Wire cutters/strippers
- Controller extension cable (PSX or TG16/PC Engine)
- (optional) male/female connectors with 5 pins minimum for easy controller switching
- Wires to solder into the controller extension cable to go to the Arduino (the Arduino sockets are very small, so you will need some smaller gauge wire to fit, so it might be best to pickup some wire after you see the socket size)
- Wire cutters/strippers
- Exacto knife or box cutters
- Soldering iron and solder
- Electrical tape
- Digital multimeter or a cheap continuity tester
- the latest Arduino software
- ClassicController Arduino Library
- Firmware for the Arduino
- PC software to connect to the Arduino and display the controller
#3 and #4 above are included in the release package of RetroSpy. The firmware is located in the firmware folder and is called firmware.ino. Just run RetroSpy.exe to launch the display software.
For building a NES, SNES, N64 or GameCube cable follow the steps found here.
The building of PSX or Turbographx-16 cable is very similar to building a Nintendo cable, so for the most part follow the steps found here. The pinout of the cables is as follows.
| PSX | Arduino Digital Pin |
|---|---|
| 1 | 6 |
| 2 | 5 |
| 3 | Not Connected |
| 4 | Not Connected |
| 5 | Not Connected |
| 6 | 2 |
| 7 | 3 |
| 8 | Not Connected |
| 9 | 4 |
| TG16 | Arduino Digital Pin |
|---|---|
| 1 | Not Connected |
| 2 | 2 |
| 3 | 3 |
| 4 | 4 |
| 5 | 5 |
| 6 | 6 |
| 7 | Not Connected |
| 8 | Not Connected |
It is possible to simply solder 9 jumper wires onto each wire of the Atari extension cable and be done, but since Genesis/SMS/Atari/etc use a standarded DB9 port we can build a cable with no soldering required.
- Take the Atari extension cable, wires, DB9 Breakout Board, DB9 Y cable and optional headers you have acquired and put them together in this configuration:

For Sega Genesis controllers you will need to make the following connections:
| DB9 Pin | Arduino Digital Pin |
|---|---|
| 1 | 2 |
| 2 | 3 |
| 3 | 4 |
| 4 | 5 |
| 5 | Not Connected |
| 6 | 6 |
| 7 | 8 |
| 8 | Not Connected |
| 9 | 7 |
For Atari Joysticks, Sega Master System controllers and the Atari Omega Race Booster Grip you will need to make the following connections:
| DB9 Pin | Arduino Digital Pin |
|---|---|
| 1 | 2 |
| 2 | 3 |
| 3 | 4 |
| 4 | 5 |
| 5 | 6 |
| 6 | 7 |
| 7 | Not Connected |
| 8 | Not Connected |
| 9 | 8 |
Once the wiring is done, hook everything up to your game system and computer, now for the easy part.
-
Plug in the USB connector to your Arduino and PC.
-
Install the latest Arduino software, download the Windows Installer option.
-
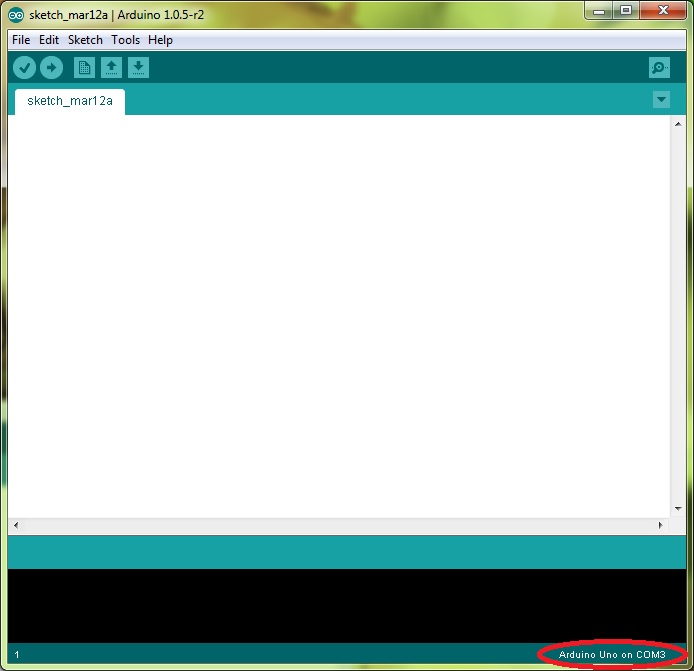
Once installed, open the Arduino software, you should see "Arduino Uno on COMX" at the bottom right corner if everything is working. If not, you may need to restart and/or replug the USB connector.
-
Install my Arduino ClassicControllerSpy library. Installation directions are here.
-
Download and unzip the latest release of RetroSpy somewhere.
-
Select File->Open and open the
firmware.inofile from the firmware folder of the unzipped RetroSpy release. -
Now uncomment the option for the operation mode (which controller) you will use. Note I am using a SNES controller here. MODE_SEGA is for Genesis & MODE_CLASSIC is for SMS/Atari.
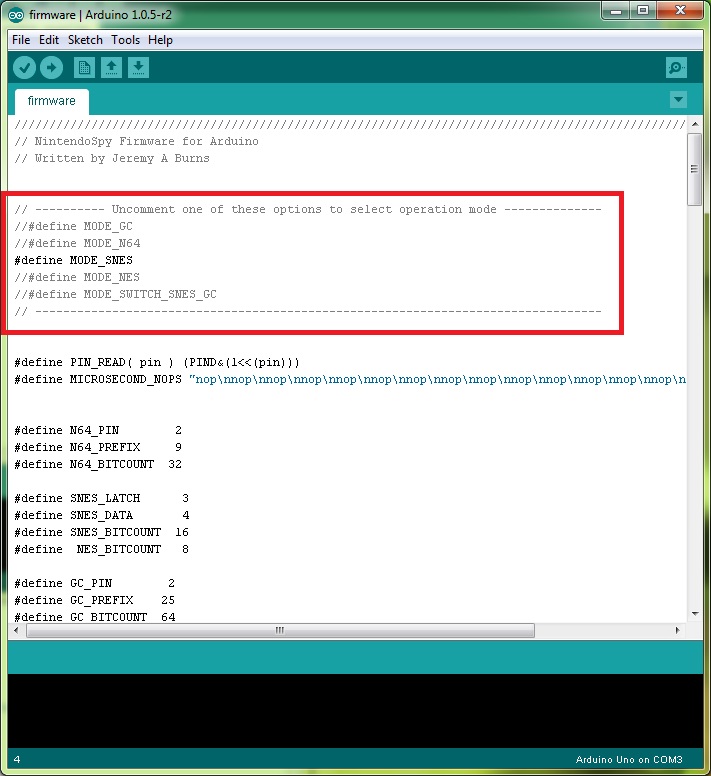
- Hit the upload button (right pointing arrow) located just under the 'Edit' menu, this will upload and run the software on the Arduino. It should look like the following image. Once successfully uploaded, you won't have to upload software again to the Arduino again unless you want to change controller modes.

-
Run
RetroSpy.exe. -
The selection here should be pretty straightforward, select the 'COMX' port that the Arduino is on, select the controller you are using, select a skin, and hit 'Go'. If everything is hooked up correctly you should see your controller and inputs displaying.