From version 0.19 onwards, the location of the plugin has moved to Assets/Plugins/GitHub. If you have version 0.18 or lower, you need to delete the Assets/Editor/GitHub folder before you install newer versions. You should exit Unity and delete the folder from Explorer/Finder, as Unity will not unload native libraries while it's running. Also, remember to update your .gitignore file.

The GitHub for Unity extension brings Git and GitHub into Unity, integrating source control into your work with friendly and accessible tools and workflows.
Please note: this software is currently alpha quality. Please refer to the list of known issues, and make sure you have backups of your work before trying it out.
Quick Guide to GitHub for Unity
- Opening the GitHub window
- Initialize Repository
- Authentication
- Publish a new repository
- Commiting your work - Changes tab
- Pushing/pulling your work - History tab
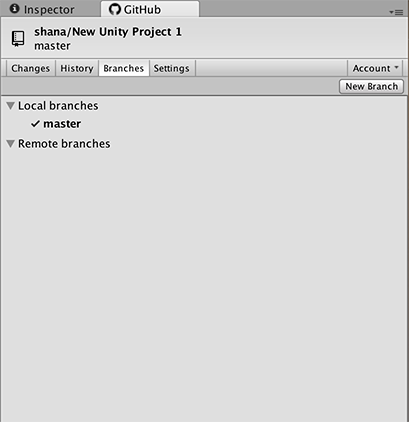
- Branches tab
- Settings tab
- Unity 5.4-2017.1
- We've only tested the extension so far on Unity 5.4 to 2017.1. There's currently an blocker issue opened for 5.3 support, so we know it doesn't run there. There are some issues for 2017.2, so it may or may not run well on that version. Personal edition is fine.
- Git and Git LFS 2.x
The current release has limited macOS support. macOS users will need to install the latest Git and Git LFS manually, and make sure these are on the path. You can configure the Git location in the Settings tab on the GitHub window.
The easiest way of installing git and git lfs is to install Homebrew and then do brew install git git-lfs.
Make sure a Git user and email address are set in the ~/.gitconfig file before you initialize a repository for the first time. You can set these values by opening your ~/.gitconfig file and adding the following section, if it doesn't exist yet:
[user]
  name = Your Name
  email = Your Email
The GitHub for Unity extension ships with a bundle of Git and Git LFS, to ensure that you have the correct version. These will be installed into %LOCALAPPDATA%\GitHubUnity when the extension runs for the first time.
Make sure a Git user and email address are set in the %HOME%\.gitconfig file before you initialize a repository for the first time. You can set these values by opening your %HOME%\.gitconfig file and adding the following section, if it doesn't exist yet:
[user]
  name = Your Name
  email = Your Email
Once the extension is installed, you can open a command line with the same Git and Git LFS version that the extension uses by going to the GitHub -> Command line menu in Unity.
This extensions needs to be installed (and updated) for each Unity project that you want to version control.
First step is to download the latest package from the releases page;
it will be saved as a file with the extension .unitypackage.
To install it, open Unity, then open the project you want to version control, and then double click on the downloaded package.
Alternatively, import the package by clicking Assets, Import Package, Custom Package, then select the downloaded package.
The extension log file can be found at ~/.local/share/GitHubUnityDebug/github-unity.log. This is a temporary location and will be changed in the future.
The extension log file can be found at %LOCALAPPDATA%\GitHubUnity\github-unity.log
The CONTRIBUTING.md document will help you get setup and familiar with the source. The documentation folder also contains more resources relevant to the project.
Please read the How to Build document for information on how to build GitHub for Unity.
If you're looking for something to work on, check out the up-for-grabs label.
First, please search the open issues and closed issues to see if your issue hasn't already been reported (it may also be fixed).
If you can't find an issue that matches what you're seeing, open a new issue and fill out the template to provide us with enough information to investigate further.
You can access the GitHub window by going to Windows -> GitHub. The window opens by default next to the Inspector window.

If the current Unity project is not in a Git repository, the GitHub for Unity extension will offer to initialize the repository for you. This will:
- Initialize a git repository at the Unity project root via
git init - Initialize git-lfs via
git lfs install - Set up a
.gitignorefile at the Unity project root. - Set up a
.gitattributesfile at the Unity project root with a large list of known binary filetypes (images, audio, etc) that should be tracked by LFS - Configure the project to serialize meta files as text
- Create an initial commit with the
.gitignoreand.gitattributesfile.
To set up credentials in Git so you can push and pull, you can sign in to GitHub by going to Window -> GitHub -> Account -> Sign in. You only have to sign in successfully once, your credentials will remain on the system for all Git operations in Unity and outside of it. If you've already signed in once but the Account dropdown still says Sign in, ignore it, it's a bug.

- Go to github.com and create a new empty repository - do not add a license, readme or other files during the creation process.
- Copy the https URL shown in the creation page
- In Unity, go to
Windows->GitHub->Settingsand paste the url into theRemotetextbox. - Click
Save repository. - Go to the
Historytab and clickPush.
You can see which files have been changed and commit them through the Changes tab. .meta files will show up in relation to their files on the tree, so you can select a file for comitting and automatically have their .meta

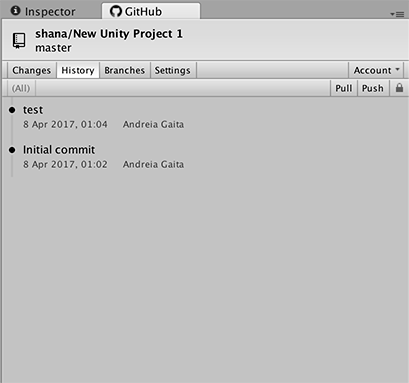
The history tab includes a Push button to push your work to the server. Make sure you have a remote url configured in the Settings tab so that you can push and pull your work.
To receive updates from the server by clicking on the Pull button. You cannot pull if you have local changes, so commit your changes before pulling.
You can configure your user data in the Settings tab, along with the path to the Git installation.
Locked files will appear in a list in the Settings tab. You can see who has locked a file and release file locks after you've pushed your work.

See unity.github.com for more product-oriented information about GitHub for Unity.
The MIT license grant is not for GitHub's trademarks, which include the logo designs. GitHub reserves all trademark and copyright rights in and to all GitHub trademarks. GitHub's logos include, for instance, the stylized Invertocat designs that include "logo" in the file title in the following folder: IconsAndLogos.
Copyright 2015 - 2017 GitHub, Inc.