React Desktop Apps lets you take advantage the adaptiveness, navigation and deep-linking benefits of a Web-based UI, the productivity and responsiveness of the React framework, the performance, depth of features and functionality in ServiceStack and .NET Framework combined with the rich native experience and OS Integration possible from a Native Desktop App - all in a single VS .NET template.
The new React Desktop Apps template in ServiceStackVS VS.NET Templates:
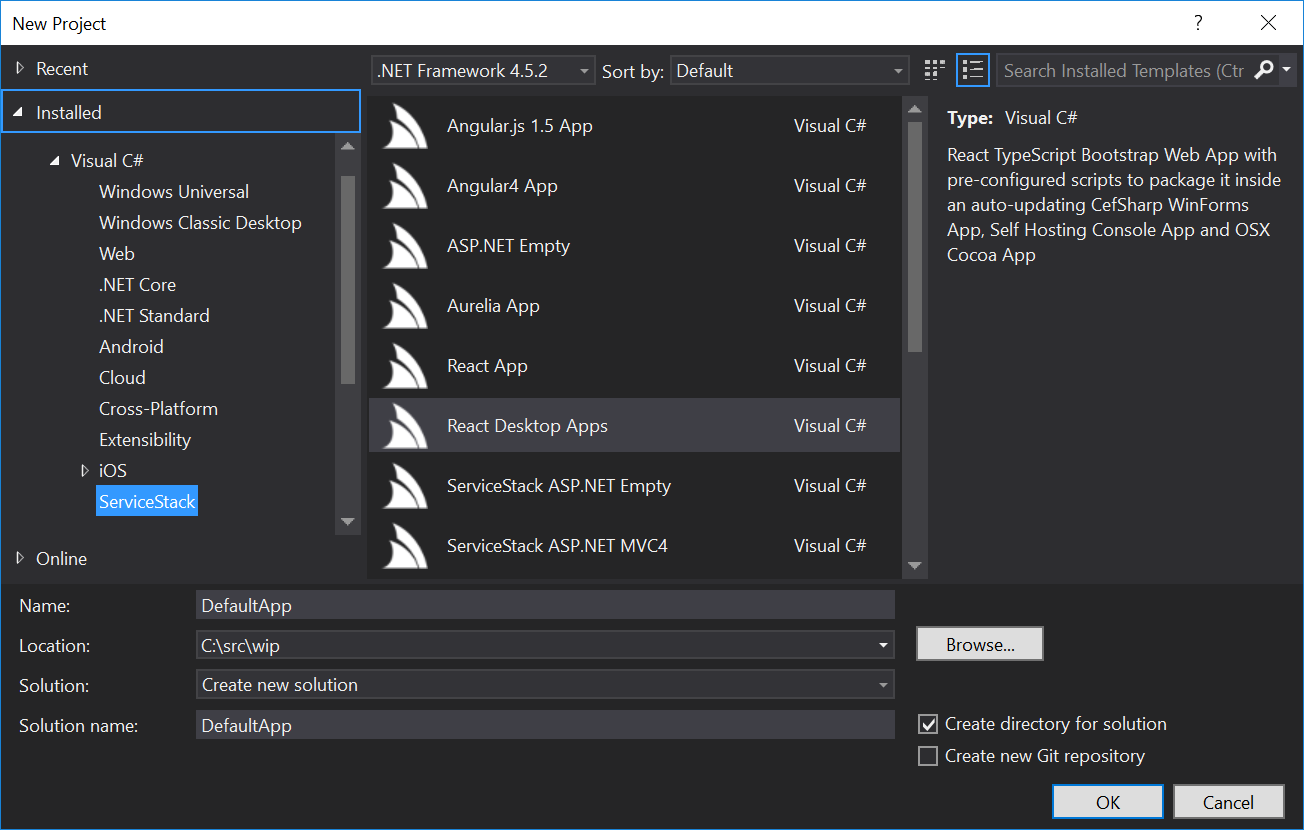
Which provides everything you need to package your ASP.NET ServiceStack Web App into a native Windows Winforms App, an OSX Cocoa Desktop App or cross-platform (Windows/OSX/Linux) "headless" Console App which instead of being embedded inside a Native UI, launches the User's prefered Web Browser for its Web UI. The Winforms App also includes auto updating support where deployed Desktop Apps can be updated by just publishing a new GitHub Release.
This Hybrid model of developing Desktop Apps with modern WebKit technologies offers a more productive and reusable alternative to developing bespoke WPF Apps in XAML or Cocoa OSX Apps with Xcode. It enables full code reuse of the Web App whilst still allowing for platform specific .js, .css and C# specialization when needed. These advantages are also why GitHub also adopted a similar approach for their new cross-platform UI in their flagship Windows and OSX Desktop Apps which leverages the same CefSharp Chromium Embedded Framework Component to render its UI on Windows.
Each application is compiled into a single executable that's xcopy-able and runnable directly without a Software install. The only pre-requisite is the .NET 4.5 Framework on Windows (pre-installed on recent versions of Windows). Whilst the OSX Cocoa Xamarin.Mac App bundles the Mono runtime alleviating the need for users to have an existing install of Mono.
The React Desktop Apps template is pre-configured with the necessary tools to package your Web Application into multiple platforms using the provided Gulp build tasks. The Desktop Apps are also debuggable allowing for a simplified and iterative dev workflow by running the preferred Host Project:
- Web - ASP.NET Web Application
- Windows - Native Windows application embedded in a CefSharp Chromium browser
- OSX - Native OS X Cocoa App embedded in a WebView control (requires Visual Studio for Mac)
- Console - Single portable, cross platform executable that launches the user's prefered browser
DefaultApp-winforms.exe (39.4 MB)
DefaultApp.AppMac.zip (25.4 MB)
DefaultApp-console.exe (5.6 MB) or DefaultApp-console.zip (2 MB)
The resulting project structure is the same as the
Webpack React App VS.NET Template,
but with 3 additional projects for hosting the new Desktop and Console Apps and a Common Resources project
shared by Host projects containing all the ASP.NET resources (e.g. .css, .js, images, etc) as embedded
resources. It's kept in-sync with the primary DefaultApp project with the 01-bundle-all or default
Gulp tasks.
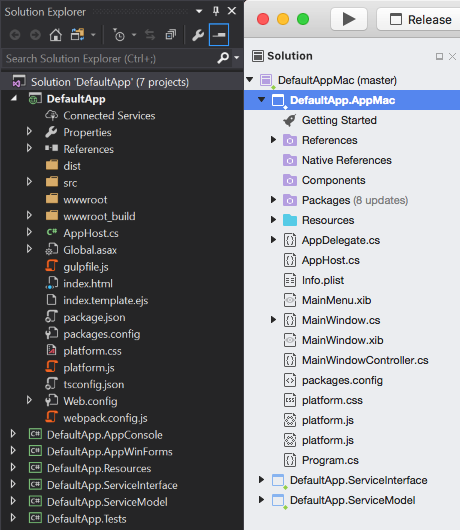
- DefaultApp - Complete Web application, inc. all Web App's .js, .css, images, etc.
- DefaultApp.AppConsole - Console Host Project
- DefaultApp.AppWinForms - WinForms Host Project
- DefaultApp.Resources - Shared Embedded resources sourced from DefaultApp
- DefaultApp.ServiceInterface - ServiceStack Service Implementations
- DefaultApp.ServiceModel - Request and Response DTO's
- DefaultApp.Tests - NUnit tests
- DefaultApp.AppMac - OSX Cocoa Host project
This is a Visual Studio for Mac project which uses the compiled embedded resources lib\DefaultApp.Resources.dll created by the 01-bundle-all Gulp task.
The primary DefaultApp project contains the complete React Web App hosted in an ASP.NET Project.
It includes gulpfile.js which provides the necessary Gulp tasks to bundle and optimize the Wep Application
ready for deployment as well as Gulp tasks to minify the Web Applications assets and publishes them
embedded resources into the shared DefaultApp.Resources project. This project is how the React WebApp
is made available to the alternative Desktop and Console Apps.
The primary Gulp Tasks you'll use to package and deploy your App which is easily runnable from VS .NET's Task Runner Explorer which is built into VS 2015 and VS 2017.
- 01-bundle-all - optimizes and packages Web App the into
wwwrootandResourcesproject - 02-package-console - Packages the Console App in
wwwroot_build\apps - 02-package-winforms - Packages the Winforms App in
wwwroot_build\apps - 03-deploy-webapp - deploys the Web App in
wwwrootwith MS WebDeploy to any IIS Server using configwwwroot_build\publish\config.json
The template also includes the ILMerge tool to merge all .NET .dlls (inc. Resources.dll) into a single, cross-platform Console Application .exe that's runnable as-is on any Windows, OSX or Linux server with .NET or Mono pre-installed.
Downloads for the Default Template Console App:
DefaultApp-console.exe (5.6MB) or DefaultApp-console.zip (2MB)
For WinForms we are taking advantage of Squirrel.Windows to produce our Windows installer and handle updating of our Windows client application.
Squirrel.Windows is run via the 02-package-winforms Gulp task and produces us a Setup.exe that auto runs our application on install.
We can then release and manage updates of this application using GitHub releases. Our client application will check GitHub for new versions, then
download and install them if any are available.
To package the OSX App you'll need to open the DefaultAppMac.sln in Visual Studio for Mac on OSX which packages the App as on OSX App or Installer.
Download for the Default Template OSX Cocoa App:
DefaultApp.AppMac.zip (24.8 MB)
The necessary infrastructure for optimizing, packaging the React Web Application is contained in the
/wwwroot_build folder:
/wwwroot_build
  /apps                       # directory where Console and Winforms Apps are published
  /deploy                     # copies all files in folder to /wwwroot
    appsettings.txt           # production appsettings to override dev defaults
  /publish
    config.json               # deployment config for WebDeploy IIS deployments
  /tools                      # deployment tools for Console and Winforms Apps
    ILMerge.exe			      # ILMerge to merge console app output into single binary
  package-deploy-console.bat  # runs ILMerge to package Console App
To deploy an app you just need to populate publish/config.json with the remote IIS WebSite settings
and UserName/Password of an Account with permission to deploy a Website with MS WebDeploy:
{
    "iisApp": "AppName",
    "serverAddress": "deploy-server.example.com",
    "userName": "{WebDeployUserName}",
    "password" : "{WebDeployPassword}"
}
Then run the 03-deploy-webapp Gulp task to package the optimized React App in /wwwroot into a
webdeploy.zip package which it publishes to a remote IIS Web Server using the configuration above.
If you specify Visual Studio settings when creating a repo in GitHub its will ignore the
/publishfolder so this sensitive info isn't committed along with the project. If you're publishing to a public repo please double-check this config file doesn't get published by ensuring it's specified in your repo's.gitignore
The React Desktop Template is structured for optimal developer productivity, fast iterations, maximum re-use, easy customizability and optimal runtime performance driven by a pre-configured automated workflow. It also maximizes skill re-use where most development time will be spent developing a normal ASP.NET React Web Application without any consideration for the different platforms the template create packages for.
The template follows the same Modern Webpack ASP.NET Apps as ServiceStack's other Single Page App templates which uses node's rich ecosystem to enable access to premier Web technologies that's pre-configured with Webpack and Gulp tasks to take care of website bundling, optimization, application packaging and ASP.NET Website deployemnts.
The entire React application is hosted within a single static index.html which is generated by Webpack based on index.template.ejs:
<!DOCTYPE html>
<html>
<head lang="en">
    <meta charset="UTF-8">
    <meta http-equiv="X-UA-Compatible" content="IE=edge">
    <meta name="viewport" content="width=device-width, initial-scale=1, user-scalable=0, maximum-scale=1, minimum-scale=1">
    <title>DefaultApp</title>
</head>
<body>
    <link rel="stylesheet" href="/platform.css" />

    <div id="app"></div>

    <script src="/platform.js"></script>
</body>
</html>
The 01-bundle-all Gulp task runs a Webpack production build that takes care of compiling your Apps TypeScript, CSS and SASS source files,
bundling and copying all resources into the /wwwroot folder and DefaultApp.Resources project, transforming it into the following
index.html:
<!DOCTYPE html>
<html>
<head lang="en">
    <meta charset="UTF-8">
    <meta http-equiv="X-UA-Compatible" content="IE=edge">
    <meta name="viewport" content="width=device-width, initial-scale=1, user-scalable=0, maximum-scale=1, minimum-scale=1">
    <title>DefaultApp</title>
    <link href="/dist/app.css" rel="stylesheet"></head>
<body>
    <link rel="stylesheet" href="/platform.css" />

    <div id="app"></div>

    <script src="/platform.js"></script>
    <script type="text/javascript" src="/dist/vendor.bundle.js"></script>
    <script type="text/javascript" src="/dist/app.bundle.js"></script>
</body>
</html>By maintaining all functionality within the existing pre-defined groups, no additional config is needed since the existing references are already marked as Embedded Resources allowing the entire Web Application to be embedded inside the .NET DefaultApp.Resources.dll. This is what each of the Desktop and Console Application references to be able to host your Website.
Should you wish to add additional resources outside these pre-defined groups you'll need to
ensure they're copied over
by Webpack and then have their Build Action set to Embedded Resource.

For most applications your Application will be optimized into the following layout in both the static
DefaultApp.Resources project as well as the optimized ASP.NET Web Application created in /wwwroot,
in preparation for production deployment:
/wwwroot
  /dist
    app.bundle.js     # Compiled and bundled TypeScript
    app.css           # Bundled SASS and css
    /img              # All application images
      fontawesome-*   # 3rd party fonts
  platform.css        # Platform-specific css
  platform.js         # Platform-specific js
  index.html
The Host projects for each platform are essentially "native application wrappers" around hosting the React
Website inside different applications. The React App itself is encapsulated within the shared
DefaultApp.Resources project as embedded resources.
Customizations for each platform is available by modifying the platform.css and project.js files at the
base of each project's folder.
In addition, an easy way to limit which HTML elements are displayed is to use the platform class to initially
hide the element, then specify which platforms it should be displayed in by listing the specific platforms, e.g:
<ul className="nav navbar-nav">
    <li><a onClick={this.handleAbout}>About</a></li>
    <li className="platform winforms">
        <a onClick={this.handleToggleWindow}>Toggle Window</a>
    </li>
    <li className="platform winforms mac">
        <a onClick={this.handleQuit}>Close</a>
    </li>
</ul>
We use this technique to only show the Toggle Window Menu Item to the Winforms App and the Close Menu Item to the Winforms and OSX Mac App, i.e. ignoring it in the Console and ASP.NET Web App.
Since each host is just a normal C# project you also have complete freedom in enhancing each platform with enhanced functionality specific to that platform. E.g. you can add Services only available to a single platform by telling ServiceStack to also register Services contained in the host project by specifying multiple assemblies in the AppHost constructor:
public class AppHost : AppSelfHostBase
{
    public AppHost()
      : base("DefaultApp Console", typeof(MyServices).Assembly, typeof(AppHost).Assembly)
}We tell each Host to serve the Embedded Resources in DefaultApp.Resources by specifying it in the HostConfig:
SetConfig(new HostConfig {
    EmbeddedResourceBaseTypes = { typeof(AppHost), typeof(SharedEmbeddedResources) }
});
SharedEmbeddedResources is an empty "marker" class in the DefaultApp.Resources project which allows us to easily refer
to it's assembly with typeof(SharedEmbeddedResources).Assembly.
We need to specify base types to preserve Assembly namespaces after they're ILMerged into a single .exe
We use the window.nativeHost API to encapsulate the differences and invoke native functionality available
on each platform.
Since the web project is written in TypeScript/TSX, we can take advantage of TypeScript to write out native host.
We want to attach it to the window, so we'll also need to append our Window interface to include nativeHost object.
When running as a normal ASP.NET Web App these API's just call the browsers DOM:
window.nativeHost = {
    quit: function () {
        window.close();
    },
    showAbout: function () {
        alert("DefaultApp - ServiceStack + React");
    },
    ready: function () { },
    toggleFormBorder: function () { }
};The Console App is similar since it's also viewed in an external browser it isn't able to take advantage of any Inter-Process Communications (IPC) and requires an Ajax call to communicate back to the C# Self-Hosting Console Application:
/* console */
window.nativeHost = {
    quit: function () {
        var r = new XMLHttpRequest();
        r.open("POST", "/nativehost/quit", true);
        r.onreadystatechange = function () {
            if (r.readyState != 4 || r.status != 200)
                return;
            window.close();
        };
        r.send("");
    },
    showAbout: function () {
        alert('ServiceStack SelfHost Console + React');
    },
    ready: function () {
        //
    },
    platform: 'console'
};
Calls to /nativehost call the NativeHostService below:
public class NativeHostService : Service
{
    public void Any(NativeHostAction request)
    {
        if (string.IsNullOrEmpty(request.Action))
            throw HttpError.NotFound("Function Not Found");

        var nativeHost = typeof(NativeHost).CreateInstance<NativeHost>();
        var methodName = request.Action.Substring(0, 1).ToUpper() + request.Action.Substring(1);
        var methodInfo = typeof(NativeHost).GetMethod(methodName);
        if (methodInfo == null)
            throw new HttpError(HttpStatusCode.NotFound, "Function Not Found");

        methodInfo.Invoke(nativeHost, null);
    }
}

public class NativeHostAction : IReturnVoid
{
    public string Action { get; set; }
}

public class NativeHost
{
    public void Quit()
    {
        System.Threading.ThreadPool.QueueUserWorkItem(_ =>
        {
            System.Threading.Thread.Sleep(10);    // Allow /nativehost/quit to return gracefully
            Environment.Exit(0);
        });
    }
}
Which just proxies the ajax request and invokes the matching C# method on NativeHost, in this case
/nativehost/quit terminates the Console Application.
With the Winforms and OSX Native Desktop Applications we instead want to intercept these calls and show
native dialogs and likewise having /nativehost/quit close the Desktop application.
With Winforms we don't need to provide a JavaScript API wrapper since CefSharp provides us with a JavaScript interop that lets us to register a C# object and expose it directly as a JavaScript object with:
ChromiumBrowser.RegisterJsObject("nativeHost", new NativeHost(this));So our entire window.nativeHost API is defined in C#:
public class NativeHost
{
    //...
    public void Quit()
    {
        formMain.InvokeOnUiThreadIfRequired(() => {
            formMain.Close();
        });
    }

    public void ShowAbout()
    {
        MessageBox.Show(@"ServiceStack with CefSharp + ReactJS",
            @"DefaultApp.AppWinForms", MessageBoxButtons.OK, MessageBoxIcon.Information);
    }

    public void ToggleFormBorder()
    {
        formMain.InvokeOnUiThreadIfRequired(() => {
            formMain.FormBorderStyle = formMain.FormBorderStyle == FormBorderStyle.None
                ? FormBorderStyle.Sizable
                : FormBorderStyle.None;
        });
    }
}
Which like the JavaScript API's can be invoked from JavaScript, e.g:
nativeHost.showAbout();Unfortunately whilst the OSX Cocoa App also embeds a WebView control, it doesn't provide an API to register C# objects directly, so like the Console Application we need to communicate with the containing C# Application via Ajax requests:
/* mac */
window.nativeHost = {
    quit: function () {
        post('/nativehost/quit');
    },
    showAbout: function () {
    	post('/nativehost/showAbout');
    },
    ready: function () {
        //
    },
    platform: 'mac'
};

function post(url, data, callback) {
    var r = new XMLHttpRequest();
    r.open("POST", url, true);
    r.onreadystatechange = function () {
        if (r.readyState != 4 || r.status != 200)
            return;
        callback(r.responseText);
    };
    r.send(data);
}
In the Cocoa App it uses a copy of the NativeHostService used in the Console App to proxy each call to the
matching method on NativeHost which then invokes the required native Cocoa API's:
public class NativeHost
{
    public void ShowAbout()
    {
        Program.MainMenu.InvokeOnMainThread (() => {
            foreach (var item in Program.MainMenu.ItemArray()) {
                if (item.Title == "DefaultApp") {
                    item.Submenu.PerformActionForItem(0);
                }
            }
        });
    }

    public void Quit()
    {
        AppDelegate.MainWindowController.InvokeOnMainThread (() => {
            AppDelegate.MainWindowController.Hide();
        });
        Environment.Exit(0);
    }
}This project contains the self-hosting Console App which launches the users prefered browser to render the React Web UI with:
static class Program
{
    public static string HostUrl = "http://127.0.0.1:2337/";

    static void Main(string[] args)
    {
        new AppHost().Init().Start("http://*:2337/");
        "ServiceStack SelfHost listening at {0}".Fmt(HostUrl).Print();
        Process.Start(HostUrl);

        Thread.Sleep(Timeout.Infinite);
    }
}This project contains the Winforms App that utilizes CefSharp to embed the fast and modern Chromium browser inside a Windows Application.
To embed the Chromium web browser, we instantiate the ChromiumWebBrowser and set it to navigate to the
applications Url to render the React Web UI. The browser control is then fully docked to the containing
FormMain and configured to fill the entire screen:
public FormMain()
{
    InitializeComponent();
    VerticalScroll.Visible = false;

    ChromiumBrowser = new ChromiumWebBrowser(Program.HostUrl)
    {
        Dock = DockStyle.Fill
    };

    Controls.Add(ChromiumBrowser);

    Load += (sender, args) =>
    {
        FormBorderStyle = FormBorderStyle.None;
        Left = Top = 0;
        Width = Screen.PrimaryScreen.WorkingArea.Width;
        Height = Screen.PrimaryScreen.WorkingArea.Height;
    };

    ChromiumBrowser.RegisterJsObject("nativeHost", new NativeHost(this));
}This project contains the OSX Cocoa Application which requires Visual Studio for Mac on OSX to build.
The entry point for the Cocoa Application is in Program.cs which first starts the self-hosting Service before loading the Cocoa Desktop App:
public static class Program
{
    public static string HostUrl = "http://127.0.0.1:3337/";

    public static AppHost App;
    public static NSMenu MainMenu;

    static void Main (string[] args)
    {
        App = new AppHost();
        App.Init().Start("http://*:3337/");

        NSApplication.Init();
        NSApplication.Main(args);
    }
}
As-is standard for Cocoa Apps, the UI for each Window is contained in .xib files that are created and designed
using Interface Builder. In the AwakeFromNib() callback we fully dock the WebView to the MainWindow and
set its MainFrameUrl to navigate to the Applications Url to render the React Web UI:
public partial class MainWindow : MonoMac.AppKit.NSWindow
{
    public override void AwakeFromNib()
    {
        base.AwakeFromNib ();
        Program.MainMenu = NSApplication.SharedApplication.MainMenu;
        webView.MainFrameUrl = Program.HostUrl;
        webView.Frame = new RectangleF(0,0,this.Frame.Width,this.Frame.Height);
        this.DidResize += (sender, e) =>  {
            webView.Frame = new RectangleF(0,0,this.Frame.Width,this.Frame.Height);
        };
    }
}
Gulp tasks are used in the DefaultApp project to automate the bundling, packaging and deployment of the
applications. These tasks are declared as small, composable Gulp tasks that are then orchestrated
by the high-level Alias tasks which are easily run within Visual Studio using Task Runner Explorer or
from the command-line with the Gulp script.
Stages the App so it's ready for release and avoid any build steps at development time to improve the simplicity and speed of the development workflow. This alias task is made up of small, simple tasks that use Gulp to perform the necessary tasks like calling Webpack to process resources, compile TypeScript, minify js/css, copying/deleting of resources, etc.
As this template leverages Webpack to package the application you won't need to modify index.template.ejs manually as the
bundled resources are automatically injected into the generated index.html page.
Normally all client assets would be bundled and copied by Webpack but should you need to extend the Gulp task
to copy additional resources you can specify additional them in the COPY_FILES rules at the top of
webpack.config.js:
var COPY_FILES = [
    { from: 'bin/**/*',                  to: 'wwwroot' },
    { from: 'App_Data/**/*',             to: 'wwwroot' },
    { from: 'Global.asax',               to: 'wwwroot' },
    { from: 'wwwroot_build/deploy/**/*', to: 'wwwroot', flatten: true },
    { from: 'platform.*',                to: 'wwwroot' },
    { from: 'Web.config',                to: 'wwwroot',
      transform: (content, path) => toString(content).replace(
          '<compilation debug="true"',
          '<compilation'
      )
    }
];This task first calls 01-build-all, restores NuGet packages and builds the AppConsole project.
After the project is built, it calls package-deploy-console.bat which uses ILMerge to merge
all Application .dlls into a stand-alone Console application .exe that's copied into the
/wwwroot_build/apps output directory.
If your Console Application requires additional .NET .dlls they'll also need to be listed in package-deploy-console.bat:
SET STAGING=staging-console

IF EXIST %STAGING%\ (
RMDIR /S /Q .\%STAGING%
) ELSE IF EXIST %STAGING% (
DEL /s %STAGING%
)

MD %STAGING%

SET TOOLS=.\tools
SET OUTPUTNAME=DefaultApp-console.exe
SET ILMERGE=%TOOLS%\ILMerge.exe
SET RELEASE=..\..\DefaultApp.AppConsole\bin\Release
SET INPUT=%RELEASE%\DefaultApp.AppConsole.exe
SET INPUT=%INPUT% %RELEASE%\DefaultApp.Resources.dll
SET INPUT=%INPUT% %RELEASE%\DefaultApp.ServiceInterface.dll
SET INPUT=%INPUT% %RELEASE%\DefaultApp.ServiceModel.dll
SET INPUT=%INPUT% %RELEASE%\ServiceStack.dll
SET INPUT=%INPUT% %RELEASE%\ServiceStack.Text.dll
SET INPUT=%INPUT% %RELEASE%\ServiceStack.Client.dll
SET INPUT=%INPUT% %RELEASE%\ServiceStack.Common.dll
SET INPUT=%INPUT% %RELEASE%\ServiceStack.Interfaces.dll
SET INPUT=%INPUT% %RELEASE%\ServiceStack.Server.dll
SET INPUT=%INPUT% %RELEASE%\ServiceStack.OrmLite.dll
SET INPUT=%INPUT% %RELEASE%\ServiceStack.Redis.dll

%ILMERGE% /target:exe /targetplatform:v4,"C:\Program Files (x86)\Reference Assemblies\Microsoft\Framework\.NETFramework\v4.5" /out:%STAGING%\%OUTPUTNAME% /ndebug %INPUT%

IF NOT EXIST apps (
MD apps
)

COPY /Y .\%STAGING%\%OUTPUTNAME% .\apps\This task also performs 01-build-all as well restoring NuGet packages and building the AppWinForms project. Once the project resources are ready, it uses Squirrel.Windows to package your application into a Windows installer Setup.exe and places it in wwwroot_build/apps. The resultant Setup.exe and related NuGet package files are used to handle installation and updating client application.
![]()
The template is already setup to easily enable auto updates for your application using Squirrel.Windows and GitHub Releases. Once you've created a project from the React Desktop Apps template, we need to change two pieces of config within the App.config in the Host.AppWinForms project, specifically EnableAutoUpdate to true and UpdateManagerUrl to your GitHub project URL (exclude the trailing slash).
<configuration>
  ...
  <appSettings>
    <add key="EnableAutoUpdate" value="false" />
    <add key="UpdateManagerUrl" value="{ReleaseFolderUrl}"/>
  </appSettings>
</configuration>
To package the Windows application we can use a preconfigured Gulp task called 02-package-winforms. This will build all the required resources for your application and package them into a Setup.exe Windows installer.
These files are located in the main project under wwwroot_build\apps\winforms-installer. The Releases folder contains all the distributables of your Windows application.
/DefaultApp
  /wwwroot_build
    /apps
      /winforms-installer
        /Releases
          DefaultApp-1.0.0.0-full.nupkg
          RELEASES
          Setup.exe
To publish your initial version to GitHub, create a Release in GitHub and upload these 3 files in your releases folder.

The steps to update your application to a 1.1 release include:
- Update the version of the AppWinForms project, either directly in
Properties/AssemblyInfo.csor through Project properties GUI. - Save changes and run the
02-package-winformsGulp task. - Commit your changes and push them to GitHub. (This is required due to the new tag needs to be on a different commit)
- Create a new GitHub release and include the same 3 files, plus the delta NuGet package. Clients running
1.0.0.0will detect the new version and updates can be easily managed with Squirrel.Windows.
During step 2 your new version is picked up by the Gulp task and Squirrel creates a delta NuGet package, eg
DefaultApp-1.1.0.0-delta.nupkgwhich will be used for quick updates to clients on the previous version (1.0).

Users that have installed version 1.0.0.0 will see a prompt already setup in the template that asks to update the application. By clicking update, the delta of 1.1.0.0 is downloaded and applied, then the application is restarted running the newer version of the application.

This Gulp task MS WebDeploy to deploy the application from the staged wwwroot folder to an existing IIS application.
Config for the deployment, eg the IIS Server address, application name, username and password is located in the /wwwroot_build/publish/config.json.
{
    "iisApp": "YourAppName",
    "serverAddress": "deploy-server.example.com",
    "userName": "{WebDeployUserName}",
    "password" : "{WebDeployPassword}"
}
If you are using Github's default Visual Studio ignore, this file will not be included in source control due to the default rule of publish/ to be ignored.
You should check your Git Repository .gitignore rules before committing any potentially sensitive information into public source control.
This task shows a quick way of updating your development server quickly after making changes to your application. For more information on use web-deploy using either Gulp or just Visual Studio publish, see WebDeploy with AWS.
For more info on working with React, see the Intro to React docs on the Chat-React project.
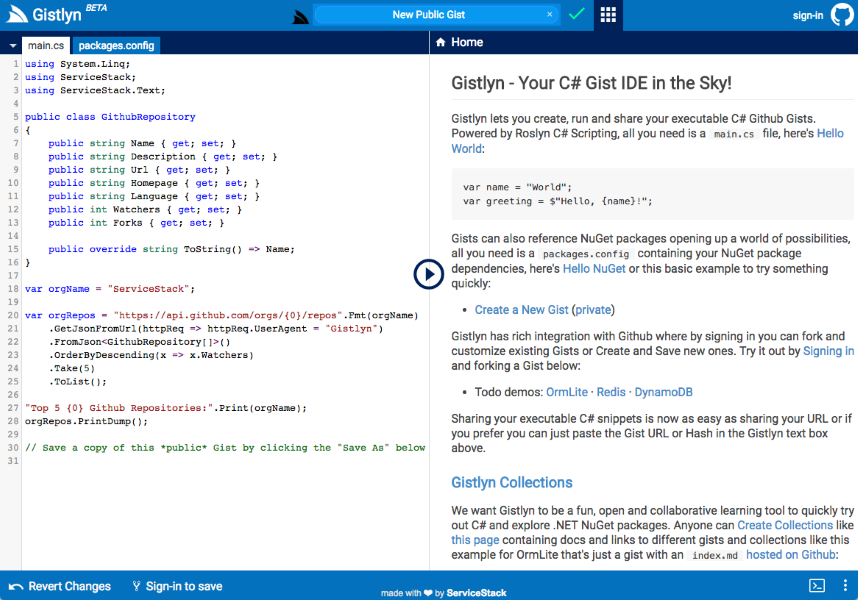
Gistlyn is a C# Gist IDE for creating, running and sharing stand-alone, executable C# snippets.
Downloads for Windows, OSX, Linux and Web
Redis React is a simple user-friendly UI for browsing data in Redis servers that leverages the navigation and deep-linking benefits of a Web-based UI, the productivity and responsiveness of the React framework and the deep Integration possible from a Native App.
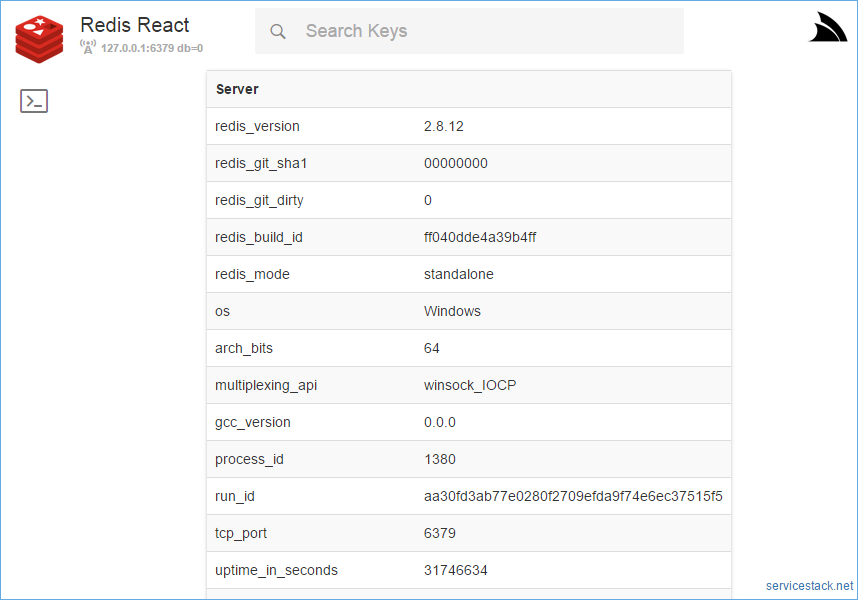
Downloads for Windows, OSX, Linux and Web
A port of React Chat built with the new React Desktop Apps VS.NET template and packaged into a native Desktop App for Windows and OSX. It takes advantage of Server Events to enable synchronized real-time control of multiple Windows Apps:
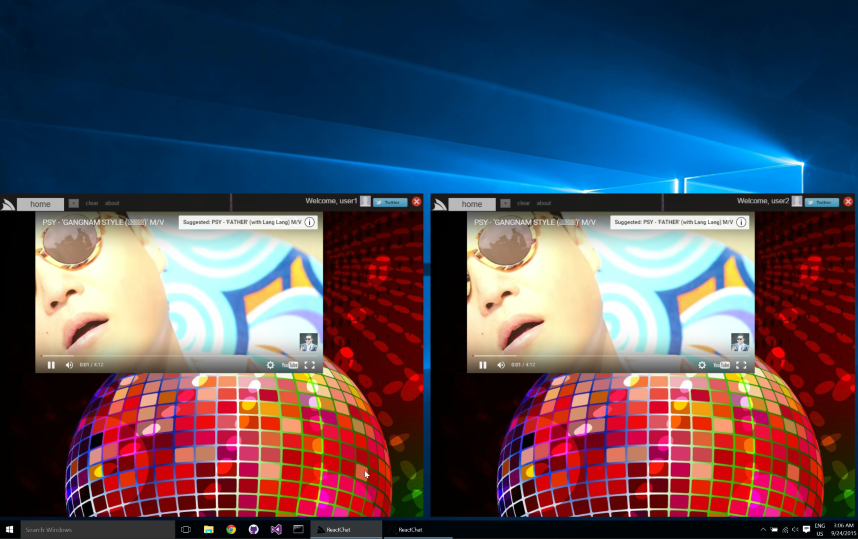
Downloads for Windows, OSX, Linux and Web