Library with the support of widgets for a Blazor application. The main goal is to help with loose coupling inside a system. Initial idea cames from PureMVC architecture, which has been simplified and evolved a little bit.
Preview alpha release is coming soon. Currently on Blazor 0.9.0 preview3-19154-02. Visual Studio 2019 (Preview 4 or later) with the ASP.NET and web development workload selected is needed same like .NET Core 3.0 Preview 3 SDK (3.0.100-preview3-010431).

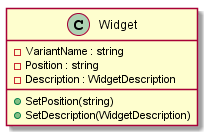
- Widget: an independent and self-containing unit of mediator and presenter (razor components).
- MessageBus: centralised message bus for widgets and services. Powerful tool to decoupled items in the system, must be used wisely.
- Interaction: communication from platform (component) to logic layer (mediator).
- State: an automatically stored and restored state of a widget, when the same widget is placed to the same position.
- Variant: a predefined widget configuration; simplifies a widget creation.
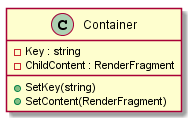
- Container: named placeholder in UI where can be placed content, dynamically.
- Customisation: allows configuring a currently created widget.
- Store: a piece of the application state.
The main concept of Widgetised Blazor is to build decoupled libraries with widgets and services to meet your business requirements.
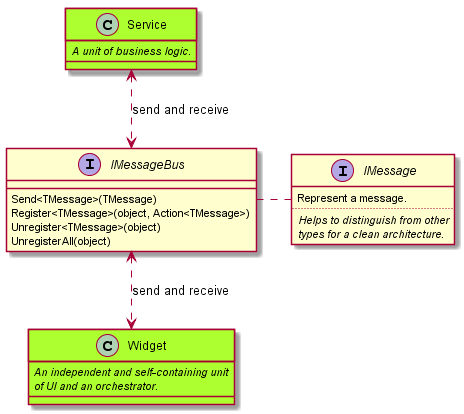
Base architectural bricks are services, widgets and grout is a message bus for sending messages between independent units.
To manage widgets by building, activating, deactivating or destroying can be done in centralised service, called IWidgetManagementService.
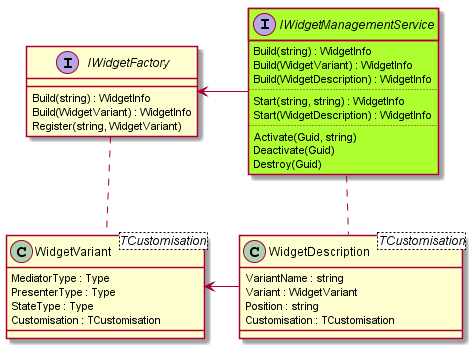
The system is using default .net IServiceProvider for resolving types and widgets (IoC container). All widget parts should be registered with IServiceCollection or a custom IWidgetFactory needs to be used.
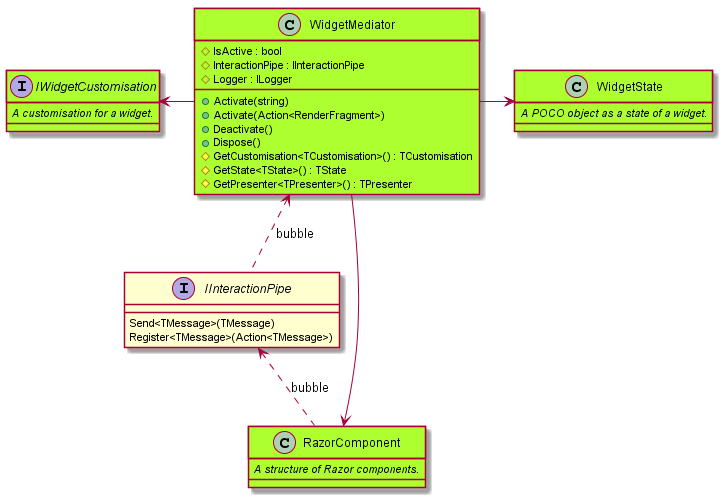
Each widget needs to have a mediator and presenter, optionally can have customisation model and persistent state. By default in the world of Razor components is presenter hidden and the mediator can interact directly with the root component. Entire communication from UI to mediator should be done only through interaction pipeline.
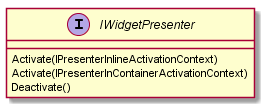
Presenters are here for abstraction in-between logic and platform layers, which allows switching to different platform any time. To make a transition even easier a custom presenter type shouldn't be referenced in the mediator. The widget can call methods only on the interface of a presenter.
- platform -> logic: bubbling of interactions in a component tree which ends in a mediator.
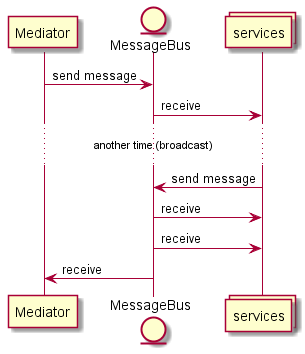
- logic <-> logic: a broadcast messaging bus, between services and mediators.
The intersections are designed to be used on the platform layer in the hierarchical structure of components, where they can bubble up in the tree and potentially be captured and handled inside the mediator.
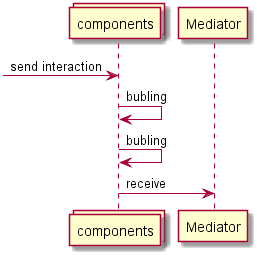
An iteraction is sent and received by IInteractionPipe which should be structured into a chain of pipes (a pipeline). Any component with IInteractionPipelineContract interface will be automatically connected to the chain when is used as a main component in a presenter. The base class CustomComponent contains a helper method RegisterChild(IComponent) to connect a child component to the pipeline.
Register for an interaction:
public class CounterWidgetMediator : WidgetMediator<ICounterWidgetPresenter>
{
  private int count;

  public void Initialise()
  {
    // Register an interaction handler
    InteractionPipe.Register<CounterMessage.Increment>(HandleIncrease);
  }

  // Handler of the interaction
  private void HandleIncrease(IMessage message)
  {
    count++;
    Presenter.SetCount(count);
  }
}
To report an interaction the same interface IInteractionPipe is needed.
@using Blazor.Widgetised.Components
@inherits CustomComponent

<!-- ... content ... -->

<button class="btn btn-primary" onclick="@OnButtonClick">Up</button>

@functions
{
    void OnButtonClick()
    {
        InteractionPipe.Send(new CounterMessage.Increment());
    }
}On the logic layer between services and widgets can be used message bus which is designed to send broadcast messages and keep subsystem modules/widgets totally decouple to each other.
Register a handler or sent a message is possible by IMessageBus interface. Registration can be done by Register method and specifying a handler method in shape void Handler(IMessage).
void RegisterHandler(IMessageBus messageBus)
{
  messageBus.Register<Message>(this, (message) => { /* handle the message here */ });
}

public void Dispose()
{
  // We should do a proper clean-up and unregister all handlers or this object won't be collected
  messageBus.UnregisterAll(this);
}
Each message needs to implement IMessage and then can be sended by IMessageBus:
void SendMessage(IMessageBus messageBus)
{
  messageBus.Send(new Message("MessageName", "MessageBody"));
}
The interface
IMessageis currently used only to force developers to build a new types as messages and keep architecture clean by avoiding to send any object as a message.
The library contains a couple of predefined components.
Place a widget inline.
A registered widget can be placed just with VariantName if a state should be automatically preserved a Position need to be specified, as well.
A totally custom widget can be rendered with Description property.
Widget registration should happen by IWidgetFactory interface:
public static void RegisterWidgetVariants(this IComponentsApplicationBuilder appBuilder)
{
  IWidgetFactory widgetFactory = appBuilder.Services.GetService<IWidgetFactory>();
  widgetFactory.Register("MyWidgetVariant", new WidgetVariant(typeof(MyWidgetMediator)));
}
To place an inline widget inside Razor component can be done by Widget element:
<Widget VariantName="MyWidgetVariant" />If you planning to dynamically instantiate a widget from a code-based component you can render it directly by RenderTreeBuilder.
builder.OpenComponent<Widget>(0);
builder.AddAttribute(1, nameof(Widget.VariantName), "MyWidgetVariant");

// or specify the exact description of the new widget
// builder.AddAttribute(
//  1,
//  nameof(Widget.Description),
//  new WidgetDescription()
//  {
//    Variant = new WidgetVariant(typeof(MyWidgetMediator))
//    ...
//  });

builder.CloseComponent();A place holder for dynamic content. A content can be any RenderFragment but predominantly intended for widgets.
Placement of a container inside a component:
<Container Key="MyContainer">
  This content will be used when the container is <strong>empty</strong>.
</Container>
To instantiate a widget inside the container from any place of code can be done by direct access to service IWidgetManagementService:
private IWidgetManagementService Service { get; }

void Foo()
{
  // Build a widget instance through service
  WidgetInfo info = Service.Build("MyWidgetVariant");

  // Activate the widget into the container
  Service.Activate(info.Id, "MyContainer");
}
Or by sending a message StartWidgetMessage to IMessageBus:
readonly IMessageBus messageBus;

void StartWidget()
{
  messageBus.Send(new StartWidgetMessage
  {
    VariantName = "MyWidgetVariant",
    Position = "MyContainer"
  });
}Simple region component to define a part of UI which used MVVM pattern.
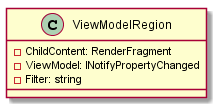
Any view model with the implementation of INotifyPropertyChanged can be used as a parameter for the region component:
public class MyViewModel : INotifyPropertyChanged
{
  private string text;
  private bool flag;
  private IImmutableList<string> items;

  public event PropertyChangedEventHandler PropertyChanged;

  public string Text
  {
    get => text;
    set => Set(ref text, value);
  }

  public bool Flag
  {
    get => flag;
    set => Set(ref flag, value);
  }

  public IImmutableList<string> Items
  {
    get => items;
    set => Set(ref items, value);
  }

  private void Set<TValue>(ref TValue field, TValue value, [CallerMemberName] string  memberName = "")
  {
    field = value;
    PropertyChanged?.Invoke(this, new PropertyChangedEventArgs(memberName));
  }
}
The minimalistic way is to pass a view model and define content for the region component.
<ViewModelRegion ViewModel="@ViewModel">
  <p>
    Text: <i>@ViewModel.Text</i><br />
    Flag: <i>@ViewModel.Flag</i>
  </p>
</ViewModelRegion>

@functions
{
  private MyViewModel ViewModel { get; } = new MyViewModel();
}
To specify on which properties the region is going to be updated use Filter parameter. Any regular expression is allowed.
<ViewModelRegion ViewModel="@ViewModel" Filter="(Items?|Child(ren)?)">
  <ul>
    @foreach (string item in ViewModel.Items)
    {
      <li>@item</li>
    }
  </ul>
</ViewModelRegion>Abstract class for a custom component with the support of interaction pipeline and MVVM pattern.
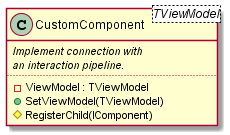
A custom component can be used with any view model. For automatic updates an implementation of INotifyPropertyChanged would be needed.
@using Blazor.Widgetised.Components
@using Blazor.Widgetised.Messaging

@* Custom component with the view model *@
@inherits SystemComponent<MyViewModel>

<table>
  <tr>
    <td>Text</td>
    <td>
      <input type="text" id="text" bind="@ViewModel.Text" />
    </td>
  </tr>
  <tr>
    <td>Flag</td>
    <td>
      <label><input type="checkbox" id="flag" bind="@ViewModel.Flag" />True</label>
    </td>
  </tr>
  <tr>
    <td>Controls</td>
    <td>
      <button onclick="@OnButtonClick">Add item</button>
    </td>
  </tr>
</table>

@functions
{
  private void OnButtonClick()
  {
    InteractionPipe.Send<Messages.Click>(new Messages.Click
    {
      Name = "AddItem",
      Content = "next item"
    });
  }
}To be able to create more flexible and configurable widgets: A WidgetVariant or WidgetDescription can contain a custom object which will be used as the static or dynamic configuration for a widget.
The first step is to create a strongly typed customisation model:
public class ExampleCustomisation
{
  public ExampleCustomisation()
  {
    // Default values
    Text = "default";
    Number = 42;
    Flag = true;
  }

  public string Text { get; set; }

  public int Number { get; set; }

  public bool Flag { get; set; }
}
The customisation can be overwritten by specifying new instance inside WidgetDescription. When you need to change only the specific set of properties a dynamic customisation object DynamicCustomisation<TCustomisation> or Dictionary<string, object> should be used. A dictionary is a better option if you don't want to use dynamic types.
dynamic customisation = new DynamicCustomisation<ExampleCustomisation>();

// only the specific subset of properties can be overwritten
customisation.Number = 42;
customisation.Flag = false;

WidgetDescription description = new WidgetDescription()
{
  VariantName = "MyWidetVariant",
  Customisation = customisation
};
When the widget's going to be created the original customisation from the variant is merged with the dynamic changes.
Dynamic types require two nuget packages: Microsoft.CSharp and System.Dynamic.Runtime.
Strongly typed customisation which supports partial updates and merging needs to implement IProviderOfChangedProperties interface. For easier implementation is base class PartialCustomisationBase.
public class TypedPartialExampleCustomisation : PartialCustomisationBase
{
  private string text = string.Empty;
  private int number;
  private bool flag;

  public bool Flag
  {
    get => flag;
    set => SetProperty(ref flag, value);
  }

  public int Number
  {
    get => number;
    set => SetProperty(ref number, value);
  }

  public string Text
  {
    get => text;
    set => SetProperty(ref text, value);
  }
}public void ConfigureServices(IServiceCollection services)
{
services.AddSingleton<IWritable, WritableConsole>();
services.AddSingleton<ILogger, TextLogger>();
services.AddSingleton<IMessageBus, MessageBus>();
services.AddSingleton<IWidgetContainerManagement, WidgetContainerManagement>();
services.AddSingleton<IWidgetStore, WidgetStore>();
services.AddSingleton<IWidgetStateStore, WidgetStateStore>();
services.AddSingleton<IWidgetFactory, WidgetFactory>();
services.AddSingleton<IWidgetManagementService, WidgetManagementService>();
services.RegisterWidgets();
}- Better logging (more trace logs)
- Use nullable reference types (C# 8.0)
- Create MVVM example
- Write decent documentation
- Create architecture overview diagram
- Unit tests
- Release alfa version
- Add widget lifetime manager
- Implement generic layout widget
- Experiment with ReactiveUI