The PayEx payment provider for EPiServer Commerce supports the following payment methods:
- Credit Card
- PayPal
- Gift Cards
- Invoice Ledger
- Invoice 2.0 (Payment method is depricated. Use Financing Invoicing instead)
- Financing Invoice
- Direct Bank Debit
- PayEx Part Payment
- MasterPass
- Prerequisites
- Installing the PayEx payment provider
- Configuring the PayEx payment provider
- Using the PayEx payment provider 1. What is the redirect model? 2. What is the direct model? 3. Implementing a payment method using the redirect model 4. Implementing a payment method using the direct model 5. Going into production
- Extra steps needed for payment methods 1. MasterPass 2. Financing Invoicing
- Extending the payment provider
- Troubleshooting
- EPiServer.CMS version 8.0.0 or higher
- EPiServer.Commerce version 8.8.0 or higher
- .NET Framework 4.5 or higher
- You should also take a look at the PayEx prerequisites
##[↑] Installing the PayEx payment provider
###Step 1### Download the PayEx.EPi.Commerce.Payment package from the EPiServer NuGet feed. Add the package to your Web project.
###Step 2### Download the PayEx.EPi.Commerce.Payment.CommerceManager package from the EPiServer NuGet feed. Add the package to your Commerce Manager project.
###Step 3### Build your project and browse to the website
##[↑] Configuring the PayEx payment provider ###Step 1### Login to EPiServer Admin, click on the Config tab and click on the Plug-in Manager under Tool Settings. Click on the PayEx.EPi.Commerce.Payment plugin and fill in the following settings:
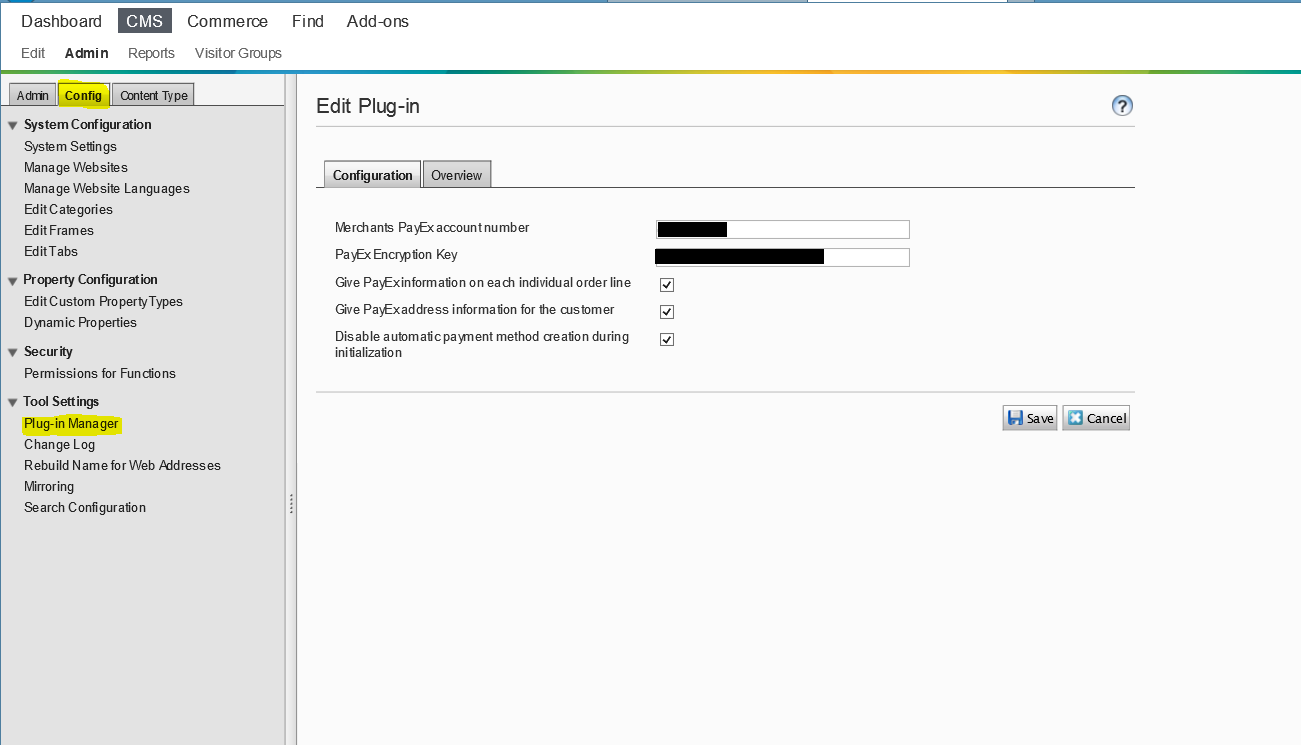
Merchants PayEx account number: The merchants account number given to you by PayEx.
PayEx Encryption Key: The encryption key generated in PayEx Admin
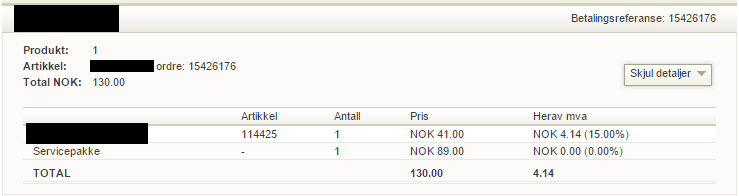
Display individual order lines in PayEx: If this option is selected, the customer will be able to view their order lines in PayEx when completing the purchase. This option only applies to payment methods that support the redirect method. The following screenshot shows how the orderlines are displayed:
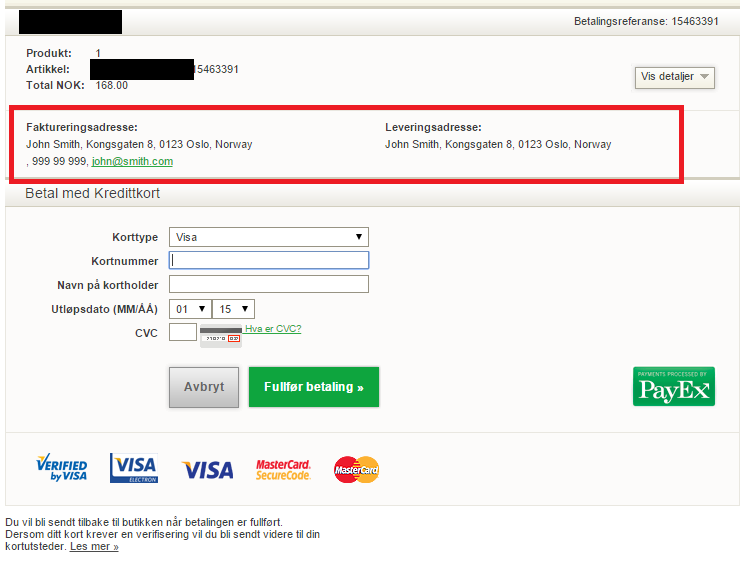
Display customer address information in PayEx: If this option is selected, the customer will be able to view their address information in PayEx when completing the purchase. This option only applies to payment methods that support the redirect method. The following screenshot shows how the address information is displayed:
Disable automatic payment method creation during initialization: During initialization of the website, all the supported payment methods are added to the Commerce Manager automatically. If you wish to disable this functionality, you can select this option.
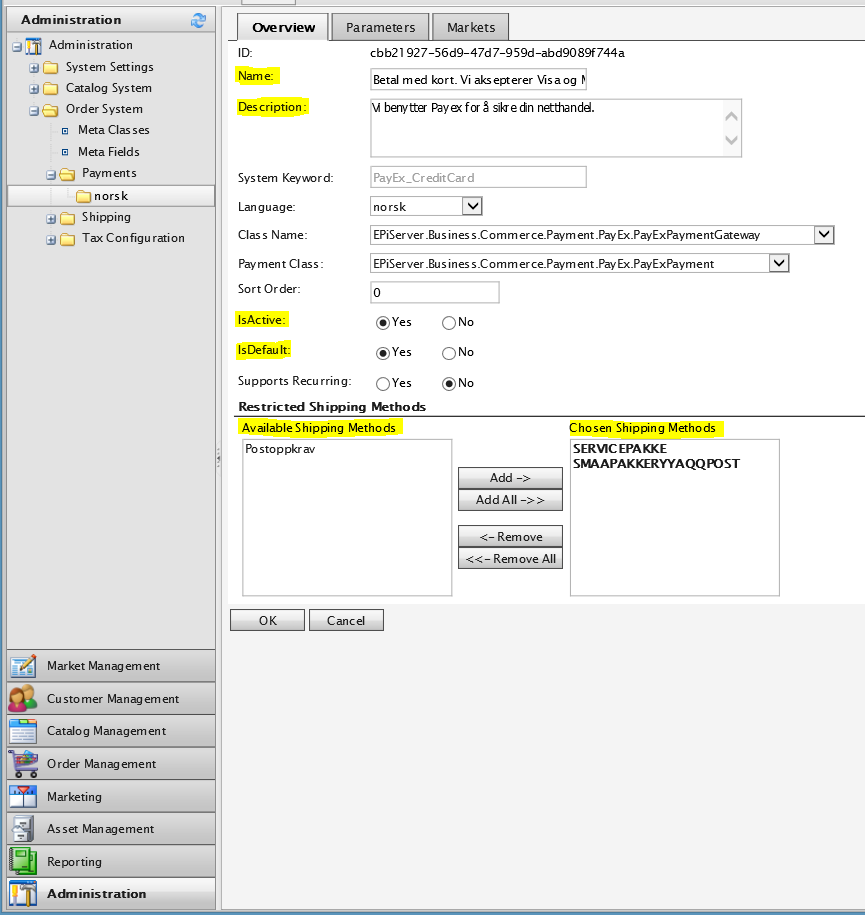
###Step 2### Browse to your Commerce Manager, and do the following for all the payment methods you wish to use:
In the Overview tab
- Edit the name and description.
- Set IsActive to true
- If this is the default payment method, set IsDefault to true
- Select the shipping methods available for this payment
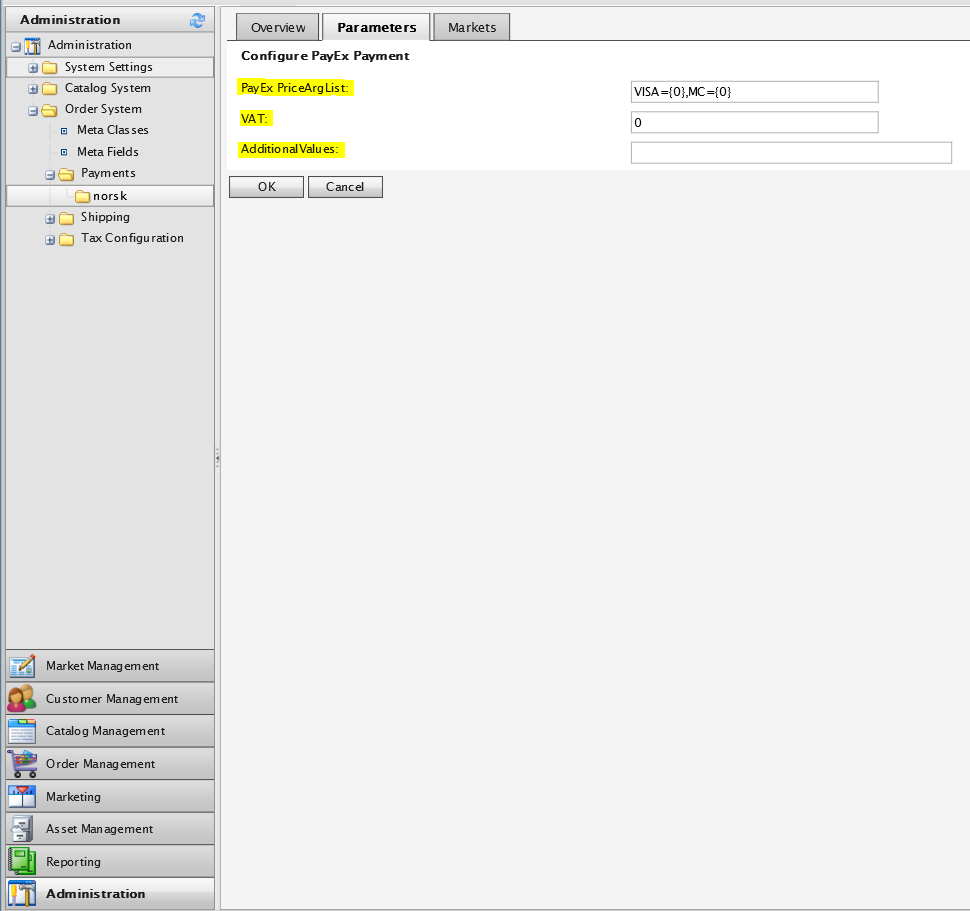
In the Parameters tab
-
Set the PayEx PriceArgsList parameter to a valid value according to the PayEx documentation. Instead of specifying the price as a number, set it to {0} as this will be replaced with the price of the order line items the customer is trying to purchase. Example value: VISA={0},MC={0}
-
If you wish to pass any AdditionalValues to PayEx according to the PayEx documentation, you can specify those values here. If the value you wish to pass in is a dynamic value, you can choose to specify them in code as described in the Specifying the additionalValues parameter section.
In the Markets tab
- Select the markets for which this payment method should be available.
###Step 3### If your shipping methods contain restrictions as to which payment methods they can be used in combination with, you need to browse to each of the shipping methods and define these restrictions.
##[↑] Using the PayEx payment provider
How you use the PayEx payment provider depends on which payment methods you wish to use. The payment methods can be separated into two groups: The ones that support the PayEx redirect model and the ones that support the PayEx direct model.
###[↑] What is the redirect model?
The redirect model states that the customer will be redirected from your Commerce website to PayEx. PayEx will collect the customers payment information before redirecting the customer back to your Commerce website.
The following payment methods use the redirect model:
###[↑] What is the direct model? The direct model states that all communication between your Commerce website and PayEx is done server-to-server. This means that the payment process runs from beginning to end without the customer leaving your website.
The following payment methods use the direct model:
###[↑] Implementing a payment method using the redirect model
####Step 1#### After the customer has entered all necessary information during the checkout process, create a new instance of the PayExPayment class and assign this to an OrderForm in the customers Cart.
public PayExPayment(
	string clientIpAddress,
	string productNumber,
	string cancelUrl,
	string returnUrl,
	string description
)
Parameters
clientIpAddress: The clients IP address
productNumber: Merchant product number/reference for this specific product. We recommend that only the characters A-Z and 0-9 are used in this parameter.
cancelUrl: A string identifying the full URL for the page the user will be redirected to when the Cancel Purchase button is pressed by the user. We do not add data to the end of this string. Set to blank if you don’t want this functionality. (Note: This is the PayEx cancel button, and must not be associated with cancel buttons in the customers bank.)
returnUrl: A string identifying the full URL for the page the user will be redirected to after a successful purchase. We will add orderRef to the existing query, and if no query is supplied to the URL, then the query will be added.
description: Merchant’s description of the product.
Note that you also need to set the standard Mediachase.Commerce.Orders.Payment properties, example code:
 private void CreatePayment(Cart cart, PaymentMethodDto.PaymentMethodRow paymentMethod)
 {
    PayExPayment payExPayment = new PayExPayment("1.0.0.127", "1234",
            "http://localhost?cancel", "http://localhost?return", "Description");
    payExPayment.Amount = cart.Total;
    payExPayment.OrderFormId = cart.OrderForms[0].Id;
    payExPayment.PaymentMethodName = paymentMethod.Name;
    payExPayment.PaymentMethodId = payExPayment.PaymentMethodId;
    payExPayment.TransactionType = TransactionType.Authorization.ToString();
    payExPayment.Status = PaymentStatus.Pending.ToString();
  }
####Step 2#### The payment process is initiated in the ProcessPaymentActivity in the CartCheckoutWorkflow and the user is redirected to PayEx. Unless you've changed the default Commerce workflows for your Commerce website, you will not need to write any code for this to happen!
####Step 3#### After PayEx has collected the customers payment information, the customer will be redirected to the URL you supplied for the returnUrl parameter in step 1. If you're developing your Commerce website using ASP.NET MVC you can find an example callback controller here: View example callback controller
Important: The example callback controller is only an example, you will have to adjust it to your project
What's important is that the callback controller handles the following:
- Calls PayExPaymentGateway.ProcessSuccessfulTransaction function in order to complete the payment
- If PayExPaymentGateway.ProcessSuccessfulTransaction is successful, create a Purchase Order with the given order number and redirect the user to the order confiration page.
###[↑] Implementing a payment method using the direct model
####Step 1#### After the customer has entered all necessary information during the checkout process, create a new instance of the ExtendedPayExPayment class and assign this to an OrderForm in the customers Cart. How you create the ExtendedPayExPayment class depends on which payment method has been selected:
public ExtendedPayExPayment(
	string clientIpAddress,
	string productNumber,
	string returnUrl,
	string description,
	string socialSecurityNumber,
	string countryCode,
	string email,
	string mobilePhone
)
Parameters
clientIpAddress: The clients IP address
productNumber: Merchant product number/reference for this specific product. We recommend that only the characters A-Z and 0-9 are used in this parameter.
returnUrl: A string identifying the full URL for the page the user will be redirected to after a successful purchase. We will add orderRef to the existing query, and if no query is supplied to the URL, then the query will be added.
description: Merchant’s description of the product.
socialSecurityNumber: Customer social security number, 10 digits for Swedish and Finnish customers, 11 digits for Norwegian customers
countryCode: Customer origin Country, only SE is available at the moment
email: Customers email address
mobilePhone: Customers mobile phone number. Phone number need to be formatted with country code and “+” – (+46XXXXXXXXX, +47XXXXXXXX etc.) RegEx validation: “[a-zA-Z0-9_:!;\”#<>=?\[\]@{}´\n\r %-/À-ÖØ-öø-úü]*”
public ExtendedPayExPayment(
	string clientIpAddress,
	string productNumber,
	string returnUrl,
	string description,
	string socialSecurityNumber,
	string firstname,
	string lastname,
    string streetAddress,
	string coAddress,
	string city,
	string postNumber,
	string countryCode,
	string email,
	string mobilePhone
)
Parameters
clientIpAddress: The clients IP address
productNumber: Merchant product number/reference for this specific product. We recommend that only the characters A-Z and 0-9 are used in this parameter.
returnUrl: A string identifying the full URL for the page the user will be redirected to after a successful purchase. We will add orderRef to the existing query, and if no query is supplied to the URL, then the query will be added.
description: Merchant’s description of the product.
socialSecurityNumber: Customer social security number, 10 digits for Swedish and Finnish customers, 11 digits for Norwegian customers
firstname: Customers legal first name
lastname: Customers legal last name
streetAddress: Customers street address
coAddress: Customers C/O address. Can be null or string.Empty.
city: Customers city
postNumber: Customers post number
countryCode: Customer origin Country, only SE is available at the moment
email: Customers email address
mobilePhone: Customers mobile phone number. Phone number need to be formatted with country code and “+” – (+46XXXXXXXXX, +47XXXXXXXX etc.) RegEx validation: “[a-zA-Z0-9_:!;\”#<>=?\[\]@{}´\n\r %-/À-ÖØ-öø-úü]*”
#####Note #####
Note that you also need to set the standard Mediachase.Commerce.Orders.Payment properties, example code:
 private void CreatePayment(Cart cart, PaymentMethodDto.PaymentMethodRow paymentMethod)
 {
    ExtendedPayExPayment payExPayment = new ExtendedPayExPayment("1.0.0.127", "1234", "http://localhost?return", "Description", "12345678912", "SE", "myemail@contoso.com", "99999999");
    payExPayment.Amount = cart.Total;
    payExPayment.OrderFormId = cart.OrderForms[0].Id;
    payExPayment.PaymentMethodName = paymentMethod.Name;
    payExPayment.PaymentMethodId = payExPayment.PaymentMethodId;
    payExPayment.TransactionType = TransactionType.Authorization.ToString();
    payExPayment.Status = PaymentStatus.Pending.ToString();
  }
####Step 2#### The payment process is initiated in the ProcessPaymentActivity in the CartCheckoutWorkflow and the user is redirected to PayEx. Unless you've changes the default Commerce workflows for your Commerce website, you will not need to write any code for this to happen!
####Step 3#### If the CartCheckoutWorkflow was successful, the payment has been initiated and you can create a purchase order from your cart, setting the order number equal to the order number found on the carts PayExPayment.
When your project is ready for production, you must remember to update the following settings:
- "Merchants PayEx account number" in the PayEx.EPi.Commerce.Payment module settings
- "PayEx Encryption Key" in the PayEx.EPi.Commerce.Payment module settings
- The PayEx endpoint URL in web.config must be changed from https://test-external.payex.com to https://external.payex.com
##[↑] Extra steps needed for payment methods
###[↑] MasterPass
There are two purchase flows when working with MasterPass, best practice and redirect flow. This payment method support both.
To select which flow to use, go to the MasterPass payment method in Commerce Manager and select the parameters tab. In this view you you can check the Use best practice flow to enable this option as shown in the screenshoot below.

AdditionalValues paramters RESPONSIVE and USEMASTERPASS are automatically set and should not be set in Commerce Manager for this payment method.
Select "Add shopping cart items to MasterPass" if you add want to send shopping cart data to PayEx to be shown in the MasterPass view. If you want to override the standard formatting of shopping cart, you can implement IMasterPassShoppingCartFormatter and register it with StructureMap.
_container.Configure(x =>
    {
	    x.For<IMasterPassShoppingCartFormatter()
	    .Use<YourMasterPassShoppingCartXmlFormatter>();
    }
####MasterPass Best Practice#### Detailed information regarding this option can be found at http://www.payexpim.com/payment-methods/masterpass/
When this option is enabled, you should add a checkout button at the beginning of the checkout experience, prior to the collection of shipping and billing information as described in the PayEx documentation. When this button is clicked, you will need to get the payment method for MasterPass from EPiServer Commerce and add it to the carts payments as shown in CreatePayments example above. When you run the workflow CartCheckout the user will be redirected to PayEx to select their wallet and are redirected back to the returnurl set on the payment in Commerce. This url will contain an orderRef query parameter that you should use to get the customers address from PayEx and set this as the shipping address on the cart as shown in example below.
        var payExService = ServiceLocator.Current.GetInstance<IPayExPaymentService>();
        var address = payExService.GetDeliveryAddressFromPayEx(orderRef);
The consumer should be able to review the order before finalizing the purchase. Prices for shipping could be affected by the selected shipping address inside the MasterPass Wallet and the customer should be made aware of this.
When the customer finalizes the order PayExPaymentGateway.ProcessSuccessfulTransaction function must be called, in order to complete the payment.
- If PayExPaymentGateway.ProcessSuccessfulTransaction is successful, create a Purchase Order with the given order number and redirect the user to the order confiration page.
####Regular redirect flow#### This payment method requires no extra steps and can be used in the same manner as the other redirect options.
There are two available payment methods for Financing Invoicing. One for swedish and one for norwegian end customers. To limit what payment option is shown to the customer, you can use markets in EPiServer Commerce.
There are some extra parameters that need to be set to be able to use the Financing Invoicing payment option. Go to the Financing Invoicing payment method in Commerce Manager and select the parameters tab.
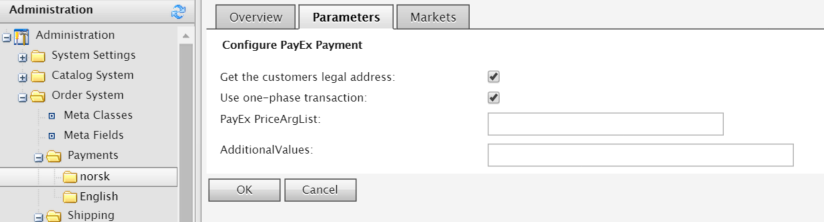
You can select "get the customers legal address" for the swedish payment method. When this is selected, legal address is retrieved from PayEx and address is updated on the ExtendedPayExPayment. If you want this address updated on the billing address on the order, you will need to implement IUpdateAddressHandler and register the class with StructureMap.
_container.Configure(x =>
	    {
		     x.For<IUpdateAddressHandler()
		     .Use<YourUpdateAddressHandler>();
		});
If you select one-phase transaction, the transactions will be captured immediately when checkout workflow is executed. If this option is enabled order line information is needed by PayEx. This is handled automatically, but requires adjustments to the CalculateTaxActivity in Commerce workflow as described in section about Supplying VAT to PayEx. Discounts, shipping and handling costs are summed up in one row and sent to PayEx. If you would like to change this implementation, you will need add your own implementation of IFinancialInvoicingOrderLineFormatter and register it with StructureMap like in the following example:
 _container.Configure(x =>
    {
	     x.For<IFinancialInvoicingOrderLineFormatter()
	     .Use<YourFinancialInvoicingOrderLineFormatter>();
	});
##[↑] Extending the payment provider
###[↑] Generating order numbers
The payment provider requires an order number in order to begin initialization of the payment. This means that the payment provider will generate an order number for you, but you have the ability to override this functionality to make order number sequences appropriate for your project.
The default order number generation looks like this:
public string Generate(Cart cart)
{
    string num = new Random().Next(1000, 9999).ToString();
    return string.Format("{0}{1}", cart.OrderGroupId, num);
}
An example order number generated with this method is 3259375.
If you want the order numbers to look differently for your project, you can implement your own IOrderNumberGenerator. In this example, all order numbers are prefixed by the number 5, an example order number generated with the method below is 51011521:
using System;
using PayEx.EPi.Commerce.Payment.Contracts.Commerce;
using Mediachase.Commerce.Orders;
namespace PayExProviderDemo
{
public class OrderNumberGenerator : IOrderNumberGenerator
{
public string Generate(Cart cart)
{
string num = new Random().Next(100, 999).ToString();
return string.Format("5{0}{1}", cart.OrderGroupId, num);
}
}
}
Important: PayEx requires order numbers to be numeric. If you generate a non-numeric order number, payment initialization will fail.
After implementing your own IOrderNumberGenerator, it will have to be injected into your dependency injection container to override the default implementation (examples below use StructureMap):
x.For<IOrderNumberGenerator>().Use<OrderNumberGenerator>();
Remember that your implementation of IOrderNumberGenerator will have to be injected into both your web project and your Commerce Manager project. If you don't already have a dependency resolver module for your Commerce Manager project, you can use the following InitializableModule:
using EPiServer.Framework;
using EPiServer.Framework.Initialization;
using EPiServer.ServiceLocation;
using Mediachase.Commerce.Initialization;
using StructureMap;

namespace PayExProviderDemo.Initializers
{
	[ModuleDependency(typeof(CommerceInitialization))]
	[InitializableModule]
	public class DependencyResolverModule : IConfigurableModule
	{
    	private IContainer container;

    	public void ConfigureContainer(ServiceConfigurationContext context)
    	{
        	container = context.Container;

        	container.Configure(
            	x =>
            	{
                	x.For<IOrderNumberGenerator>().Use<OrderNumberGenerator>();
            	});
    	}

    	public void Initialize(InitializationEngine context)
    	{
    	}

    	public void Preload(string[] parameters)
    	{
    	}

    	public void Uninitialize(InitializationEngine context)
    	{
    	}
	}
}
If you want to display a VAT value per line item in PayEx, you will need to make some changes to the CalculateTaxActivity in Mediachase.Commerce.Workflow.Activities.
Find the following piece of code in CalculateTaxActivity.cs ...
if (taxes.Length > 0)
{
    foreach (TaxValue tax in taxes)
    {
        if(tax.TaxType == TaxType.SalesTax)
            totalTaxes += item.ExtendedPrice * ((decimal)tax.Percentage / 100);
    }
}
...and replace it with this:
if (taxes.Length > 0)
{
    decimal itemTax = 0;
    decimal itemTaxPercentage = 0;
    foreach (TaxValue tax in taxes)
    {
       if (tax.TaxType == TaxType.SalesTax)
       {
           itemTax = item.ExtendedPrice * ((decimal)tax.Percentage / 100);
           itemTaxPercentage = (decimal)tax.Percentage;
           totalTaxes += itemTax;
       }
    }
    item[Constants.Metadata.LineItem.VatAmount] = itemTax;
    item[Constants.Metadata.LineItem.VatPercentage] = itemTaxPercentage;
}
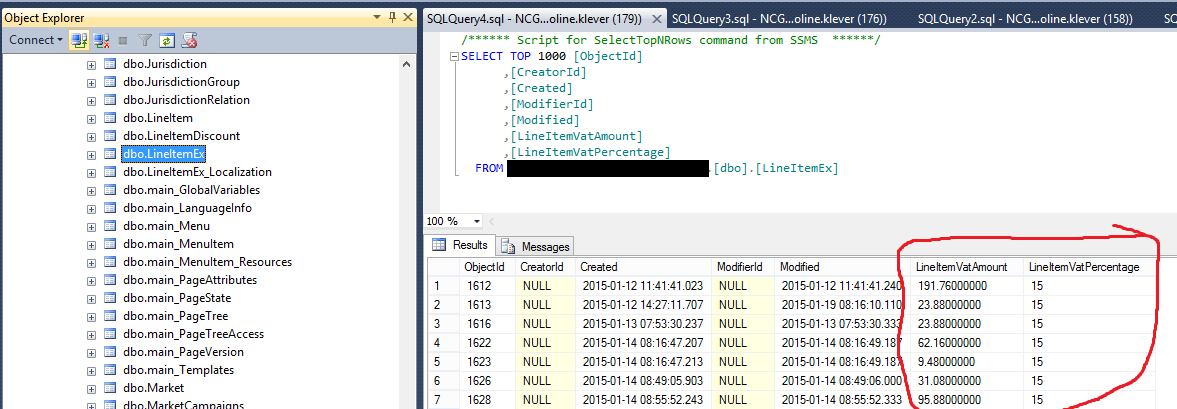
What this piece of code does is calculate both the VAT amount and the VAT percentage and save the result to the lineItems. The PayEx provider will find the values saved on the LineItem and pass these on to PayEx.
If you wish to ensure that the VatAmout meta field and VatPercentage meta field of the line items are saved as they should, you can take a look in the dbo.LineItemEx table in your Commerce Manager database. You should see that the values have been populated:
Note: The VAT values will only be displayed if you've selected the Display individual order lines in PayEx option in the PayEx.EPi.Commerce.Payment Plug-In settings as described in Step 1 of "Configuring the PayEx payment provider"
###[↑] Specifying the additionalValues parameter
During payment initialization, PayEx gives you the option of passing in additionalValues as a parameter. The additionalValues parameter is used for several things, for example enabling the payment menu, enabling responsive design or passing in invoice data. Take a look at the PayEx documentation for the additionalValues parameter to see all the options available.
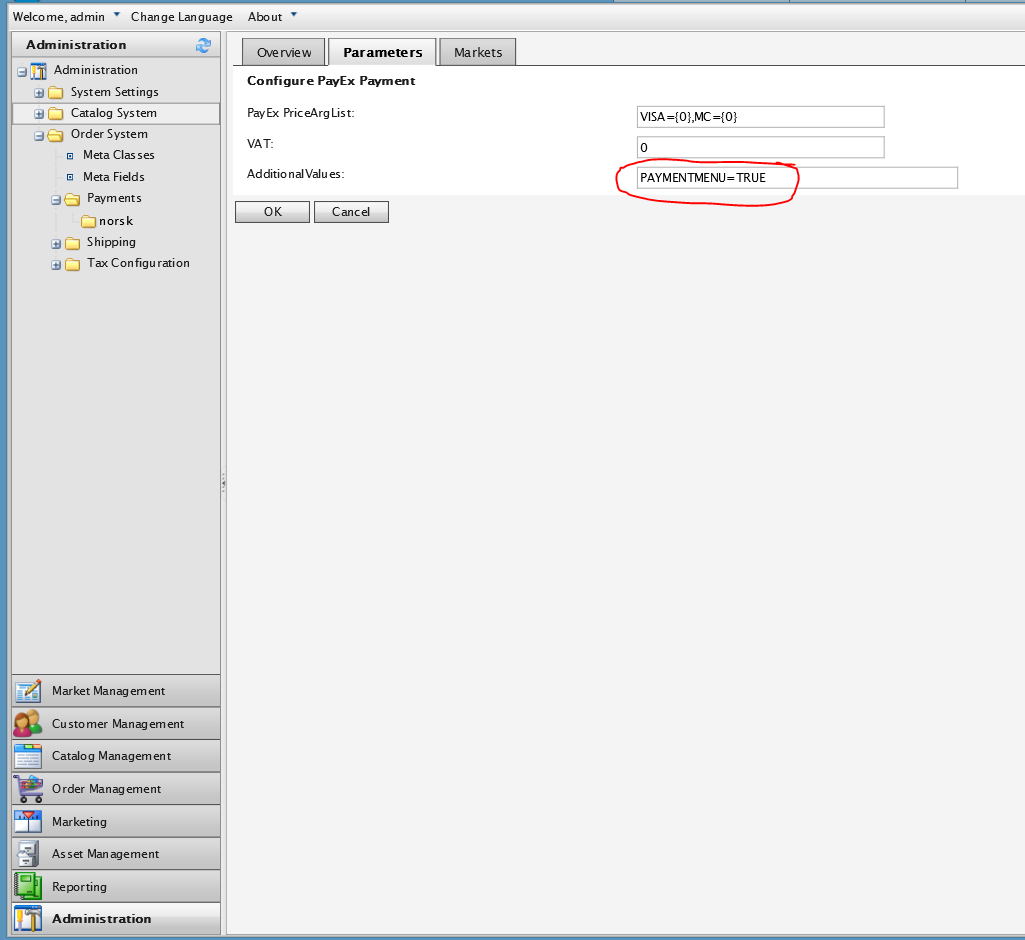
If the value you wish to pass along with the additionalValues parameter is a plain string (such as "PAYMENTMENU=TRUE"), you can specify it in the parameters tab for the payment method in Commerce Manager:
- In the Commerce Manager, click on Administration -> Order System -> Payments
- Click on the language folder you wish to view
- Click on the PayEx payment method you wish to add a parameter to
- Go to the Parameters tab and enter the AdditionalValue
If the value you wish to pass along the additionalValues parameter is a dynamic value such as the invoice due date or invoice customer number, you cannot specify this using the previous method. This is because both the due date and the customer ID should be generated based on the purchase being made, in other words: It will vary from purchase to purchase.
In order to specify dynamic values you can implement your own IAdditionalValuesFormatter. In the example below we're assuming that the Invoice Ledger payment method is being used, which enables us to specify the customer ID and invoice due date that is six days from now:
using PayEx.EPi.Commerce.Payment;
using PayEx.EPi.Commerce.Payment.Contracts.Commerce;
using System;
using System.Text;
namespace PayExProviderDemo.Commerce.Core.Payment.PayEx
{
public class AdditionalValuesFormatter : IAdditionalValuesFormatter
{
public string Format(PayExPayment payExPayment)
{
StringBuilder stringBuilder = new StringBuilder();
stringBuilder.AppendFormat("INVOICE_CUSTOMERID={0}", payExPayment.CustomerId);
DateTime sixDaysForward = payExPayment.Created.AddDays(6);
stringBuilder.AppendFormat("&INVOICE_DUEDATE={0}", new DateTime(sixDaysForward.Year, sixDaysForward.Month, sixDaysForward.Day).ToString("yyyy-MM-dd"));
return stringBuilder.ToString();
}
}
}
###[↑] Avoid payment being set to processed when redirected to PayEx
If you don't want Commerce to set the payments to processed when the customer is redirected to PayEx to enter payment information, you can modify the workflow activity ProcessPaymentActivity to include a check if user is being redirected in the ProcessPayment method.
var httpContext = HttpContext.Current;
var isRedirecting = httpContext != null
				    && httpContext.Response.IsRequestBeingRedirected;

// update payment status
if (processPaymentResult && !isRedirecting)
{
	PaymentStatusManager.ProcessPayment(payment);
}
else
{
	if (isRedirecting)
       message = "User is being redirected to payment provider for registring payment and cart cannot be saved as order yet.";

    throw new PaymentException(PaymentException.ErrorType.ProviderError
							    , "", String.Format(message));
}

Logger.Debug(String.Format("Payment processed."));
The PayEx Payment Provider logs to a logger named PayEx.EPi.Commerce.Payment. Include the following logger in your EPiServerLog.config log:
<logger name="PayEx.EPi.Commerce.Payment">
<level value="All"/>
<appender-ref ref="[Insert your appender here]" />
</logger>