SpaceMonkey was created to be a telemetry interface for games with no native telemetry support.
SpaceMonkey mimics the functionality of the Codemasters Dirt 4 custom udp format which allows SpaceMonkey to be used via the UDP protocol by any software that already supports Dirt 4 and Dirt Rally 2.0 custom udp. SpaceMonkey also optionally writes telemetry to a Memory Mapped File as an alternative to UDP.
SpaceMonkey contains telemetry visualisation and filtering functionality.
SpaceMonkey supports XINPUT, currently mapped to standard gamepad inputs for steering (left stick), accelerator(right trigger), and brake(left trigger). Clutch and axis assignments coming in a future version. Use the XBOX 360 controller emulator to map your direct input devices to an XINPUT gamepad. https://www.x360ce.com/
SpaceMonkey has been tested with Sim Racing Studio (motion, wind, shakers and led), SimCommander 4 (Accuforce v2) and SimFeedback (motion) and should work with any software that supports Dirt 4 Custom UDP.
- Please make sure you run SpaceMonkeyStart.exe as administrator or use a user account with administrator privileges.- Dirt 5
- Wreckfest
- BeamNG.Drive
- GTA 5
- Digital Combat Simulator
- Nascar Heat 4/5 (MonsterGames)
- All American Racing (MonsterGames)
- Sprint Car Racing (MonsterGames)
- WRC 7/8/9
- Richard Burns Rally (NGP 6)
- STAR WARS: Squadrons (Note: broken; requires pointer change)
- Warplanes: WW1
- VTOL VR
- IL-2 Sturmovik
- Overload
- Trail Out
- Mechwarrior 5 Mercenaries
- Dakar Desert Rally
- WRC Generations
- Tiny Combat Arena
- EA Sports WRC
The latest installer for SpaceMonkey is here (v1.1.1)
Install anywhere to your local drive.
 )]
)]
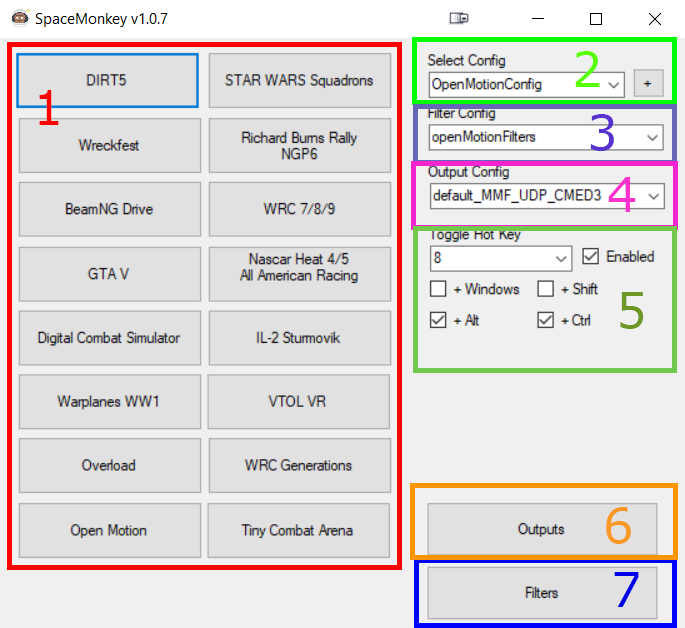
- Game selection buttons; press one to load the interface for the selected game.
- Config selection; Choose or duplicate/rename the main configuration parameters. Configs are stored in the Configs folder. Ideally a config file will be created for each game as they often have different requirements for filtering.
- Filter Config; Extra filter configs can be created by copying a filter config in the Filters folder.
- Telemetry Ouput; Choose how you want telemetry to be output from SpaceMonkey. These configs are modified by pressing the Outputs button (6)
- Hotkey; The hotkey can be used to pause and resume telemetry globally when the app is not in focus.
- Outputs; Press this button to load the Outputs Interface.
- Filters Button; press this to load the filters interface.
All changes to config options are saved as they are changed.
 )]
)]
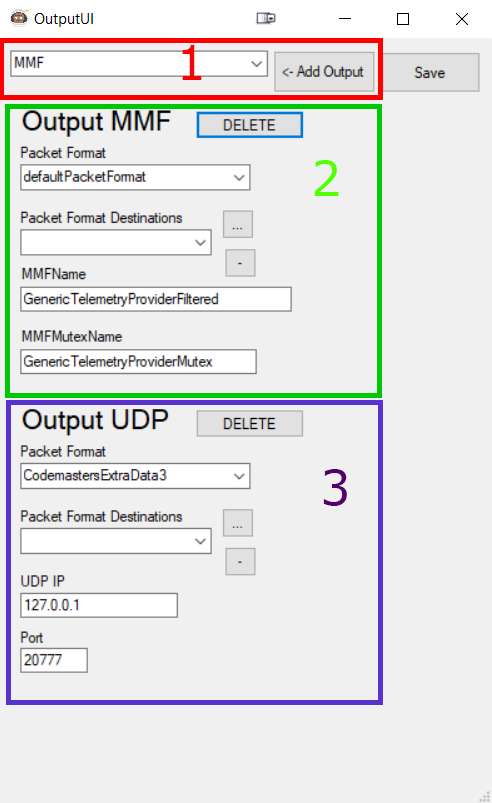
The outputs interface modifies the outputs config that is selected in the main interface. Only load this interface while a game ui is not running.
- Change the dropdown to select an output type then press the Add Output button to add an output. Callback is a reserved type that currently only works with Simfeedback and any other software that wants to use this interface. It doesn't need to be added manually and can be ignored for now.
- Output MMF outputs the 'Packet Format' specified, to the Memory Mapped File with the name specified in 'MMFName', using the global mutex specified by 'MMFMutexName'. The values shown here are the defaults used by existing software.
- Output UDP outputs the 'Packet Format' specified, over UDP to the 'UDP IP' specified and and 'Port' specified. The example here outputs the Codemasters extradata=3 format which is what most software uses for dirt rally and dirt rally 2.
- 'Packet Format Destinations'; these are folders that the packet format configuration file is copied to. Packet formats are specified in the PacketFormats folder and conform to the Dirt 4 Custom UDP specification. https://www.scribd.com/document/350826037/UDP-output-setup
The default output configs are as follows
- default_CB: This can be specified when you just want to output in the default format via callback. This is primarily used when SpaceMonkey is loaded as a dll from inside some other app and registers a callback to recieve telemetry that way. This is now the preferred method for SimFeedback as it has the lowest latency.
- default_CMED3: This config is to output to Codemasters extradata=3 format for when you want to output to software that supports this specific format for Dirt Rally 1/2 and it doesn't support custom udp. SimHub is one example.
- default_MMF_UDP: This can be specified when you want to output to both MMF and UDP with the default formats as SpaceMonkey has always done by default.
- default_MMF_UDP_CMED3: This can be specified when you want to output to MMF with the default format, and then also output Codemasters extradata=3 over UDP to some other app such as SimHub.
- Load Dirt 5 and get to the main menu with the vehicle visible.
- Go to the main interface of Space Monkey and select a main config for DIRT5.
- Go to the main interface of Space Monkey and press the DIRT5 button.
- Click the Initialize! button in the SpaceMonkey Dirt5UI and wait for the game's memory to be scanned. If successful the status message will change to Success! and you will see debug output in the text box.
- SpaceMonkey will now be outputting telemetry.
- Load Wreckfest in 64 bit mode.
- Setup a session and get to the stage where you have the start race option on the left and the selected vehicle in the centre of the screen.
- Go to the main interface of Space Monkey and select a main config for Wreckfest.
- Go to the main interface of Space Monkey and press the Wreckfest button.
- Select the player number from the drop down. In single player this is always 00. In multiplayer this is the order of your player in the lobby at the point that you join the lobby. Check as soon as you enter the lobby or you may get the wrong number.
- Click the Initialize button and wait for the game's memory to be scanned. If successful the status message will change to Success! and you will see debug output in the text box.
- Space Monkey will now be outputting telemetry.
- Adam Sawkins has made some changes to Wreckfest to make it work better with SRS. Those changes are available under the new Wreckfest Experimental button (v1.0.5).
- Backup your motionSim.lua file in the lua/vehicle subfolder of BeamNG.drive.
- Run the SpaceMonkey BeamNG.Drive plugin.msi installer in the BeamNG subfolder of Space Monkey to install the BeamNG.Drive telemetry provider into BeamNG.Drive. NOTE: installer in 1.0.6 is broken, please use this one https://github.com/PHARTGAMES/SpaceMonkey/blob/main/BeamNG/Installer/SpaceMonkey%20BeamNG.Drive%20plugin-SetupFiles/SpaceMonkey%20BeamNG.Drive%20plugin.msi
- Within BeamNG.drive 'Options > OTHER', set the following options:
- MotionSim enabled [x]
- IP: 127.0.0.1
- Port: 4444
- Update rate: 50
- Acceleration Smoothing: X, Y, Z all set to 0. (This is a personal preference, however these values are also programatically smoothed within the plugin code.)
- Go to the main interface of Space Monkey and select a main config for BeamNG Drive.
- Go to the main interface of Space Monkey and press the BeamNG Drive button.
- Specify the UDP receive port specified in the setup step (Default 4444)
- Press the Initialize! button.
- Space Monkey will now wait for a connection from BeamNG.Drive and output telemetry automatically. You can launch BeamNG.Drive and any other software at this point.
- Navigate to Documents/My Games/WRC/telemetry/
- Edit the config.json file in a text editor
- Change the "structure": "wrc" entry to match as follows; frequencyHz and port are optional
{
	"structure": "wrc",
	"packet": "session_update",
	"ip": "127.0.0.1",
	"port": 20777,
	"frequencyHz": 60,
	"bEnabled": true
}- Go to the main interface of Space Monkey and select a main config for EA WRC.
- Go to the main interface of Space Monkey and press the EA WRC button.
- Specify the UDP receive port specified in the setup step (Default 20777), if you are forwarding to a different port with SimHub or other, use this port.
- Press the Initialize! button.
- Space Monkey will now wait for a connection from EA Sports WRC and output telemetry automatically. You can launch EA Sports WRC and any other software at this point.
- Install ScripthookV: https://www.gta5-mods.com/tools/script-hook-v
- Download and install Community Script Hook V .NET: https://www.gta5-mods.com/tools/scripthookv-net
- Run the "SMTP GTA Plugin.msi" installer in the GTAV subfolder of SpaceMonkey. Install into your GTAV root folder, the default location is appropriate for a default steam installation, just need to change the drive letter.
- Go to the main interface of Space Monkey and select a main config for GTAV.
- Go to the main interface of Space Monkey and press the GTAV button.
- Press the Initialize! button.
- Space Monkey will now wait for a connection from GTAV and output telemetry automatically. You can launch GTAV and any other software at this point.
- Backup any Export.lua files in your C:\Users\USER_NAME\Saved Games\DCS\Scripts\
- Run the "SMTP DCS Export Plugin.msi" installer in the DCS subfolder of SpaceMonkey. Install into your C:\Users\USER_NAME\Saved Games\DCS\Scripts folder, the default destination should be appropriate.
- If you are using multiple export files, you can remove the SpaceMonkey Export.lua and add a "dofile(lfs.writedir()..[[Scripts\ExportSM.lua]])" entry to your main Export.lua.
- Go to the main interface of Space Monkey and select a main config for DCS.
- Go to the main interface of Space Monkey and press the DCS button.
- Specify the UDP receive port specified in the setup step (Default 6666). If you want to recieve on a different port you will also need to edit the Export.lua file installed to C:\Users\USER_NAME\Saved Games\DCS\Scripts\ and change the port.
- Press the Initialize! button.
- Space Monkey will now wait for a connection from DCS and output telemetry automatically. You can launch DCS and any other software at this point.
- Load the game.
- Go to the main interface of Space Monkey and select a main config for MonsterGames..
- Go to the main interface of Space Monkey and press the Nascar Heat 4/5..etc.. button which will load the MonsterGamesUI.
- In the Monster Games UI, click the Initialize button and wait for a message box to appear in the top left corner of the game window stating that SpaceMonkey is injected.
- Space Monkey will now be outputting telemetry. Load any other software at this point.
This feature only outputs Sway, Heave and Surge accelerations and may not perform optimally. As such, the output does not have enough information to run an Accuforce wheel in FFB Foundation mode through SimCommander. It uses a dll provided by the user Motion4All on RaceDepartment.
- Extract the contents of the "WRCInjection.zip" file in the WRC subfolder of SpaceMonkey into your WRC 7/8/9 game folder.
- Run the Install.bat file.
- Go to the main interface of Space Monkey and select a main config for WRC.
- Go to the main interface of Space Monkey and press the WRC 7/8/9 button.
- Press the Initialize! button.
- Space Monkey will now wait for a connection from WRC and output telemetry automatically. You can launch WRC and any other software at this point.
- Ensure you have NGP 6 installed in your Richard Burns Rally installation.
- Edit the RichardBurnsRally.ini file next to the RichardBurnsRally_SSE.exe and ensure that these settings under the [NGP] section look like this:
udpTelemetry=1
udpTelemetryAddress=192.168.50.194
udpTelemetryPort=6775
You may be able to use 127.0.0.1 for the udpTelemetryAddress
- In the game make sure that options/plugins/ngp6/udp telemetry is turned on (u to toggle), but it should be if the RichardBurnsRally.ini is setup correctly.
- Go to the main interface of Space Monkey and select a main config for Richard Burns Rally.
- Go to the main interface of Space Monkey and press the Richard Burns Rally button.
- Specify the UDP receive port specified in the setup step (Default 6775)
- Press the Initialize! button.
- Space Monkey will now wait for a connection from Richard Burns Rally and output telemetry automatically. You can launch Richard Burns Rally and any other software at this point.
This only works offline and with the Steam version of the game. You must uninstall EasyAntiCheat for Space Monkey to work. You need to block connections to the game in your firewall so that it can't tell the servers that you are playing with EasyAntiCheat disabled. Follow the Setup steps.
- Setup firewall rules to block udp and tcp from both the starwarssquadrons.exe and starwarssquadrons_launcher.exe files.
- In the STAR WARS: Squadrons game folder there is a subfolder named EasyAntiCheat. Run EasyAntiCheat_Setup.exe and choose uninstall.
- In the SpaceMonkey install folder there is a subfolder name Squadrons. Copy the steam_appid.txt from this folder into the STAR WARS: Squadrons game folder.
- Launch STAR WARS: Squadrons by running the starwarssquadrons.exe located in the game install folder.
- Go to the main interface of Space Monkey and select a main config for Squadrons.
- Go to the main interface of Space Monkey and press the STAR WARS: Squadrons button which will load the Squadrons UI.
- Press the Initialize! button.
- You can now switch back to STAR WARS: Squadrons and you should have telemetry once you start a game.
- Load the game.
- Go to the main interface of Space Monkey and select a main config for Warplanes WW1..
- Go to the main interface of Space Monkey and press the Warplanes WW1 button which will load the Warplanes WW1 UI.
- In the Warplanes WW1 UI, click the Initialize button .
- Space Monkey will now be outputting telemetry. Load any other software at this point.
- Load the game.
- Go to the main interface of Space Monkey and select a main config for VTOL VR..
- Go to the main interface of Space Monkey and press the VTOL VR button which will load the VTOL VR UI.
- In the VTOL VR UI, click the Initialize button .
- Space Monkey will now be outputting telemetry. Load any other software at this point.
- Edit the file data/startup.cfg located within the IL-2 Sturmovik game folder and add the following:
[KEY = motiondevice]
addr = "127.0.0.1"
decimation = 1
enable = true
port = 4321
[END]
Simulation produces 50Hz rate data output (output 50 samples per second) of in-game player body's state: orientation, rotation speed (spin) and acceleration (if game mission has user-controlled body). To reduce UDP messages output rate the above setup section contains an integer setting “decimation”: UDP_output_rate = Data_output_rate / decimation The default setup makes UDP output rate at the simulation's rate and is equal 50Hz.
Some people may find better results with "decimation = 2".
- Go to the main interface of Space Monkey and select a main config for IL-2 Sturmovik.
- Go to the main interface of Space Monkey and press the IL-2 Sturmovik button.
- Specify the UDP receive port specified in the setup step (Default 4321)
- Press the Initialize! button.
- Space Monkey will now wait for a connection from IL-2 Sturmovik and output telemetry automatically. You can launch IL-2 Sturmovik and any other software at this point.
- Load the game. (Tested with the steam version)
- Go to the main interface of Space Monkey and select a main config for Overload..
- Go to the main interface of Space Monkey and press the Overload button which will load the OverloadUI.
- In the Overload UI, click the Initialize button and wait for a message box to appear in the top left corner of the game window stating that SpaceMonkey is injected.
- Space Monkey will now be outputting telemetry. Load any other software at this point.
WRC Generations telemetry is still WIP, the game outputs telemetry at a non deterministic rate and some of the parameters are giving incorrect values; because of this you should follow the instructions 100% for the best experience and be aware that you may experience some glitches.
- In explorer, navigate to C:\Users<USERNAME>\Documents\My Games\WRCG
- Open UserSettings.cfg in a text editor
- Find the following lines and edit to match. (TelemetryRate must be 60 to match the internal update rate of SpaceMonkey and the update rate of the game.)
WRC.Telemetry.TelemetryRate = 60;
WRC.Telemetry.TelemetryAdress = "127.0.0.1";
WRC.Telemetry.EnableTelemetry = true;
WRC.Telemetry.TelemetryPort = 20777;
- Launch WRC Generations
- Navigate to Options / Video
- Turn on v-sync. (with this set to false the telemetry will be very noisy).
- Set Physics simulation synchronisation to High. (with this setting set to low the telemetry will be very noisy).
- Close WRC Generations before proceeding to the Usage steps.
- Go to the main interface of Space Monkey and select a main config for WRC Generations.
- Go to the main interface of Space Monkey and press the WRC Generations button.
- Press the Initialize! button.
- Space Monkey will now wait for a connection from WRC Generations and output telemetry automatically. You can launch WRC Generations and any other software at this point.
- Navigate to the TrailOut sub folder inside the Space Monkey install folder.
- Extract the contents of TrailOut_0.3.zip into the game installation, there will be a folder named TrailOut containing two folders named Binaries and Content.
- Go to the main interface of Space Monkey and select a main config for Open Motion.
- Go to the main interface of Space Monkey and press the Open Motion button.
- Press the Initialize! button.
- Space Monkey will now wait for a connection from Open Motion and output telemetry automatically.
- Navigate to the UnrealModLoader_V2.2.1 sub fodler inside the Space Monkey install folder.
- Launch UnrealEngineModLauncher.exe
- Launch Trail Out
- Navigate to the MW5 sub folder inside the Space Monkey install folder.
- Extract the contents of MW5Mercs_0.3.zip into the game installation, there will be a folder named MW5Mercs containing two folders named Binaries and Content.
- Go to the main interface of Space Monkey and select a main config for Open Motion.
- Go to the main interface of Space Monkey and press the Open Motion button.
- Press the Initialize! button.
- Space Monkey will now wait for a connection from Open Motion and output telemetry automatically.
- Navigate to the UnrealModLoader_V2.2.1 sub fodler inside the Space Monkey install folder.
- Launch UnrealEngineModLauncher.exe
- Launch MW5
- Navigate to the Dakar2 sub folder inside the Space Monkey install folder.
- Extract the contents of Dakar2Mod_0.2.zip into the Dakar2Game subfolder of the game installation, there will be two folders named Binaries and Content.
- Go to the main interface of Space Monkey and select a main config for Open Motion.
- Go to the main interface of Space Monkey and press the Open Motion button.
- Press the Initialize! button.
- Space Monkey will now wait for a connection from Open Motion and output telemetry automatically.
- Navigate to the UnrealModLoader_V2.2.1 sub fodler inside the Space Monkey install folder.
- Launch UnrealEngineModLauncher.exe
- Launch Dakar Desert Rally
- Load the game.
- Go to the main interface of Space Monkey and select a main config for Tiny Combat Arena..
- Go to the main interface of Space Monkey and press the Tiny Combat Arena button which will load the Tiny Combat Arena UI.
- In the Tiny Combat Arena UI, click the Initialize button and wait for a message box to appear in the top left corner of the game window stating that SpaceMonkey is injected.
- Space Monkey will now be outputting telemetry. Load any other software at this point.
More info here
-
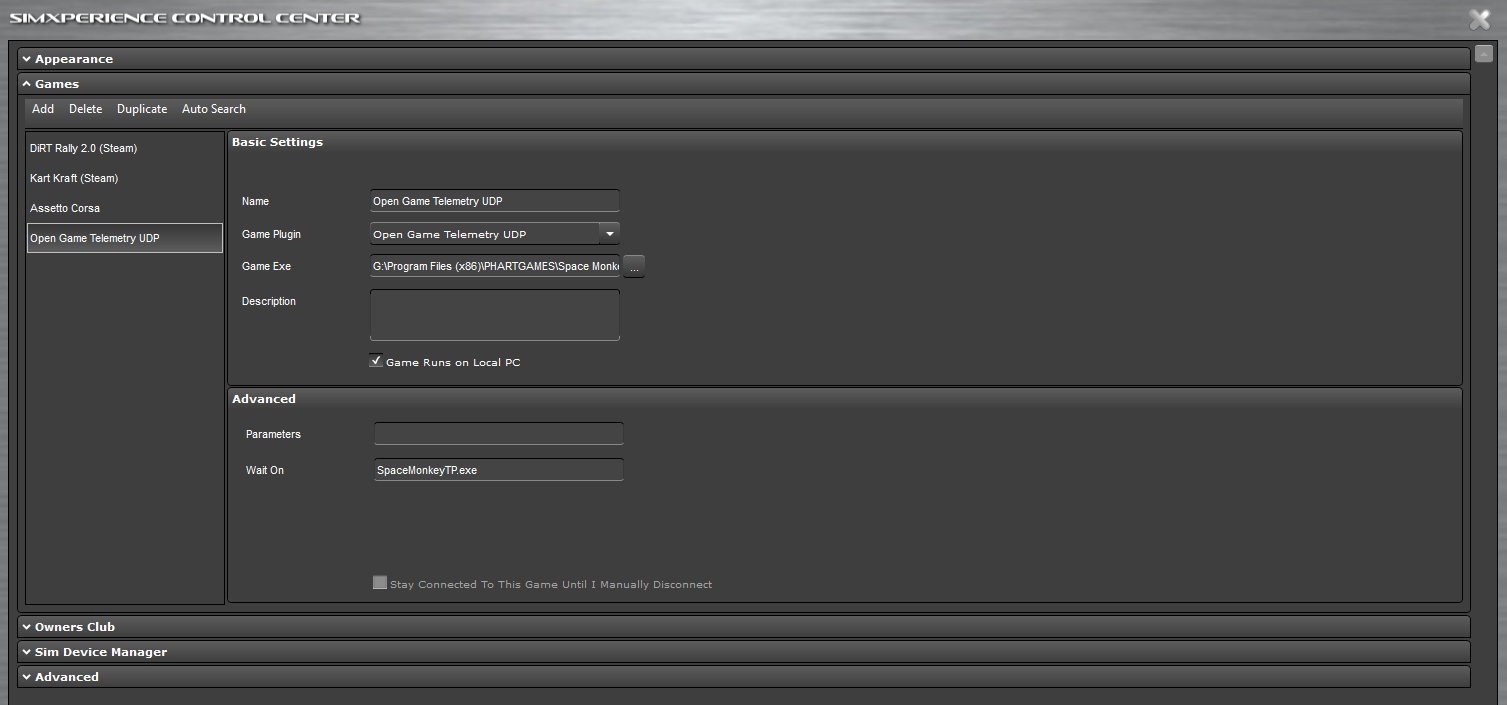
Create a new game entry under settings with the following settings. Point the Game Exe at the SpaceMonkeyTP.exe in the location you installed it to previously.
 )]
)] -
For car games, you have the option to create a duplicate of an existing Dirt Rally 2.0 or Dirt 4 profile, for Aircraft games you can duplicate an X-Plane profile. You can also create a profile from scratch, then change it's settings as follows.
 )]
)]
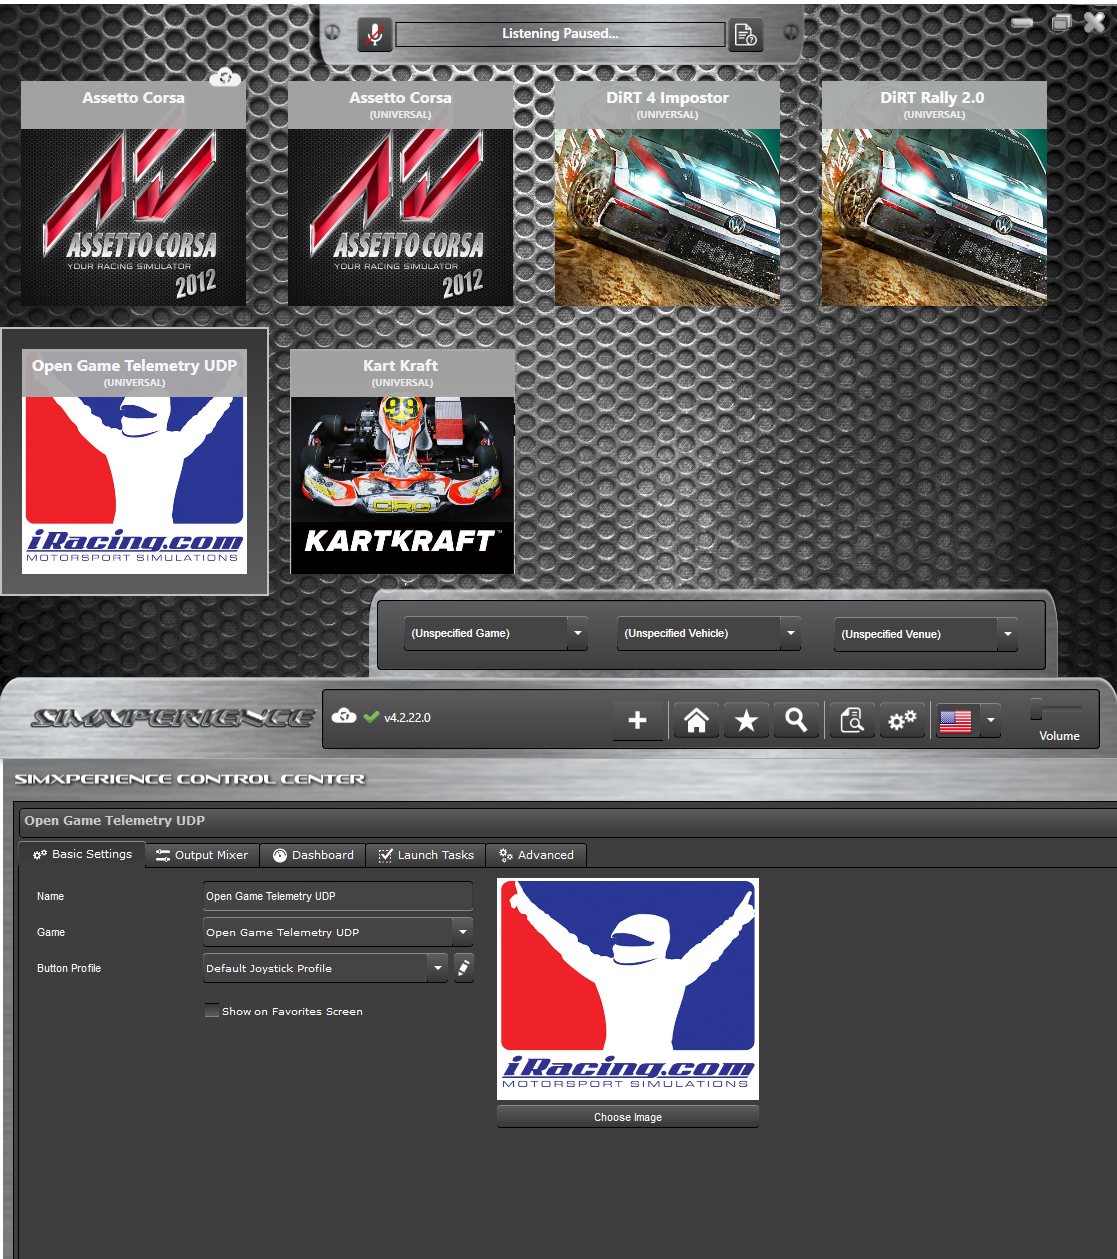
- Click the launch button on your new profile, SpaceMonkey will load.
- Perform the Usage steps for the game you wish to use, as described in this document.
Setup instructions here
https://github.com/PHARTGAMES/SpaceMonkey/blob/main/GTPSimfeedback/README.md
The mutex used by SpaceMonkey is named "GenericTelemetryProviderMutex"
The MMF used by SpaceMonkey is named "GenericTelemetryProviderFiltered"
Example MMF usage here https://github.com/PHARTGAMES/SpaceMonkey/blob/main/GTPSimfeedback/GTPTelemetryProvider.cs
Actual example here https://github.com/PHARTGAMES/SpaceMonkey/blob/main/GTPSimfeedback/GTPTelemetryProvider.cs
Simplified example
using GenericTelemetryProvider;
using CMCustomUDP;

public void TelemetryCallback(CMCustomUDPData telemetryData)
{
	//use telemetryData here
}

public void Init()
{

	AppDomain currentDomain = AppDomain.CurrentDomain;

	AppDomain.CurrentDomain.AssemblyResolve += (object sender, ResolveEventArgs args) =>
	{
		try
		{
			string assemblyName = args.Name.Split(',')[0];

			RegistryKey localKey;
            if (Environment.Is64BitOperatingSystem)
                localKey = RegistryKey.OpenBaseKey(RegistryHive.LocalMachine, RegistryView.Registry64);
            else
                localKey = RegistryKey.OpenBaseKey(RegistryHive.LocalMachine, RegistryView.Registry32);

            string installPath = localKey.OpenSubKey("SOFTWARE\\PHARTGAMES\\SpaceMonkeyTP").GetValue("install_path").ToString();
			if (string.IsNullOrEmpty(installPath))
			{
				throw new Exception("SpaceMonkey Not Installed");
			}
			else
			{
				Assembly ass = Assembly.LoadFrom(installPath + assemblyName + ".dll");

				return ass;
			}
		}
		catch (Exception e)
		{
			Console.WriteLine("Failed to load assembly: " + e.Message);
			return null;
		}
	};

	SMClient.Init((success) => //this will load the SpaceMonkey window
	{
		SMClient.RegisterTelemetryCallback(TelemetryCallback); //this will register the callback
	);
}Release v1.0.5
- Added Overload support
- Added Extra telemetry for engine, gears and suspension to BeamNG.drive. This will work with SimCommander Simvibe.
- Added Wreckfest Experimental for SRS users.
- Fixes for crashes caused by incorrect culture being set.
- Fixes for timer accuracy.
- Fixes for app not closing threads correctly at shutdown.
Release v1.0.6
- Added WRC Generations support
- Added Trail Out support
- Added MechWarrior 5 Mercenaries support
- Added Dakar Desert Rally support
- Added Tiny Combat Arena support
- Wreckfest telemetry improvements (fixed noise, 64bit support)
- GTAV updated to support latest scripthook.net
- General rework and cleanup to start moving providers toward Open Motion.
Release v1.0.7
- Added Codemasters extradata=3 support to allow output to more apps that don't support custom_udp such as SimHub.
- Added multiple output configuration support through the Outputs Interface.
- OpenMotion api expanded to support engine and gear telemetry as well as math rewrite.
- Added telemetry callback interface and restructured project to be loaded as a dll.
- Simfeedback plugin gets SpaceMonkey integration and callback support.
Release v1.0.8
- Added EA Sports WRC Support
Release v1.0.9
- Try fix dependency issues in GTPSimfeedback and SpaceMonkeyTP
- Fix EA WRC axis issues.
Release v1.1.0
- Fixed issues reading install folder from registry in GTPSimfeedback and SpaceMonkeyTP
- Add EAWRC profile to GTPSimfeedback
Release v1.1.1
- Add slip_angle and slip_angle2 to output; use defaultPacketFormat_SlipAngle when outputting mmf or udp if you would like to use these values.
- Fix race conditions in WRC and BeamNG that started to break with "2023-11 Cumulative Update for .NET Framework 3.5, 4.8 and 4.8.1 for Windows 10 Version 22H2 for x64 (KB5032339)"
https://github.com/PHARTGAMES/SpaceMonkey/issues
Enter an issue here https://github.com/PHARTGAMES/SpaceMonkey/issues
Discord: https://discord.gg/ecfweprpx
https://github.com/PHARTGAMES/SpaceMonkey/graphs/contributors
Tiger Feet oO0o for helping me debug registry issues in production; you're awesome!