


A simple yet powerful hierarchical finite state machine for the Unity game engine. It is scalable and customisable by being class-based, but also supports functions (lambdas) for rapid prototyping.
Thanks to overloading, it minimises boilerplate code while still supporting generics.
It has a special focus on the temporal aspects of state transitions, making it ideal for timing and synchronisation sensitive problems.
-
State machines are an amazingly easy way to write and organise game logic. (As soon as you have states, e.g. Walk, Run, Sneak, Jump, you can use a state machine)
-
It's easy and straightforward to use
-
It helps you tame complex behaviour (e.g. weapon handling -> cooling, ammo, reload, fire) or write AI for NPCs
-
Helps you write self documenting code, that is maintainable and readable
-
Reduces the boilerplate code required to write a state machine
-
UnityHFSM is lightweight and efficient, making it perfect for solving small and big problems
-
It is especially designed for Unity, and supports coroutines, which would otherwise be difficult to implement in a state machine
-
No GC Allocations for state changes / updates / ... after setting up the state machine (-> No unwanted GC related lag spikes because of the state machine)
-
The code is well documented
-
It is not a component (MonoBehaviour) and therefore has a low overhead
-
By being hierarchical, it can reduce the amount of duplicate code between states
In the wiki:
Table of contents:
To get started, download the latest version of UnityHFSM from the Releases page. Simply extract the zip file and put the folder anywhere in your Assets folder. Et voilà, you're ready to go!
Add from OpenUPM | via scoped registry
To add OpenUPM to your project:
-
Open
Edit/Project Settings/Package Manager -
Add a new Scoped Registry:
Name: OpenUPM URL: https://package.openupm.com/ Scope(s): com.inspiaaa.unityhfsm -
Click Save
-
Open Package Manager
-
Select
My Registriesin dropdown top left -
Select
UnityHFSMand clickInstall
Add from GitHub | no updates through PackMan
You can also add it directly from GitHub on Unity 2019.4+. Note that you won't be able to receive updates through Package Manager this way, you'll have to update manually.
- Open Package Manager (Window > Package Manager)
- Click +
- Select Add from Git URL
- Paste
https://github.com/Inspiaaa/UnityHFSM.git#upmfor the latest stable release (recommended)https://github.com/Inspiaaa/UnityHFSM.gitfor the development versionhttps://github.com/Inspiaaa/UnityHFSM.git#v1.8.0for a specific version (v1.8.0here)
- Click Add
- Tip: If you're using VSCode and you're not getting any IntelliSense, you may have to regenerate the
.csprojproject files (Edit > Preferences > External Tools > Regenerate project files)
Here's a simple state machine for an enemy spy in a game.
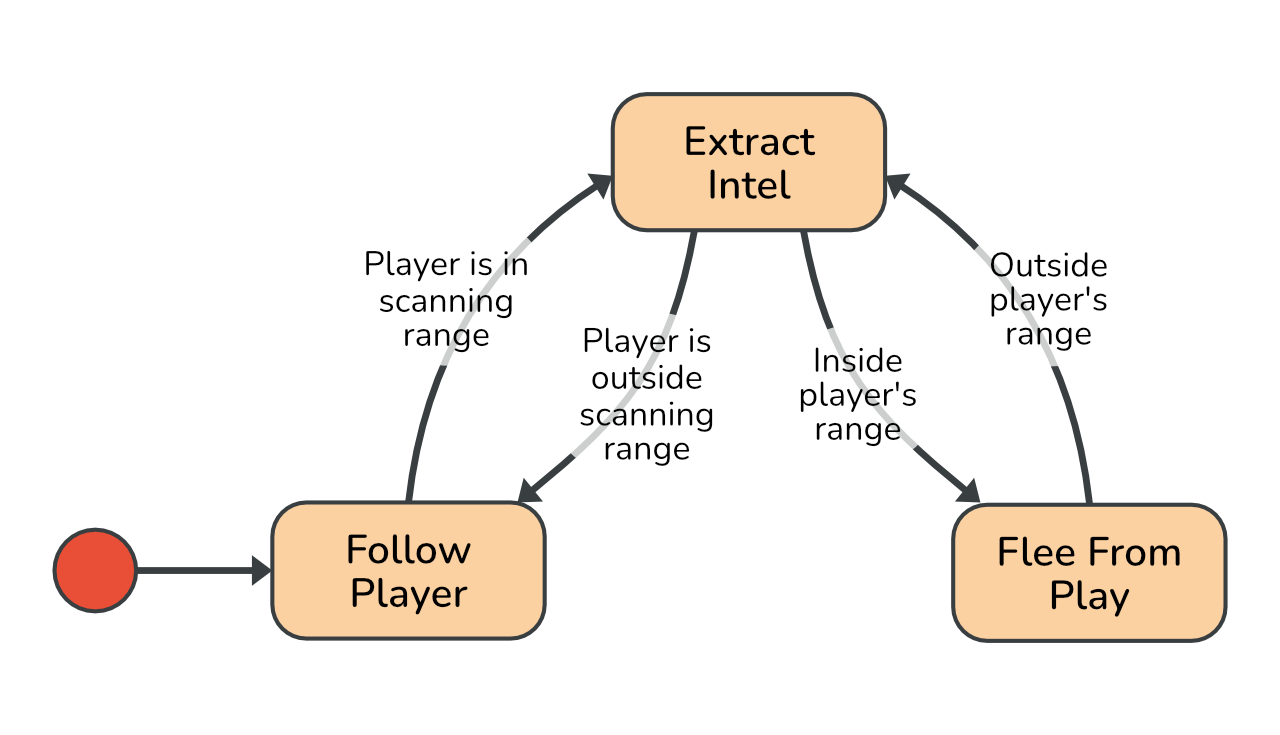
As you can see, the enemy will try to stay outside of the player's viewing range while extracting intel. When the player goes too far away, it will follow the player again.
-
Create the state machine:
fsm = new StateMachine();
-
Add states: Each state is represented by a
StateBaseobject. You can either use one of the built-in state classes (e.g. theStateclass) to define the state's logic or write a custom class that inherits fromStateBase.fsm.AddState( name, new State( onEnter, onLogic, onExit ) );
-
Add transitions: Transitions can be defined using
TransitionBaseobjects. They determine when and under which conditions the state machine should switch to another state. As with the states, the simplest option is to use one of the builtin transition types (e.g. theTransitionclass). If you instead choose to create a custom transition class by inheriting fromTransitionBase, see the class-based architecture section for more information.fsm.AddTransition( new Transition( from, to, condition ));
-
Initialise the state machine
fsm.SetStartState(id);
fsm.Init();
-
Run the state machine:
void Update() {
    fsm.OnLogic()
}
using System.Collections;
using System.Collections.Generic;
using UnityEngine;
using UnityHFSM;  // Import the required classes for the state machine.

public class EnemyController : MonoBehaviour
{
    private StateMachine fsm;

    public float playerScanningRange = 4f;
    public float ownScanningRange = 6f;

    void Start()
    {
        fsm = new StateMachine();
    }
}To be able to define the states' logic concisely, we'll need to create some helper methods and properties first. Their implementation is just an example and may differ for your scene setup.
Vector2 PlayerPosition => PlayerController.Instance.transform.position;

float DistanceToPlayer => Vector2.Distance(PlayerPosition, transform.position);

void MoveTowardsPlayer(float speed) {
    transform.position = Vector2.MoveTowards(
        transform.position,
        PlayerPosition,
        speed * Time.deltaTime
    );
}
Next, we can define the states in the Start method:
void Start()
{
    fsm = new StateMachine();

    // Empty state without any logic.
    fsm.AddState("ExtractIntel");

    fsm.AddState("FollowPlayer", new State(
        onLogic: state => MoveTowardsPlayer(1)
    ));

    fsm.AddState("FleeFromPlayer", new State(
        onLogic: state => MoveTowardsPlayer(-1)
    ));

    // This configures the entry point of the state machine.
    fsm.SetStartState("FollowPlayer");
}
Notice the fsm.AddState("ExtractIntel") call. Interestingly, we don't need to pass in a state object here. This is due to one of the many "shortcut" methods that UnityHFSM provides. These are meant to reduce the amount of boilerplate code required for common operations, such as adding blank states. The above line is equivalent to writing:
fsm.AddState("ExtractIntel", new StateBase<string>(needsExitTime: false));Furthermore, we can actually shorten the other state definitions even more by using shortcut methods. We can for example write the FollowPlayer state in a more concise way:
fsm.AddState("FollowPlayer", onLogic: state => MoveTowardsPlayer(1));Although this example is using lambda expressions for the states' logic, you can of course also just pass normal functions.
void Start()
{
    // ...

    fsm.AddTransition(new Transition(
        "ExtractIntel",
        "FollowPlayer",
        transition => DistanceToPlayer > ownScanningRange
    ));

    fsm.AddTransition(new Transition(
        "FollowPlayer",
        "ExtractIntel",
        transition => DistanceToPlayer < ownScanningRange
    ));

    fsm.AddTransition(new Transition(
        "ExtractIntel",
        "FleeFromPlayer",
        transition => DistanceToPlayer < playerScanningRange
    ));

    fsm.AddTransition(new Transition(
        "FleeFromPlayer",
        "ExtractIntel",
        transition => DistanceToPlayer > playerScanningRange
    ));
}
Although the above code snippet is definitely functional, you may notice that it seems a bit overly verbose and repetitive. That's because it is. We can do better!
Firstly, as creating transitions with the Transition class is so common, there are shortcut methods to minimise the amount of boilerplate code. The first transition is equivalent to writing:
fsm.AddTransition("ExtractIntel", "FollowPlayer",
    transition => DistanceToPlayer > ownScanningRange);
Secondly, it is a common pattern to define a transition in one direction when a condition is true, and in the other direction when it is false. UnityHFSM provides a special feature to implement this in code: two way transitions. Using a combination of this feature and shortcut methods we can reduce the original code snippet to the following:
fsm.AddTwoWayTransition("ExtractIntel", "FollowPlayer",
    transition => DistanceToPlayer > ownScanningRange);

fsm.AddTwoWayTransition("ExtractIntel", "FleeFromPlayer",
transition => DistanceToPlayer < playerScanningRange);void Start()
{
// ...
// Initialises the state machine and must be called before OnLogic()
// is called.
fsm.Init();
}
void Update()
{
fsm.OnLogic();
}At this point, the basic version of the enemy controller is finished and ready to use :D
By the way, using all of the aforementioned tricks, the entire definition of the state machine can be reduced to remarkably few lines of code:
void Start()
{
    fsm = new StateMachine();

    fsm.AddState("ExtractIntel");
    fsm.AddState("FollowPlayer", onLogic: state => MoveTowardsPlayer(1));
    fsm.AddState("FleeFromPlayer", onLogic: state => MoveTowardsPlayer(-1));

    fsm.SetStartState("FollowPlayer");

    fsm.AddTwoWayTransition("ExtractIntel", "FollowPlayer",
        transition => DistanceToPlayer > ownScanningRange);
    fsm.AddTwoWayTransition("ExtractIntel", "FleeFromPlayer",
        transition => DistanceToPlayer < playerScanningRange);

    fsm.Init();
}When dealing with more complex behaviour, it is natural to break the problem down into sub-problems. This approach maps beautifully to state machines. First you define the states and then in a later step you can add the logic and behaviour to them. When designing a state, it can sometimes be useful to draw another state diagram just for it and to think about how you can break down its behaviour. The result of this is a hierarchy of states - a hierarchical state machine.
How can we implement this in UnityHFSM?
Because the StateMachine class inherits from StateBase, it can be treated as a normal state. This allows for the nesting of state machines together with states. On top of this, UnityHFSM provides additional features to describe the timing / exit conditions for a state machine (more on this later).
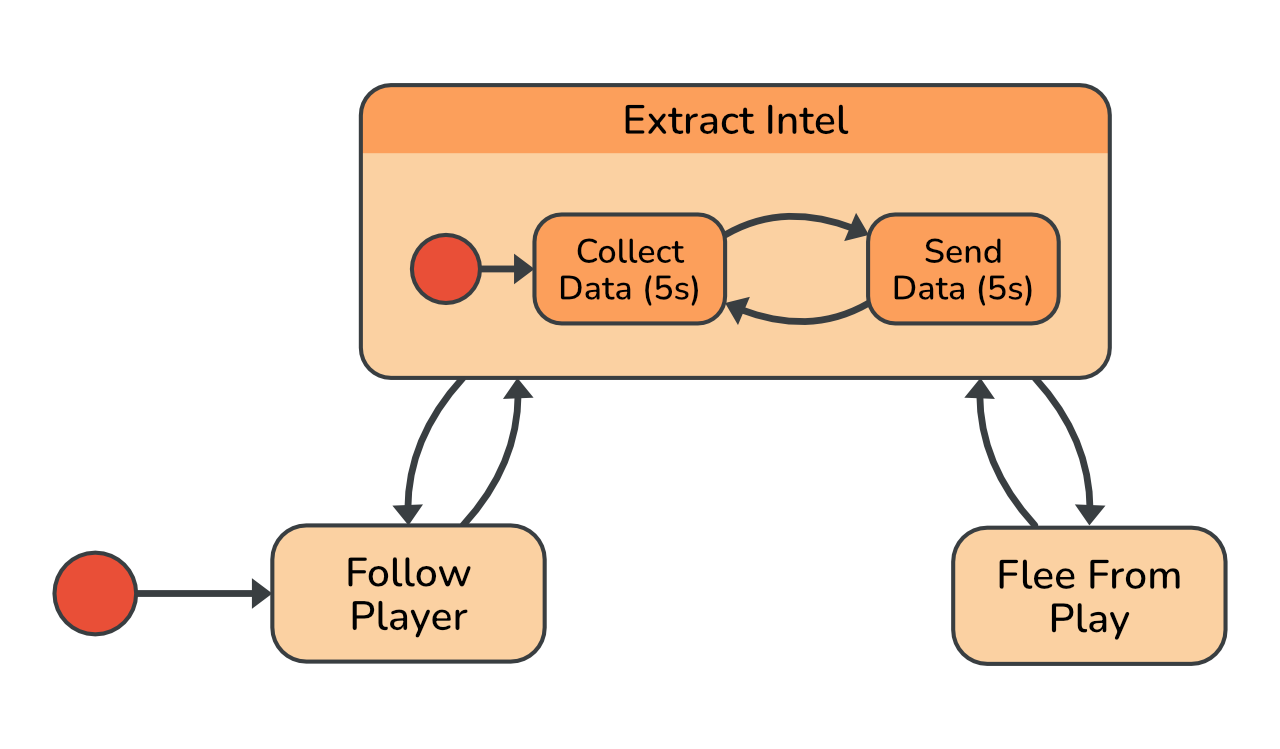
In the previous example, we left the Extract Intel state empty. Let's change this. When extracting intel, the spy should first collect data and then send it, repeating the process once completed.
So that you can see a visual difference, let's make it that the enemy spins when it enters the Send Data state, like it's sending the data out in all directions.
-
Create a separate state machine for the nested states (States in
Extract Intel) -
Add the nested states to the new state machine
-
Add the new state machine to the main state machine as a normal state
void Start()
{
    // This is the main state machine.
    fsm = new StateMachine();

    // This is the nested state machine.
    var extractIntel = new StateMachine();
    fsm.AddState("ExtractIntel", extractIntel);

    // ...
}We want the enemy to stay in the CollectData and in the SendData state for 5 seconds each. There are a few ways we can implement this.
One option would be to use the built-in TransitionAfter class to define a transition that only activates after a certain delay. Using it would look like this:
extractIntel.AddTransition(new TransitionAfter("CollectData", "SendData", 5));Another option could be to use UnityHFSM's timing features. We can add transitions that do not have a condition and should therefore make the state machine instantly advance to the next state. At the same time, we declare that the CollectData and SendData states require "exit time", meaning that the transitions should only occur once the active state is ready and can cleanly exit. See the code snippet below and the next section for more details.
void RotateAtSpeed(float speed)
    => transform.eulerAngles += new Vector3(0, 0, speed * Time.deltaTime);

void Start()
{
    fsm = new StateMachine();

    var extractIntel = new StateMachine();
    fsm.AddState("ExtractIntel", extractIntel);

    extractIntel.AddState("SendData",
        onLogic: state => {
            // When the state has been active for more than 5 seconds,
            // notify the fsm that the state can cleanly exit.
            if (state.timer.Elapsed > 5)
                state.fsm.StateCanExit();

            // Make the enemy turn at 100 degrees per second.
            RotateAtSpeed(100f);
        },
        // This means the state won't instantly exit when a transition should
        // happen but instead the state machine waits until it is given permission
        // to change state.
        needsExitTime: true
    );

    extractIntel.AddState("CollectData",
        // The canExit function is another way to define when the state is
        // allowed to exit (it calls `fsm.StateCanExit()` internally).
        canExit: state => state.timer.Elapsed > 5,
        needsExitTime: true
    );

    extractIntel.SetStartState("CollectData");

    // A transition without a condition.
    extractIntel.AddTransition("SendData", "CollectData");
    extractIntel.AddTransition("CollectData", "SendData");

    // ...
}The timing of state changes is controlled by the active state's needsExitTime property.
When needsExitTime = false, the state can exit at any point in time, e.g. because of a transition, regardless of its current internal state.
When needsExitTime = true, this cannot happen. It indicates to the state machine, that it may need more time before it is ready to exit. Any transition that should happen is delayed and becomes the "pending transition". This is very useful when you do not want an action to be interrupted before it has ended, like in the above case. (This can be skipped / overridden by forcing a transition using forceInstantly = true).
But when is the right time for the state machine to finally change states? This is where the fsm.StateCanExit() method comes. Calling fsm.StateCanExit() notifies the state machine that the state can cleanly exit. If a transition is pending, it will be executed.
Here's what happens in the general case when a transition should happen:
-
The state machine calls
activeState.OnExitRequest(). If the state can exit, it should callfsm.StateCanExit(). -
If the state couldn't exit when
OnExitRequest()was called, the active state has to notify the state machine at a later point in time that it can exit by calling thefsm.StateCanExit()method. This can e.g. happen in anOnLogiccall or when an event is triggered.
flowchart TD
  Start([Transition]) --> NeedsExitTime{"Does active state<br>need exit time?"}

  NeedsExitTime -->|No| End([Change State])

  NeedsExitTime -->|Yes| OnExitRequest["FSM calls<br> activeState.OnExitRequest()"]
  OnExitRequest --> StateCanExit{"Does the active state <br> call fsm.StateCanExit()?"}
  StateCanExit -->|Yes| End
  StateCanExit -->|No| Later

  subgraph "Delayed State Change"
    Later["Later in<br>OnLogic / an event / ..."]
    Later --> CallStateCanExit["fsm.StateCanExit()"]
  end

  CallStateCanExit --> End
Another quality of life feature is the canExit property of the State class. It allows you to write in a declarative way when the state is ready to exit. Internally, the passed canExit function is called on each exit request and on each logic call if a transition is pending. If it returns true, it calls fsm.StateCanExit(). In the above example, the SendData code could look like this using this feature:
extractIntel.AddState("SendData",
    onLogic: state => RotateAtSpeed(100f),
    canExit: state => state.timer.Elapsed > 5,
    needsExitTime: true
);Warning: This is one of the most advanced and complex features of UnityHFSM. The other chapters are easier to follow.
Although the CollectData and SendData states both have their needsExitTime properties set to true, the state machine will instantly exit them, if the player moves too close or too far away. After all, nested state machine that holds these two states does not have its own needsExitTime property set to true.
To fix this, we can simply set needsExitTime = true in the ExtractIntel state machine. This however raises another question: When is the nested state machine allowed to exit? And how can we indicate that it is allowed to exit?
The answer is by using exit transitions. These are special transitions that are only checked, when the parent state machine has a pending transition - in other words: when the parent state machine wants the nested state machine to exit. When the transition succeeds, the nested state machine exits so that the parent state machine can transition to its next state. To be exact, the nested state machine only exits when an exit transition succeeds and its currently active state is ready to exit (which is always true when needsExitTime = false, otherwise when StateCanExit() is called).
Let's use this feature in our example. Here's what we'll be doing:
-
While collecting data, the spy should be able to exit the
ExtractIntelstate at any time. This can be achieved by adding an exit transition fromExtractIntel. -
Once all the data has been collected, it should send it out, regardless of where the player is. It does not matter if the player is too far away, as the data has already been collected. To keep it simple, let's make it that the enemy also tries to finish the sending phase, even if it risks being discovered by the player by getting to close.
![]()
Firstly, we'll edit the Start method so that the nested state machine has needsExitTime set to true:
var extractIntel = new StateMachine(needsExitTime: true);Secondly, the state machine should be able to exit CollectData at any time, meaning that its needsExitTime should be set to false. This means that we'll also need to use a TransitionAfter transition later.
extractIntel.AddState("CollectData"); // needsExitTime = false by defaultFinally, we also have to add the transitions. The SendData --> CollectData transition can stay the same. As CollectData can instantly exit now (needsExitTime = false), but we only want to transition to SendData after 5 seconds, we'll have to use a TransitionAfter transition. Furthermore, we have to add the exit transition.
extractIntel.AddTransition("SendData", "CollectData");

// Exit transition without a condition.
extractIntel.AddExitTransition("CollectData");

extractIntel.AddTransition(new TransitionAfter("CollectData", "SendData", 5));
In the above code snippet, there are two important things to note:
-
The line adding the exit transition uses a shortcut method. It's roughly the same as writing:
extractIntel.AddExitTransition(new Transition("CollectData", ""));
We don't need to define a condition, as it won't be checked unless the main state machine is trying to transition from
ExtractIntelto another state. -
The order of the transitions matters. Transitions that are added first, are also checked first and therefor have a higher precedence. In this case, we want to prioritise exit transition over the normal transition to the
SendDatastate, hence it is added first.
Tip: When debugging a complex hierarchical state machine, it can be really handy to know not only which state is active in the root state machine (using
fsm.ActiveStateName) but also which states are active in nested state machines.That's why UnityHFSM has a feature to do just this:
print(fsm.GetActiveHierarchyPath());Example output:
/ExtractIntel/CollectData.Then you can use this on each
Update()call to debug the state machine.
How could we change the code so that the enemy spy aborts sending the data when the player gets too close? This means that we would want to instantly exit the ExtractIntel state and go to the FleeFromPlayer state. This requires us to override the needsExitTime property of ExtractIntel by marking its outbound transition to FleeFromPlayer as a forced transition with forceInstantly = true.
fsm.AddTwoWayTransition("ExtractIntel", "FleeFromPlayer",
    transition => DistanceToPlayer < playerScanningRange,
    forceInstantly: true);
To keep it simple, the transitions between ExtractIntel and FleeFromPlayer are forced in both directions (because we're using a two way transition). In our example it does not make any difference. However, if you wanted to only force it in one direction, you could simply create two separate transitions.
The state machine supports three ways of changing states:
-
Using
Transitionobjects as described earlier. You can even have multiple transitions that connect the same two states. They are checked on everyOnLogiccall and can be seen as a type of polling.fsm.AddTransition( new Transition( from, to, condition ) );
-
Calling the
RequestStateChangemethod: Instead of usingTransitionobjects to manage state changes, each state can individually also manage its own transitions by directly calling theRequestStateChangemethod.fsm.RequestStateChange(state, forceInstantly: false);
Example
fsm.AddState("FollowPlayer", new State(
    onLogic: (state) =>
    {
        MoveTowardsPlayer(1);

        if (DistanceToPlayer() < ownScanningRange)
        {
            fsm.RequestStateChange("ExtractIntel");
        }
    }
));
-
Using "Trigger Transitions": These are normal transitions that are only checked when a certain trigger (an event) is activated.
These are really handy when a polling-based solution does not fit or is not efficient enough. Trigger Transitions let you effortlessly leverage the efficiency of event-based transitions, in combination with the full power of the existing high-level transition types.
fsm.AddTriggerTransition(triggerName, transition);
Example
// Flappy Bird Example
fsm.AddTriggerTransition(
    "OnCollision",
    new Transition("Alive", "Dead")
);

// Later
fsm.Trigger("OnCollision");
Therefore UnityHFSM supports both polling-based and event-based transitions, as well as the feature to bypass the concept of transitions all together. That's pretty cool.
There is also a slight variation of the Transition state change behaviour, that allows you to change to a specific state from any other state (a "global" transition as opposed to a "local" / "direct" transition). They have the same forceInstantly / needsExitTime handling as normal transitions.
fsm.AddTransitionFromAny( new Transition(
    from,
    to,
    condition
));

// For Trigger Transitions
fsm.AddTriggerTransitionFromAny(
    triggerName,
    transition
);
Example
fsm.AddTransitionFromAny( new Transition(
    "",    // From can be left empty, as it has no meaning in this context
    "Dead",
    t => (health <= 0)
));

// For Trigger Transitions
fsm.AddTriggerTransitionFromAny(
    "OnDamage",
    new Transition("", "Dead", t => (health <= 0))
);Every StateMachine's OnLogic method manages the automatic transitions via Transition (TransitionBase) objects and the active state's logic function.
Here's what happens:
-
The state machine checks all global transitions (transitions from any state) and sees if a transition should occur. If this is the case, the state machine will advance to the new state, and call the new state's
OnLogicfunction. -
If this is not the case, the fsm checks all direct transitions (transitions that go directly from the active state to another state) and sees if a transition should occur. If this is the case, the state machine will move on to the new state, and call the new state's
OnLogicfunction. -
If this is not the case, the fsm will finally call the currently active state's
OnLogicfunction.
Because global transitions are checked first, they have the highest priority. The reason for this design decision can be illustrated with the following example: When the health of the player drops below 0, regardless of which state the fsm is in, it should transition to the Dead state.
As you can see on the steps mentioned above, only one transition can occur per OnLogic call. This has many reasons, one of which being that the state machine does not get stuck in an infinite loop.
flowchart TD
    Start([OnLogic])
    GlobalTransitions{Is a global<br>transition triggered?}
    LocalTransitions{Is a direct<br>transition triggered?}
    ActiveState["ActiveState.OnLogic()"]
    Transition
    NewState["NewState.OnLogic()"]
    Return([Return])

    Start --> GlobalTransitions
    GlobalTransitions --> |No| LocalTransitions
    GlobalTransitions --> |Yes| Transition
    LocalTransitions -->  |No| ActiveState
    LocalTransitions -->  |Yes| Transition

    Transition --> NewState

    ActiveState --> Return
    NewState --> Return
There is however a way to perform multiple transitions in one OnLogic call: As soon as the state machine enters a state that is marked as a "ghost state", it will instantly try all of its outbound transitions. If any one succeeds, it will instantly transition to the next state.
Example:
fsm.AddState("A");
fsm.AddState("B", new State(isGhostState: true));
fsm.AddState("C");

fsm.AddTriggerTransition("Event", "A", "B");
fsm.AddTransition("B", "C");
At a later point, when Event is triggered, the state machine will exit A, enter B, exit B, enter C and finally call the OnLogic method of C:
fsm.Trigger("Event");By using the CoState class you can run coroutines. This class handles the following things automatically:
-
Starting the coroutine
-
Optional: Running the coroutine again once it has completed
-
Terminating the coroutine when the state exits
As a result of a limitation of the C# language, you can sadly not use lambda expressions to define IEnumerators (=> coroutines).
Here's how we could use it in our example: We can replace the SendData state with a more advanced one, which makes the spy turn in one direction for two seconds, and then in the other direction for the same duration.
IEnumerator SendData()
{
    var timer = new Timer();

    while (timer.Elapsed < 2)
    {
        RotateAtSpeed(100f);
        // Wait until the next frame.
        yield return null;
    }

    while (timer.Elapsed < 4)
    {
        RotateAtSpeed(-100f);
        yield return null;
    }

    // Because needsExitTime is true, we have to tell the FSM when it can
    // safely exit the state.
    fsm.StateCanExit();
}

void Start()
{
    // ...

    extractIntel.AddState("SendData", new CoState(
        this,   // Pass in the MonoBehaviour that should run the coroutine.
        SendData,
        loop: true,  // Repeat the coroutine once finished.
        needsExitTime: true
    ));

    // ...
}
The CoState class also allows you to pass in an iterator function that takes the CoState as a parameter. One of the side-effects of the way the UnityHFSM is internally implemented regarding its inheritance hierarchy and its support for generics, is that the function has to take the state as a CoState<string, string> object and not simply as CoState:
IEnumerator SendData(CoState<string, string> state)
{
    // ...
}
Tip: When designing your state machine, it can sometimes be difficult to decide when to use a nested state machine and when to use a coroutine via
CoState. Although both can usually achieve the desired outcome, one may be a lot simpler to implement than the other. As a rule of thumb, use a coroutine if you notice that your state diagram resembles a flowchart, otherwise use a hierarchical state machine.
UnityHFSM is fundamentally designed in an object-oriented manner which allows you to easily create custom state and transition types. By simply inheriting from the common base classes (StateBase, TransitionBase), custom states and transitions can be developed. This is also how the built-in state and transition types, such as CoState and TransitionAfter, have been implemented internally.
Here's an overview over the methods you can override:
Creating custom states
class CustomState : StateBase
{
    public CustomState()
        : base(needsExitTime: false, isGhostState: false) { }

    public override void Init() { }

    public override void OnEnter() { }
    public override void OnLogic() { }
    public override void OnExit() { }

    public override void OnExitRequest() { }
}
Creating custom transitions
class CustomTransition : TransitionBase
{
    public CustomTransition(string from, string to)
        : base(from, to, forceInstantly: false) { }

    public override bool ShouldTransition() { return true; }

    public override void Init() { }

    public override void BeforeTransition() { }
    public override void AfterTransition() { }
}UnityHFSM also provides first-class support for generics. This means that if you do not want to use strings for the state identifiers and the events, you can easily use a different datatype, e.g. int, enums, custom classes, even booleans...
Advantages of using types other than string:
-
It can improve the safety of your state machine as it can prevent the issue of typos in the string state names leading to errors. Using enums can ensure that the state identifiers are checked at compile-time.
-
It can offer a better mapping to different kinds of problems, e.g. using
intevents for HTTP response status codes instead of strings. -
It can greatly improve the base performance of state machines. Using ints or enums as the state identifiers can speed up the internal mechanics by up to 50% depending on the use case.
Side note: UnityHFSM is already highly optimised and in most cases the time spent in the user's code far outweighs the internal time spent performing transitions / update calls in the state machine. However, in the rare case where reducing the execution time by a few nanoseconds makes a difference, you can use ints or enums to reduce UnityHFSM's overhead to a minimum.
Every nested state machine can use its own type for the state identifiers (TStateId). The only thing that all state machines in a given hierarchy have to share, is the type for the triggers / events (TEvent), so that they can be passed down the hierarchy.
To realise this, the StateMachine class takes 3 generic type parameters: TOwnId, TStateId and TEvent. TStateId is the type for the state names in a state machine, i.e. of its child states. If you use a state machine as a state (-> it would be a nested state machine), it itself needs an identifier for the parent state machine. This is the TOwnId type parameter. Lastly TEvent is the type for the triggers and events. The order of the parameters is: StateMachine<TOwnId, TStateId, TEvent>.
There are also multiple overloads for the StateMachine class that reduce the boilerplate code needed to get started:
-
StateMachine=StateMachine<string, string, string> -
StateMachine<TStateId>=StateMachine<TStateId, TStateId, string> -
StateMachine<TStateId, TEvent>=StateMachine<TStateId, TStateId, TEvent>
Here's a small example that shows how you can mix different types:
enum PlayerStates {
    IDLE, MOVE, JUMP
}

enum MoveStates {
    WALK, DASH
}

enum Events {
    ON_DAMAGE, ON_WIN
}
var fsm = new StateMachine<PlayerStates, Events>();
var moveFsm = new StateMachine<PlayerStates, MoveStates, Events>();
var idleFsm = new StateMachine<PlayerStates, string, Events>();
fsm.AddState(PlayerStates.IDLE, idleFsm);
fsm.AddState(PlayerStates.MOVE, moveFsm);
fsm.AddState(PlayerStates.JUMP, new State<PlayerStates, Events>());
// Or simply using shortcut methods: fsm.AddState(PlayerStates.JUMP);
moveFsm.AddState(MoveStates.WALK);
moveFsm.AddState(MoveStates.DASH);
moveFsm.AddTransition(new Transition<MoveStates>(MoveStates.WALK, MoveStates.DASH));
// Or simply: fsm.AddTransition(MoveStates.WALK, MoveStates.DASH);
idleFsm.AddState("Animation 1", new State<string, Events>());
idleFsm.AddState("Animation 2");
// ...UnityHFSM has a test suite that can be run from Unity's Test Runner window.
-
Open Window > General > Test Runner
-
To run the tests, click the Run All button
For more documentation check out the Wiki.