Transformalize automates the movement of data into data warehouses, search engines, and other value-adding systems.
It works with many data sources:
| Relational | Non-Relational | ||||||||||||||||||||||||||||||||||||||||||||||||||||||
|---|---|---|---|---|---|---|---|---|---|---|---|---|---|---|---|---|---|---|---|---|---|---|---|---|---|---|---|---|---|---|---|---|---|---|---|---|---|---|---|---|---|---|---|---|---|---|---|---|---|---|---|---|---|---|---|
|
|
Note: The providers are being moved into plug-ins.
Jobs are arranged in XML or JSON and executed with a CLI or an Orchard CMS module.
- Introducing
<connections/><entities/>- and the
tfl.execommand line interface
I use the Northwind relational database for demonstration. To follow along, you need:
- the latest release of Transformalize.
- NorthWind on a local instance of SQL Server
- an editor (recommended: Visual Studio Code with Transformalize extension)
- a SQLite tool (e.g. DB Browser for SQLite)
First, get familiar with Northwind:

The diagram shows eight normalized tables. Focus on Order Details because:
- It contains sales transactions (money).
- It's related to everything.
- In data-warehousing terms, it's a fact table.
Open your editor and paste this in:
<cfg name="NorthWind">
  <connections>
    <add name="input"
         provider="sqlserver"
         server="localhost"
         database="NorthWind" />
  </connections>
  <entities>
    <add name="Order Details" />
  </entities>
</cfg>
The arrangment above defines the input as Northwind's Order Details table. Save it as NorthWind.xml and use tfl.exe to run it:
> tfl -a NorthWind.xml
OrderID,ProductID,UnitPrice,Quantity,Discount
10248,11,14.0000,12,0
10248,42,9.8000,10,0
10248,72,34.8000,5,0
10249,14,18.6000,9,0
10249,51,42.4000,40,0
...
- Introducing
<fields/>within<entities/>- Specifying modes with the
-mflagcheckmode
Transformalize detected the fields and read the data.
This is handy, but if you want to modify or
create new fields, you must define your input fields.
You could hand-write them, or run tfl in check mode like this:
> tfl -a NorthWind.xml -m check
...
<fields>
  <add name="OrderID" type="int" primarykey="true" />
  <add name="ProductID" type="int" primarykey="true" />
  <add name="UnitPrice" type="decimal" precision="19" scale="4" />
  <add name="Quantity" type="short" />
  <add name="Discount" type="single" />
</fields>
...
Instead of getting order details (the records), check mode
returns the detected fields. Copy them into the arrangement
like this:
<cfg name="NorthWind">
  <connections>
    <add name="input" provider="sqlserver" database="NorthWind"/>
  </connections>
  <entities>
    <add name="Order Details">
      <!-- copy/paste the fields here -->
      <fields>
        <add name="OrderID" type="int" primary-key="true" />
        <add name="ProductID" type="int" primary-key="true" />
        <add name="UnitPrice" type="decimal" precision="19" scale="4" />
        <add name="Quantity" type="short" />
        <add name="Discount" type="single" />
      </fields>
    </add>
  </entities>
</cfg>
- Introducing The
<calculated-fields/>section within<entities/>- The
tattribute (short for transformation)- and th
jsandroundtransformations
Now you may calculate a new field. Place <calculated-fields/> right after <fields/> and add Revenue like this:
<calculated-fields>
  <add name="Revenue"
       type="decimal"
       t="js(Quantity * ((1-Discount) * UnitPrice)).round(2)" />
</calculated-fields>
Now run tfl:
> tfl -a NorthWind.xml
OrderID,ProductID,UnitPrice,Quantity,Discount,Revenue
10248,11,14.0000,12,0,168
10248,42,9.8000,10,0,98
10248,72,34.8000,5,0,174
10249,14,18.6000,9,0,167.4
10249,51,42.4000,40,0,1696
...
Revenue is created by the js (JavaScript) and round transformations. You may chain transformations as long as the output of one is compatible with the input of another.
Note: Transforms are being moved into plug-ins (e.g. Jint, C#, Humanizer, LambdaParser, etc.).
Introducing
initmode
Without defining an output, tfl writes to console. To save output, define the output as a SQLite database. Add an output in <connections/>:
<connections>
    <add name="input" provider="sqlserver" database="NorthWind"/>
    <!-- add it here -->
    <add name="output" provider="sqlite" file="c:\temp\NorthWind.sqlite3" />
</connections>Initializing does three things:
- destroys pre-existing output structures
- creates output structures
- bulk inserts data.
Initializing is required anytime you create or change an arrangement's output structure.
To initialize, run tfl in init mode using the -m flag like this:
> tfl -a NorthWind.xml -m init
warn  | NorthWind | Order Details | Initializing
info  | NorthWind | Order Details | 2155 from input
info  | NorthWind | Order Details | 2155 inserts into output Order Details
info  | NorthWind | Order Details | Ending 00:00:00.67
Writing Order Details into SQLite frees up the console for logging.
Transformalize doesn't map input to pre-existing output. Instead, it creates a consistent output structure that is optimized for incremental updates.
You decide:
- what new fields to calculate
- the order of fields
- the name of fields (using
alias) - the transformation and/or validation of fields
- and the output of field (using
output="true|false")
Introducing the
versionattribute for anentity
An initialization is a full rebuild and may be time-consuming. So, by default, Transformalize performs incrementals. To determine if an update or
insert is necessary, tfl compares input with output.
While keys and hashes are used to compare, comparison is unnecessary when an input's provider is queryable and stores a record version. A version is a value in a row that increments anytime the row's data is updated. Many tables have these by design. If not, SQL Server includes a ROWVERSION type that may be added to provide automatic versioning. Add one to Order Details like this:
ALTER TABLE [Order Details] ADD [RowVersion] ROWVERSION;Now let tfl know about RowVersion like this:
<entities>
                            <!-- mark it here -->
  <add name="Order Details" version="RowVersion" >
    <fields>
      <add name="OrderID" type="int" primary-key="true" />
      <add name="ProductID" type="int" primary-key="true" />
      <add name="Discount" type="single" />
      <add name="Quantity" type="short" />
      <add name="UnitPrice" type="decimal" precision="19" scale="4"/>

      <!-- add (define) it here -->
      <add name="RowVersion" type="byte[]" length="8" />
    </fields>
  </add>
</entities>
Adding a field changes output structure, so re-initialize like so:
tfl -a NorthWind.xml -m init
warn  | NorthWind | Order Details | Initializing
info  | NorthWind | Order Details | 2155 from input
info  | NorthWind | Order Details | 2155 inserts into output
info  | NorthWind |               | Time elapsed: 00:00:00.70

>tfl -a NorthWind.xml
info  | NorthWind |               | Compiled NorthWind user code in 00:00:00.1064016.
info  | NorthWind | Order Details | Change Detected: No.
info  | NorthWind |               | Time elapsed: 00:00:00.20
With a version in place, the second run doesn't read and compare
un-changed data.
Relational data is normalized and stored in many tables. It's optimized for efficient storage and integrity. It may be queried, but not without an overhead of joining busy tables. This makes retrieval slower.
De-normalization is the process of joining related data back together. The data is pre-joined (and duplicated) to avoid joining tables at run-time. Retrieval of de-normalized data is faster.
The output of Order Details (above) is numeric. Some numbers
are foreign keys (e.g. ProductID, OrderID).
These refer to more descriptive information in related entities. Others are
measures (i.e. Quantity, UnitPrice).
To denormalize Order Details, we need to the foreign keys OrderID and ProductID to
retrieve the related information from Orders and Products (see diagram). This means we have
to add the Orders and Products entities to our arrangement.
Here is the process for adding entities:
- Identify or add a version field to the source if possible (optional)
- Add the entity to the
<entities/>section. - Run
tflincheckmode to get field definitions (optional). - Add the fields to your new entity (in the arrangement)
- Set the version attribute on the entity (optional)
- Relate the new entity to the first entity
Follow the first 5 steps to add Orders to the arrangement. When finished, the arrangement should have a new entity like this:
<add name="Orders" version="RowVersion">
  <fields>
    <add name="OrderID" type="int" primary-key="true" />
    <add name="CustomerID" length="5" />
    <add name="EmployeeID" type="int" />
    <add name="OrderDate" type="datetime" />
    <add name="RequiredDate" type="datetime" />
    <add name="ShippedDate" type="datetime" />
    <add name="ShipVia" type="int" />
    <add name="Freight" type="decimal" precision="19" scale="4" />
    <add name="ShipName" length="40" />
    <add name="ShipAddress" length="60" />
    <add name="ShipCity" length="15" />
    <add name="ShipRegion" length="15" />
    <add name="ShipPostalCode" length="10" />
    <add name="ShipCountry" length="15" />
    <add name="RowVersion" alias="OrdersRowVersion" type="byte[]" length="8" />
  </fields>
</add>
Next, tell Transformalize how to relate Order Details to Orders.
Introducing the
<relationships/>section
All entities must be related to the first entity in the <relationships/> section which
follows <entities/>. To relate Orders to Order Details, add this to your arrangement:
  <relationships>
    <add left-entity="Order Details"
         left-field="OrderID"
         right-entity="Orders"
         right-field="OrderID"/>
  </relationships>
This tells Transformalize to use OrderID to relate the two entities. Now re-initialize
and run Transformalize:
tfl -a NorthWind.xml -m init
warn  | NorthWind | Order Details | Initializing
warn  | NorthWind | Orders        | Initializing
info  | NorthWind | Order Details | 2155 from input
info  | NorthWind | Order Details | 2155 inserts into output
info  | NorthWind | Orders        | 830 from input
info  | NorthWind | Orders        | 830 inserts into output
info  | NorthWind |               | Time elapsed: 00:00:01.02

tfl -a NorthWind.xml
info  | NorthWind |               | Compiled NorthWind user code in 00:00:00.1124897.
info  | NorthWind | Order Details | Change Detected: No.
info  | NorthWind | Orders        | Change Detected: No.
info  | NorthWind |               | Time elapsed: 00:00:00.25
Logging indicates records were processed from Order Details and Orders. In addition,
a view called NorthWindStar is created. NorthWindStar joins Transformalize's
star-schema output so that it appears to be a
single entity.
Using a SQLite program, query NorthWindStar to make sure Transformalize is working:
SELECT
    ProductID,
    Discount,
    Quantity,
    UnitPrice,
    CustomerID,
    EmployeeID,
    Freight,
    OrderDate,
    RequiredDate,
    ShipAddress,
    ShipCity,
    ShippedDate,
    ShipPostalCode,
    ShipRegion,
    ShipVia
FROM NorthWindStar
LIMIT 10;
ProductId Discount Quantity UnitPrice CustomerID EmployeeID Freight OrderDate RequiredDate ShipAddress ... --------- -------- -------- --------- ---------- ---------- ------- --------- ------------ ----------- 11 0.0 12 14 VINET 5 32.38 1996-07-04 1996-08-01 59 rue de l'Abbaye 42 0.0 10 9.8 VINET 5 32.38 1996-07-04 1996-08-01 59 rue de l'Abbaye 72 0.0 5 34.8 VINET 5 32.38 1996-07-04 1996-08-01 59 rue de l'Abbaye 14 0.0 9 18.6 TOMSP 6 11.61 1996-07-05 1996-08-16 Luisenstr. 48 51 0.0 40 42.4 TOMSP 6 11.61 1996-07-05 1996-08-16 Luisenstr. 48 41 0.0 10 7.7 HANAR 4 65.83 1996-07-08 1996-08-05 Rua do Paço, 67 51 0.15 35 42.4 HANAR 4 65.83 1996-07-08 1996-08-05 Rua do Paço, 67 65 0.15 15 16.8 HANAR 4 65.83 1996-07-08 1996-08-05 Rua do Paço, 67 22 0.05 6 16.8 VICTE 3 41.34 1996-07-08 1996-08-05 2, rue du Commerce 57 0.05 15 15.6 VICTE 3 41.34 1996-07-08 1996-08-05 2, rue du Commerce
Introducing the
flattenattribute
Transformalize de-normalizes in two phases. First, it moves data from a relational model into a star-schema. Secondly, it moves data into a completely de-normalized (flat) output.
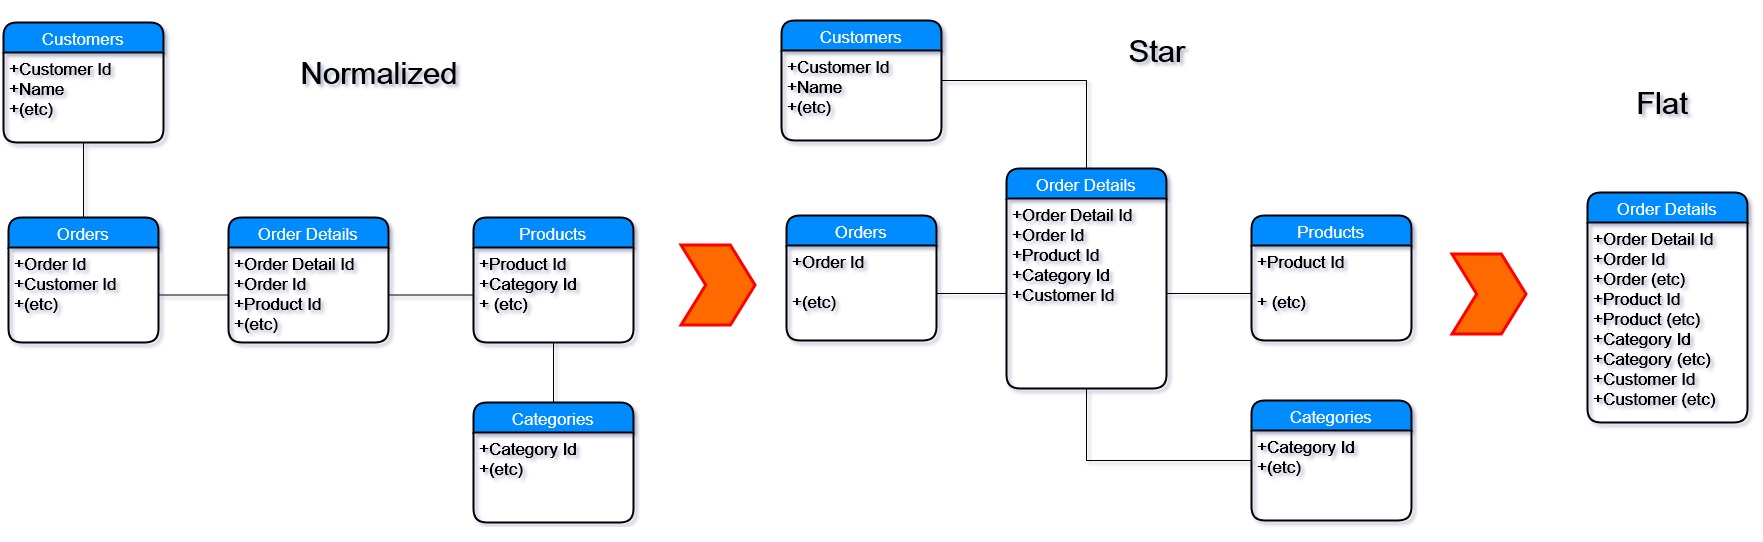
To create a star-schema, it moves the foreign keys to the center. Data retrieval is faster because everything is directly related.
To create a flat output, it moves everything to the center. Data retrieval is even faster because there aren't any relations.
To completely de-normalize, set flatten to true
in the main <cfg/> like this:
<cfg name="NorthWind" flatten="true">
    <!-- commented out for brevity -->
</cfg>
When you re-initialize, a single output structure named NorthWindFlat is created and populated. You may query it just as you queried NorthWindStar.
To add all the entities from NorthWind database (diagramed above), follow the Add an Entity process (above) for Products, Customers, Employees, Shippers, Suppliers, and Categories.
In the end, the relationships should look like this:
<relationships>
  <!-- following Orders to Customers, Employees, and Shippers -->
  <add left-entity="Order Details" left-field="OrderID" right-entity="Orders" right-field="OrderID" />
  <add left-entity="Orders" left-field="CustomerID" right-entity="Customers" right-field="CustomerID" />
  <add left-entity="Orders" left-field="EmployeeID" right-entity="Employees" right-field="EmployeeID" />
  <add left-entity="Orders" left-field="ShipVia" right-entity="Shippers" right-field="ShipperID" />

  <!-- following Products to Suppliers and Categories -->
  <add left-entity="Order Details" left-field="ProductID" right-entity="Products" right-field="ProductID" />
  <add left-entity="Products" left-field="SupplierID" right-entity="Suppliers" right-field="SupplierID" />
  <add left-entity="Products" left-field="CategoryID" right-entity="Categories" right-field="CategoryID" />
</relationships>
If you'd rather not do all that work, you can use this pre-created arrangement.
Now when you initialize and run Transformalize, there's a lot going on:
>tfl -a "c:\Temp\NorthWind.xml" -m init
warn  | NorthWind | Order Details | Initializing
warn  | NorthWind | Orders        | Initializing
warn  | NorthWind | Products      | Initializing
warn  | NorthWind | Customers     | Initializing
warn  | NorthWind | Employees     | Initializing
warn  | NorthWind | Shippers      | Initializing
warn  | NorthWind | Suppliers     | Initializing
warn  | NorthWind | Categories    | Initializing
info  | NorthWind | Order Details | 2155 from input
info  | NorthWind | Order Details | 2155 inserts into output
info  | NorthWind | Orders        | 830 from input
info  | NorthWind | Orders        | 830 inserts into output
info  | NorthWind | Products      | 77 from input
info  | NorthWind | Products      | 77 inserts into output
info  | NorthWind | Customers     | 91 from input
info  | NorthWind | Customers     | 91 inserts into output
info  | NorthWind | Employees     | 9 from input
info  | NorthWind | Employees     | 9 inserts into output
info  | NorthWind | Shippers      | 3 from input
info  | NorthWind | Shippers      | 3 inserts into output
info  | NorthWind | Suppliers     | 29 from input
info  | NorthWind | Suppliers     | 29 inserts into output
info  | NorthWind | Categories    | 8 from input
info  | NorthWind | Categories    | 8 inserts into output
info  | NorthWind |               | 2155 records inserted into flat
info  | NorthWind |               | Time elapsed: 00:00:02.66

>tfl -a "c:\Temp\NorthWind.xml"
info  | NorthWind | Order Details | Change Detected: No.
info  | NorthWind | Orders        | Change Detected: No.
info  | NorthWind | Products      | Change Detected: No.
info  | NorthWind | Customers     | Change Detected: No.
info  | NorthWind | Employees     | Change Detected: No.
info  | NorthWind | Shippers      | Change Detected: No.
info  | NorthWind | Suppliers     | Change Detected: No.
info  | NorthWind | Categories    | Change Detected: No.
info  | NorthWind |               | Time elapsed: 00:00:00.59
Let's simulate a data change:
USE [NorthWind];

UPDATE Customers
SET CompanyName = 'Bottom Dollar Markets'
WHERE CustomerID = 'BOTTM';
Now run Transformalize again:
>tfl -a "c:\Temp\NorthWind.xml"
info  | NorthWind | Order Details | Change Detected: No.
info  | NorthWind | Orders        | Change Detected: No.
info  | NorthWind | Products      | Change Detected: No.
info  | NorthWind | Customers     | Change Detected: Input: 0x75ad2 > Output: 0x73bb5
info  | NorthWind | Customers     | 1 from input
info  | NorthWind | Customers     | 1 to output
info  | NorthWind | Customers     | 1 updates to output
info  | NorthWind | Employees     | Change Detected: No.
info  | NorthWind | Shippers      | Change Detected: No.
info  | NorthWind | Suppliers     | Change Detected: No.
info  | NorthWind | Categories    | Change Detected: No.
info  | NorthWind |               | 35 records updated in flat
info  | NorthWind |               | Time elapsed: 00:00:00.74
Using the version, Transformalize picked up the one change in Customers. Since this customer has purchased 35 items (in Order Details), the flat table is updated as well.
Intrucing the
-s(schedule) flag
Most likely, you'll want to schedule incremantals so that the de-normalized data is current.
Transformalize uses Quartz.NET for this. Using
the -s schedule flag, pass in a cron expression
like this:
>tfl -a "c:\Temp\NorthWind.xml" -s "0/5 * * * * ?"
info  | Process   |                 Starting Scheduler: 0/5 * * * * ?
info  | NorthWind |               | Compiled NorthWind user code in 00:00:00.1032057.
info  | NorthWind | Order Details | Change Detected: No.
info  | NorthWind | Orders        | Change Detected: No.
... and just keeps running ...
This runs an incremental every five seconds until you press CTRL-C. If you
want to run Transformalize as a service, I recommend using NSSM.
- Introducing the
copytransform- the
dateParttransform- the
formattransform- the
toUppertransform
Most often, in addition to de-normalization, you'll need to transform records too. Transformalize de-normalizes and transforms at the same time (thus, the name).
Let's add some time dimension fields.
Modify the Orders entity to include a <calculated-fields/> section like this:
<calculated-fields>
  <add name="OrderYear" type="int" t="copy(OrderDate).datePart(year)" />
  <add name="OrderMonthSortable" t="format({OrderDate:MM-MMM}).toUpper()" />
  <add name="OrderDaySortable" t="format({OrderDate:yyyy-MM-dd})" />
  <add name="OrderDayOfWeek" t="copy(OrderDate).datePart(dayOfWeek)" />
</calculated-fields> Note: The copy method is mainly used to copy
other fields into your transformation. Generally speaking, when a
transform uses field names in it's expression (e.g. js, cs, and format),
you don't need to preceed it with a copy method.
After re-initializing, NorthWindFlat has some helpful time related fields that allow you to run queries like:
SELECT OrderDayOfWeek AS [Day], SUM(Revenue) AS [Sales]
FROM NorthWindFlat
GROUP BY OrderDayOfWeek
Day Sales Friday 284393.64 Monday 275256.90 Thursday 256143.26 Tuesday 272113.27 Wednesday 266546.72
Note that the query isn't dealing with joins or parsing dates. This is because we de-normalized it and pre-calculated useful fields.
- Introducing system fields in output
- the
read-onlyattribute
Transformalize must use a relation output to de-normalize (i.e. SQLite). However, now that it's flat, we can leverage the non-relational providers as well.
Transformalize records four system fields that may
be used by additional tfl arrangements and/or other systems:
- TflKey - a surrogate key (an auto-incrementing value)
- TflBatchId - a version number corresponding to
tflruns - TflHashCode - a numerical value calculated from every field (used for comparisons)
- TflDeleted - a boolean field tracking deletes (an optional setting)
Note: You can disable system fields by setting read-only
to true in the top-most <cfg/> element.
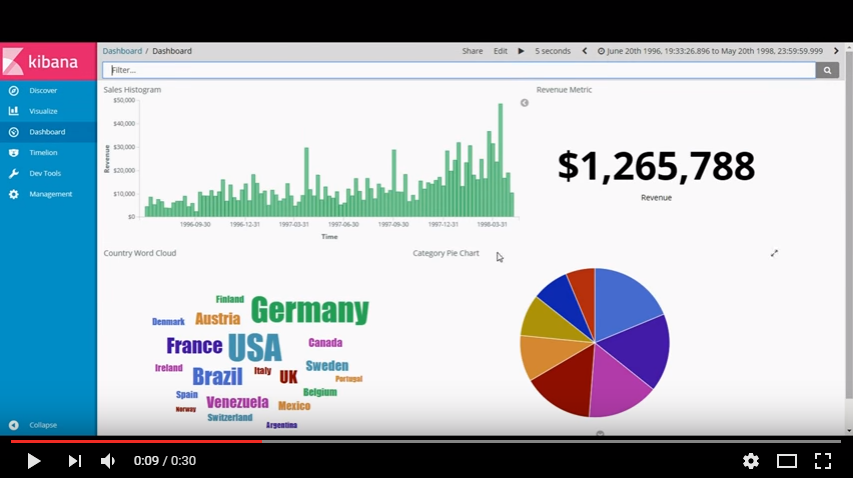
Introducing the elasticsearch provider
This section demonstrates how to load the flattened Northwind data into Elasticsearch and view it with Kibana.
Start a new arrangement with this in your XML editor:
<cfg name="NorthWind">
  <connections>
    <add name="input" provider="sqlite" file="c:\temp\NorthWind.sqlite3" />
    <add name="output"
         provider="elasticsearch"
         server="localhost"
         port="9200"
         index="NorthWind"
         version="5" />
  </connections>
  <entities>
    <add name="NorthWindFlat" version="TflBatchId" >
      <fields>
        <add name="TflKey" alias="Key" type="long" primary-key="true" />
        <add name="TflBatchId" alias="Version" type="long" />
        <add name="Revenue" type="decimal" precision="19" scale="2" />
        <add name="Freight" type="decimal" precision="19" scale="4" />
        <add name="OrderDate" type="datetime" />
        <add name="OrderYear" type="long" />
        <add name="OrderMonthSortable" />
        <add name="Country" length="15" />
        <add name="CategoryName" length="15" />
      </fields>
    </add>
  </entities>
</cfg>
This arrangement uses an elasticsearch output. Save as NorthWindToES.xml and run in it:
>tfl -a c:\temp\NorthWindToES.xml -m init
warn  | NorthWind | NorthWindFlat | Initializing
info  | NorthWind | NorthWindFlat | 2155 from input
info  | NorthWind | NorthWindFlat | 2155 to output
info  | NorthWind |               | Time elapsed: 00:00:02.40

>tfl -a c:\temp\NorthWindToES.xml
info  | NorthWind | NorthWindFlat | Starting
info  | NorthWind | NorthWindFlat | Change Detected: No.
info  | NorthWind |               | Time elapsed: 00:00:00.30
A quick query in your browser can confirm records loaded:
http://localhost:9200/northwind/northwindflat/_search?q=:&size=0
{
    "took": 2,
    "timed_out": false,
    "_shards": {
        "total": 5,
        "successful": 5,
        "failed": 0
    },
    "hits": {
        "total": 2155,
        "max_score": 0.0,
        "hits": []
    }
}
Kibana offers interactive dashboards based on Elasticsearch indexes. Here's a quick 30 second video:
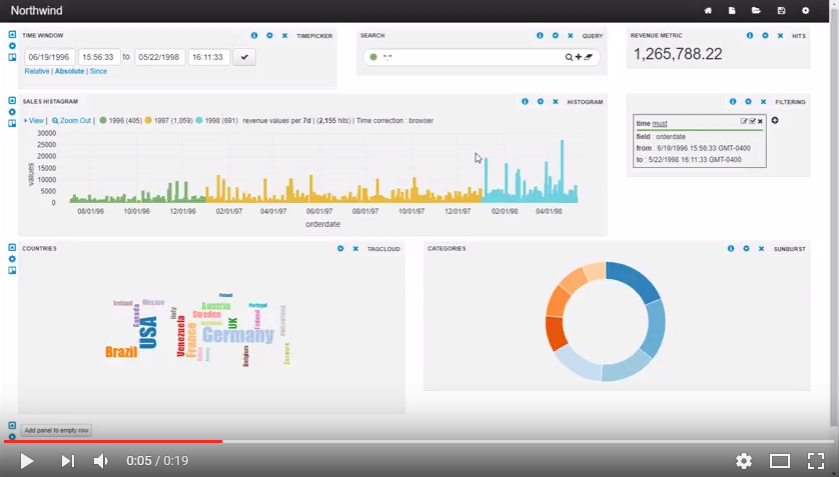
Introducing the solr provider
This section demonstrates how to load the flattened Northwind data into SOLR and view it with Banana.
Start a new arrangement with this in your XML editor:
<cfg name="NorthWind">
    <connections>
        <add name="input" provider="sqlite" file="c:\temp\NorthWind.sqlite3" />
        <add name="output"
             provider="solr"
             server="localhost"
             port="8983"
             path="solr"
             core="northwind"
             folder="C:\java\solr-6.6.0\server\solr" />
    </connections>
    <entities>
        <add name="NorthWindFlat" version="TflBatchId">
            <fields>
                <add name="TflKey" alias="Key" type="long" primary-key="true" />
                <add name="TflBatchId" alias="Version" type="long" />
                <add name="Revenue" type="decimal" precision="19" scale="2" />
                <add name="Freight" type="decimal" precision="19" scale="4" />
                <add name="OrderDate" type="datetime" />
                <add name="OrderYear" type="long" />
                <add name="OrderMonthSortable" />
                <add name="Country" length="15" />
                <add name="CategoryName" length="15" />
            </fields>
        </add>
    </entities>
</cfg>
Save as NorthWindToSOLR.xml and run:
>tfl -ac:\Temp\NorthWindToSOLR.xml -m init
info  | NorthWind | NorthWindFlat | Starting
info  | NorthWind | NorthWindFlat | 2155 from input
info  | NorthWind | NorthWindFlat | 2155 to output
info  | NorthWind | NorthWindFlat | Ending
info  | NorthWind |               | Time elapsed: 00:00:06

>tfl -ac:\Temp\NorthWindToSOLR.xml
info  | NorthWind | NorthWindFlat | Starting
info  | NorthWind | NorthWindFlat | Change Detected: No.
info  | NorthWind |               | Time elapsed: 00:00:00.285
A quick query in your browser can confirm the records loaded:
http://localhost:8983/solr/northwind/select?indent=on&q=:&rows=0&wt=json
{
    "responseHeader": {
        "status": 0,
        "QTime": 0,
        "params": {
            "q": "*:*",
            "indent": "on",
            "rows": "0",
            "wt": "json"
        }
    },
    "response": {
        "numFound": 2155,
        "start": 0,
        "docs": []
    }
}Similar to Kibana, Banana offers interactive dashboards. However, it's works against SOLR indexes instead of Elasticsearch. Here's a quick 20 second video:
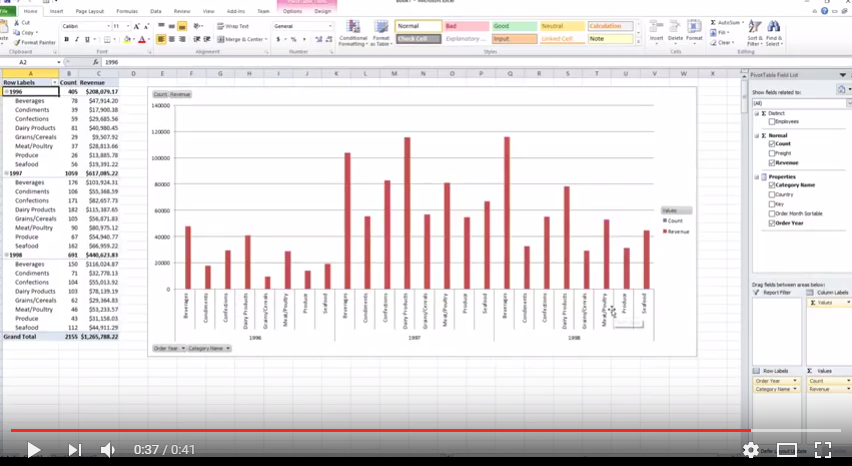
Leveraging SQL Server Analysis Services (SSAS) & Excel
- Introducing the sqlserver provider
- the ssas provider
- the
measureanddimensionattributes onfields
This section demonstrates loading the data into a SSAS cube and browsing it with Excel. To follow along, you'll need a local instance of Analysis Services, and Excel.
The SSAS provider only works with a SQL Server input, so first
make a database called TflNorthWind, and then modify
the NorthWind.xml arrangement to output to SQL Server
instead of SQLite:
<cfg name="NorthWind" flatten="true">
  <connections>
    <add name="input" provider="sqlserver" server="localhost" database="NorthWind"/>
    <!-- change output to ... -->
    <add name="output"
         provider="sqlserver"
         server="localhost"
         database="TflNorthWind" />
  </connections>
  <!-- clipped for brevity -->
</cfg>
Run this in init mode to load NorthWindFlat into
SQL Server. Then, create a new arrangement:
<cfg name="NorthWind">
    <connections>
        <add name="input" provider="sqlserver" server="localhost" database="TflNorthWind" />
        <add name="output" provider="ssas" server="localhost" database="NorthWind" />
    </connections>
    <entities>
        <add name="NorthWindFlat" version="TflBatchId" alias="Properties" >
            <fields>
                <add name="TflKey" type="int" primarykey="true" alias="Key" />
                <add name="TflBatchId" type="int" alias="Version" />
                <add name="Revenue" type="decimal" scale="2" measure="true" format="$###,###,###.00" />
                <add name="Freight" type="decimal" precision="19" scale="4" measure="true" format="$###,###,###.00" />
                <add name="OrderYear" type="int" dimension="true" />
                <add name="OrderMonthSortable" />
                <add name="Country" length="15" />
                <add name="EmployeeID" type="int" measure="true" aggregate-function="distinctcount" label="Employees" />
                <add name="CategoryName" length="15" />
            </fields>
        </add>
    </entities>
</cfg>
Save this as NorthWindToSSAS.xml and run it:
>tfl -a c:\Temp\NorthWindToSSAS.xml -m init
info  | NorthWind | Properties | Creating new OLAP database: NorthWind
info  | NorthWind | Properties | Creating new data source: TflNorthWind
info  | NorthWind | Properties | Creating new data source view: NorthWind
info  | NorthWind | Properties | Creating new dimension: Properties
info  | NorthWind | Properties | Creating new cube: NorthWind
info  | NorthWind | Properties | Processing OLAP database NorthWind
info  | NorthWind |            | Time elapsed: 00:00:03.52

>tfl -a c:\Temp\NorthWindToSSAS.xml
info  | NorthWind | Properties | Change Detected: No.
info  | NorthWind |            | Time elapsed: 00:00:00.58
This example marks some fields as measures and others as dimension attributes. This is needed to accurately describe the cube. Here is a short video showing Excel browse the resulting cube.
Note: The SSAS output is still under development and only tested on SQL Server 2008 R2.
- Introducing the Orchard CMS module
- the
parameterssection- the
filtersection within anentity- the
page,page-size, andsortableattributes for anentity- and the label attribute for a
field
The Orchard CMS Transformalize module allows you to:
- edit, store, and secure your arrangements
- run your arrangements (like the CLI does)
- view and page through your output in report mode
- export search results (to csv, and xlsx) in report mode
Although arranging a report in Transformalize can add some complexity, it still makes sense since reporting is just a form of ETL.
Here's a quick video of a Northwind report using the Elasticsearch provider we loaded earlier:
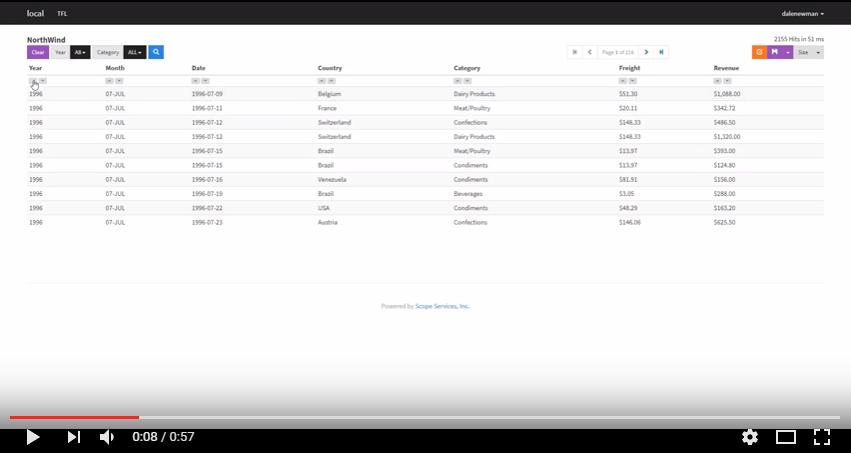
The arrangement for this is:
<cfg name="NorthWind">
  <parameters>
    <add name="orderyear" label="Year" value="*" prompt="true" multiple="true" />
    <add name="categoryname" label="Category" value="*" prompt="true" />
  </parameters>
  <connections>
    <add name="input" provider="elasticsearch" index="northwind" />
  </connections>
  <entities>
    <add name="northwindflat" alias="NorthWind" page="1" page-size="10" sortable="true" >
      <filter>
        <add field="orderyear" value="@[orderyear]" type="facet" min="0" />
        <add field="categoryname" value="@[categoryname]" type="facet" />
      </filter>
      <fields>
        <add name="orderyear" type="long" label="Year" />
        <add name="ordermonthsortable" label="Month" />
        <add name="orderdate" type="datetime" label="Date" format="yyyy-MM-dd" />
        <add name="tflkey" alias="Key" type="long" primary-key="true" output="false" />
        <add name="country" label="Country" length="15" />
        <add name="categoryname" length="15" label="Category" />
        <add name="freight" label="Freight" type="decimal" precision="19" scale="4" format="$#,###,###.00" />
        <add name="revenue" label="Revenue" type="decimal" precision="19" scale="2" format="$#,###,###.00" />
      </fields>
    </add>
  </entities>
</cfg>Introducing the
name,label,value,prompt, andmultipleattributes forparameters
Parameters allow you to pass in data from outside your arrangement.
They may be used to manipulate attribute values in the arrangement.
The parameter place-holders (e.g. @[orderyear]) are replaced with
a provided or default value before validation.
Parameters are visible in report mode
when prompt is set to true.
Introducing the
field,operator,value,expression, andtypeattributes for eachfilter
Filters allow you to limit your output. A filter is set in two ways:
- by setting
field,operator, andvalue - by setting a provider-specific
expression
Either way, you may use parameters to manipulate your filters at run-time.
SOLR and Elasticsearch support faceted navigation. When you set the filter's type to facet, Transformalize takes care of mapping the facet values to a parameter's choices.
Without paging, web-based reporting gets too big for the browser. All providers are capable of paging, but SOLR and Elasticsearch do it the best.
TODO: list open source projects