Donations welcome. Click to donate!
UIToolkit aims to make creating interactive menu systems and HUDs with a single draw call for multiple resolutions dead simple. That's quite a mouthful and a tall order. The library comes with a bunch of different UI widgets out of the box and it makes creating your own widgets extremely simple. Some conveniences for dealing with HD resolutions (iPhone 3 vs iPhone 4 for example) are optionally provided and include:
- automatic texture swapping to a double resolution texture for HD
- automatic reconfiguration of UV coordinates
- automatic handling of double resolution UIFonts
- methods for relative positioning with offsets in pixels or percents
Check out an introduction video here
Note: all touchable UI components can have highlightedTouchOffsets added. This mimics what Apple does with their iOS controls by adding a padding around the control that is activated when the control is being touched. For example, if you set the highlightedTouchOffsets to have an extra 30 pixel offset and a user touches the button, they can slide their finger an extra 30 pixels outside the boundary of the button. You can experience this by opening any Apple app on your iPhone with a button in it and touch your finger on it than slide it around off the button further and further until it is deselected.
- UISprite: the base of every component that can be seen. All UISprites can have animations added to them that can be played on demand.
- UIButton: standard button with selected state, optional sound on touch down and delegate action on touchUpInside
- UIContinousButton: UIButton that can either report every frame that a finger remains on it or when a finger touches down or up
- UIToggleButton: 3 state button that can be used just like a checkbox if desired
- UIProgressBar: standard progress bar that offers 2 modes of progression: texture stretching or just revealing the texture as progress advances
- UISlider: slider that works in both the horizontal and vertical direction
- UIKnob: rotating knob control
- UIText and UITextInstance: reads in a .fnt file and displays text including line breaks (base code courtesy of Eskema: http://eskemagames.blogspot.com/)
- UIJoystick: joystick control with configureable dead zone and background image
- UISwipeDetector: control that is capable of detecting swipes in any combination of directions (up, down, left, right)
- UIHorizontalLayout: lays out any children added to it horizontally. Spacing between the elements is configureable.
- UIVerticalLayout: lays out any children added to it vertically. Spacing between the elements is configureable.
Coming soon, an actual license. For any developers just wanting to use UIToolkit in their games go right ahead. The license will fully allow UIToolkit to be used in any and all games either modified or unmodified. In order to keep the spirit of this open source project, the forthcoming license will absolutely not allow UIToolkit to be sold or distributed in any way outside of your games. You can freely use it in as many games as you would like but you cannot distribute the source code either directly or compiled into a library outside of your game.
Feel free to include a "prime31 inside" logo on your about page, web page, splash page or anywhere else your game might show up if you would like.
small or
larger or
huge
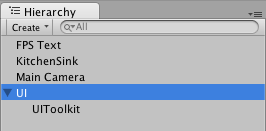
- Create a new layer, which in the example scenes is named "UILayer".
- Create an empty GameObject and position it at 0, 0, 0.
- Now drag the UI.cs script to this object. Be sure to set the UILayer that you chose in the previous step in the inspector in the UILayer slot.
- Go to the main camera and remove the UILayer (in this example "UILayer") from the Culling Mask so that your GUI doesn't get rendered twice.
- Create a new GameObject and set it as the child of the UI GameObject that was just created and drag the UIToolkit.cs script onto it. (You can create multiple UIToolkit child objects that each have their own texture atlas for when one isn't enough). Your object hierarchy should look like this.
- Set the texturePackerConfigName in the inspector (more on this later). Make sure your texture packer .txt config file your texture atlases are in the Resources folder so they can be loaded at runtime.
- Do not try to create your UI in Awake as the UI script may not be done initializing yet. Use Start instead.
UIToolkit uses the output from the free version of the excellent Texture Packer program. It is dead easy to use and makes updating your atlases later a breeze. To get things going with Texture Packer all you need to do is:
- Drag and drop all your images into Texture Packer's right pane.
- In the Output pane (bottom left) set the Data format to json, set the Data file to be in a Resources folder in your project and set the Texture file to be in the Assets/Resources folder (or any other Resources folder in your project)
- In the Geometry pane, you will need to uncheck Autosize and set the texture size as a power of 2, square texture. Pick the smallest size that fits your sprites.
- Choose File -> Publish (Command-P) to export the json config file and the texture. Make sure they both have the same name. Note: you must rename the .json file to .txt. Unity currently will not recognize .json files as TextAssets.
UIToolkit offers some conveniences for handling SD and HD resolutions with the same code. There are some naming conventions that must be adhered to for this to work. First off, you will need to have a second texture that is double the resolution of your standard texture that has the same name with "2x" appended to it. If you want to support both resolution types check the autoTextureSelectionForHD variable in the inspector of your UI game object. You will also need a second Texture Packer config file with "2x" appended to it to go along with the double sized texture.
There are also some methods available to assist with relative layout so you can code once and deploy on multiple resolutions. The UISprite class has extensions for positioning relatively from any screen corner. For example, to make a button be in the bottom left corner inset a bit from the corner on both the iPad and iPhone all you would need to do to get the position is:
button.positionFromBottomLeft( 0.05f, 0.05f, )
Text support is included with the UIText class. Your font bitmap can be created with Hiero, Angelcode or Glyph. If you want to support both HD and SD resolutions you will need to export a .fnt file for both resolutions. Both files should be placed in a Resources folder in your project and the HD version should have "2x" appended to the name to take part in auto HD switching at runtime. Add the exported bitmap font png to your texture atlas in Texture Packer and you are good to go, just be sure the image name is the same as the .fnt filename. Note: you must rename the .fnt file to .txt. Unity currently will not recognize .fnt files as TextAssets.
Once you have a UIText instance loaded up with your specific font file you can make as many UITextInstances as you want by just calling addTextInstance. Newlines can be added with the standard "\n" and you can modify the returned UITextInstance at any time and the text will automatically be rebuilt.