NuGet package: http://nuget.org/packages/QuickCross
NOTE: This readme describes version 2.0, which is the current NuGet release.
Quickly build cross-platform apps in C# with the MVVM pattern and Xamarin.

QuickCross is a lightweight (no binaries) cross-platform MVVM pattern to quickly build native Xamarin.iOS, Xamarin.Android, Windows Phone and Windows Store Apps with shared C# code.
QuickCross provides data binding for Android and for iOS. It accelerates development with scaffolders and code snippets, also for a single platform app. For cross-platform apps QuickCross increases code sharing with an Application-Navigator pattern.
QuickCross aims to leave you in full control; it does not get in the way if you want to do some things differently, and you can simply extend or modify it.
Versions before 2.0 were published under the name MvvmQuickCross. They will continue to be supported at the existing MvvmQuickCross GitHub repository, and the existing MvvmQuickCross NuGet packages will remain available. Upgrading from MvvmQuickCross to QuickCross is simple; see here how.
We developed QuickCross after trying MvvmCross. We were looking for an Mvvm framework to let us maximize code sharing across Windows Store, Windows Phone, Xamarin.iOS and Xamarin.Android platforms, and MvvmCross was the most promising option for us. In our opinion MvvmCross is a mature framework that offers a lot of functionality and has an impressive architecture. However, MvvmCross is also binary based (you use it as dlls in your app) and we found it to be too heavily engineered for our needs. It has lots of nuget packages and dlls, a plugin system, uses IoC, has many internal layers etc. It's a lot to take in - there are over 40(!) video's on it.
If we were to build an app with MvvmCross and we would run across something - anything, either big or small - that is not supported (yet) out of the box, we would either need to wait for someone else to add it, or take on an additional - potentially complex - project to create a new plugin for the framework or even a modified version of existing framework component(s). We did not want to put ourselves in this situation. Not finding a suitable alternative, we set out to create a lightweight, pragmatic framework with a focus on productivity and simple customization: QuickCross.
QuickCross is not based on or derived from MvvmCross; it solves some of the same problems but is quite different. QuickCross supports most common data binding scenario's out of the box and lets you implement other scenario's by adding a few lines of code in your app project. It is simple in both usage and internal implementation; it is distributed in a single NuGet package, included as source in your app projects, and this single readme page contains the complete reference plus an example app tutorial.
While QuickCross has some unique features (e.g. customizable code templates and scaffolder commands to quickly generate views, viewmodels and navigation code), MvvmCross has been around longer and offers more functionality, e.g. value converters and WPF and Mac platform support. If you are looking for a cross-platform Mvvm framework, we do encourage you to check out all options and decide for yourself which is best for your needs and capabilities. Happy app building!
April 28, 2014 QuickCross is nearing the 2.5 beta release with a lot of new features! Version 2.5 will add:
- NavigateToPreviousView to navigate back to the previous view on all platforms
- Dialog support for iOS (MonoTouch.Dialog) and Android (DialogFragment for AlertDialog and custom view dialogs)
- Custom binding actions for iOS and Android, to e.g. simply convert or combine viewmodel property values
- Bind to any object in iOS and Android - no longer limited to just UIView or View; now you can e.g. also bind to UI elements in navigation bars
- Bind to any property or field by name in iOS and Android - no longer code required to bind to non-default field/property
- Optimized release build size with a custom linker description on iOS and Android - save 15 MB on your package.
- Fixed iOS custom table view source support defect
Jan 14, 2014 QuickCross release 2.0 final is published!
Jan 3, 2014 QuickCross release 2.0 beta is published. Adds simple iOS data binding and an iOS example app.
No binaries, only adds a code snippets file and C# source files to your projects.
Quickly add viewmodels and views from within the Visual Studio package manager console with the New-ViewModel and New-View commands.
Quickly add data-bindable properties and commands to viewmodels with code snippets.
Maximize code sharing, including navigation logic, across platforms.
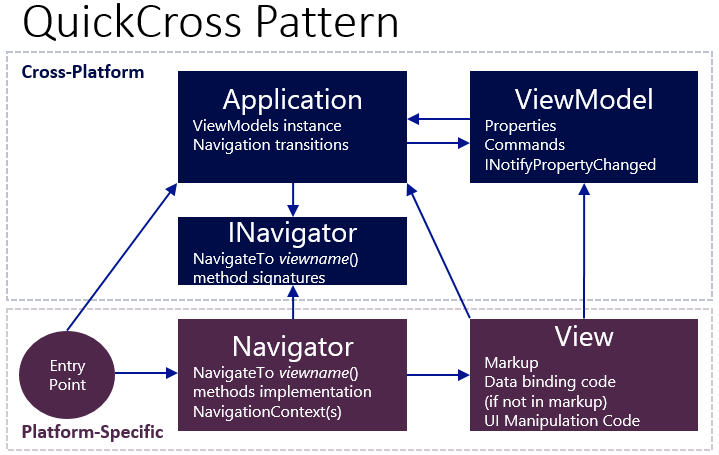
See these slides for an overview of the QuickCross pattern.
Specify data bindings in iOS with a custom runtime attribute in XCode, or in C# code. Supports coded views, Xib views and StoryBoard views. Create performant data-bound table views without writing a table view source.
See the QCTest1 app source in this repository for an example of a coded view, a Xib view, and a StoryBoard view with a UITableView, including navigation.
Override virtual methods in your view controller to handle specific property change events with custom code instead of with data binding. Or customize how the data binding sets a value to a specific control. Add a few lines of code to make new view types data bindable.
Prevent memory leaks by automatically removing and re-adding event handlers during the iOS view life-cycle.
Specify data bindings in Android by using naming conventions, tag markup or code. Use observable collections. Create performant data-bound list views without writing an adapter.
Override virtual methods in your activity or fragment to handle specific property change events with custom code instead of with data binding. Or customize how the data binding sets a value to a specific control. Add a few lines of code to make new view types data bindable.
Prevent memory leaks in Xamarin by automatically removing and re-adding event handlers during the Android activity life-cycle.
The remainder of this Readme describes:
- Getting Started steps
- The complete QuickCross reference
- How to build a simple Twitter example app for Android and iOS using data binding
- Upgrade instructions
See this more elaborate Cloud Auction example app for how you can use QuickCross. These blog posts describe the full steps and explanation on how to build this app:
- Creating a Cross-Platform Native App Using MvvmQuickCross and Xamarin, Part 1: Cross-Platform Code and Windows 8 App
- Creating a Cross-Platform Native App Using MvvmQuickCross and Xamarin, Part 2: Android App
Note that these blog posts were written for MvvmQuickCross, which is the predecessor to QuickCross. However, except for the name change and some minor details the posts content is also valid for QuickCross. Time permitting, these blog posts will be updated to match the updated example source.
To create an app with QuickCross, follow these steps:
Note: for how to upgrade an app to a newer version of QuickCross, see here.
-
In Visual Studio, create a new solution with an application project for the platform (Windows Store, Windows Phone, Android, iOS) that you are most productive with. Add a class library project for the same platform to the solution. Reference the class library from the application project.
Note for Android: Set the API level to 12 (Android 3.1) or higher in the Project properties for both projects. This is needed to support the Fragment view type. You can target lower API versions by either using the Android Support Library (which is supported in Xamarin) or by removing the Fragment view base class and template from the QuickCross folder in your application project.
Notes for iOS:
-
Select iOS 5.0 or higher (set the Deployment Target to 5.0 or higher in the iOS Application tab of the Project Properties window for the application project). This is needed to specify data binding parameters in XCode, which relies on a User-Defined Runtime Attribute named Bind.
-
Check the Allow unsafe code option (in the Build tab of the Project Properties window) for the application project. This is needed for the QuickCross data binding code, which uses the Objective C runtime library to read the Bind User-Defined Runtime Attribute.
-
Verify that in the Configuration Manager (menu Build) the Active solution platform is set to the emulator or device that you want to target (e.g. iPhoneSimulator).
Note for Windows Phone: Select Windows Phone OS 8.0 or higher.
-
-
Install the QuickCross NuGet package
The available QuickCross commands are now displayed in the package manager console. Type "Get-Help command -Online" for details.
-
In the Visual Studio package manager console (menu View | Other Windows) enter:
An QuickCross folder is now added to your library project and your application project, and a few application-specific projects items are generated and opened in Visual Studio.
Note that the package installation uses the first part of the solution filename (before the first dot) as the application name for naming new project items and classes.
-
Import the C# code snippets from the QuickCross\Templates\QuickCross.snippet file in your class library project into Visual Studio with the Code Snippets Manager (see how). If you get a "Snippet With Same Name Exists" dialog, select Overwrite.
Note do not select the QuickCross\Templates folder itself as the location to import snippets to; that may prevent the snippets to be imported correctly, as this would mean copying the snippets file over itself.
-
Add new views and viewmodels with the
New-ViewandNew-ViewModelcommands. -
Add data-bindable properties and commands to your viewmodels with the code snippets.
-
Check the TODO comments in the Visual Studio Task List (menu View | Tast List) to find guidance on how to complete the viewmodel, application and navigator classes. You can also check out the CloudAuction example app in this GitHub repository (TODO: create iOS implementation).
To code your app for more platforms:
-
Create a new solution for each platform, with a class library project for that platform and an application project for that platform, just like you did for the first platform.
-
Add all code files from the existing class library project to the class library project for the new platform.
-
Install the QuickCross NuGet package and execute the Install-Mvvm command again (it won't overwrite existing files).
-
Code the views, navigator and any platform specific service implementations in the application project.
After installing the QuickCross NuGet package, the below commands are available in the Visual Studio Package Manager Console.
Note that except for Install-Mvvm, anything that these commands do can also be done by hand; the manual steps are documented inline in the files that you add to your projects with Install-Mvvm. This makes it possible to create your initial solutions in Visual Studio, and then continue working in Xamarin Studio for Android or iOS, if you prefer that.
Install-Mvvm Installs the QuickCross support files in both your library project and your application project, in a subfolder QuickCross. The files in the QuickCross folders are not application specific; unless you want to modify the standard QuickCross templates, code snippets and/or functionality you don't need to edit these.
Install-Mvvm also generates a few application-specific project items for you. The generated project items are opened in the Visual Studio editor for your inspection.
Note that Install-Mvvm uses the first part of the solution filename (before the first dot) as the application name for naming generated project items, classes, properties and methods.
Check the TODO comments in the Visual Studio Task List to find guidance on how to complete the generated project items.
Install-Mvvm will not overwrite existing files or code. If you want to recreate the default files, remove the files that you want to recreate before running Install-Mvvm.
New-View [-ViewName] <string> [[-ViewType] <string>] [[-ViewModelName] <string>] [-WithoutNavigation]Generates a new view.
The specified ViewName will be suffixed with "View", and the specified ViewModelName will be suffixed with "ViewModel". If no ViewModelName is specified, it will be the same as the ViewName. If the viewmodel does not exist, it will be generated with the New-ViewModel command.
-
On Windows Phone or Windows Store, the
ViewTypecan bePage(default) orUserControl. -
On Android, it can be
MainLauncher,Activity(default) orFragment. -
On iOS, it can be
Code(default),Xib,StoryBoardorStoryBoardTable.See the QCTest1 app source in this repository for an example of a coded view, a Xib view, and a StoryBoard view with a UITableView, including navigation.
The specified view type determines which view templates are used. You can find these templates in the QuickCross\Templates folder of your application project. You can simply modify these templates or add your own (which is better) by adding similar named files there.
Unless the -WithoutNavigation switch is specified, New-View will also add basic navigation code to the navigator and application classes. The -WithoutNavigation switch is useful when creating views such as list item views, that do not need to navigated to directly from the application class.
E.g. this command:
New-View Personwill generate:
- A
PersonViewview markup file + class - A
PersonViewModelviewmodel class - A
PersonViewModelDesignviewmodel class - A
PersonViewModelproperty in the application class - A
NavigateToPersonView()method signature in the navigator interface - A
NavigateToPersonView()method implementation in the navigator class - A
ContinueToPerson()method in the application class
Now the only thing needed to display the view, bound to the viewmodel, is to call the ContinueToPerson() method on the application.
Check the TODO comments in the Visual Studio Task List to find guidance on how to complete the generated project items.
New-View will not overwrite existing files or code. If you want to recreate files or code fragments, remove the existing one(s) first.
New-ViewModel [-ViewModelName] <string> [-NotInApplication]Generates a new viewmodel. You can use this command to create viewmodels without creating any corresponding views (yet).
The specified ViewModelName will be suffixed with "ViewModel".
Unless the -NotInApplication switch is specified, New-ViewModel will also add a property to contain the instance of the viewmodel to the application class. The application class will then be responsible for providing an initialized viewmodel instance before navigating to the corresponding view. The -NotInApplication switch is useful when creating viewmodels such as list item viewmodels, that do not need to be instantiated and initialized directly by the application class.
E.g. this command:
New-ViewModel Personwill generate:
- A PersonViewModel viewmodel class
- A PersonViewModelDesign viewmodel class
- A PersonViewModel property in the application class
Check the TODO comments in the Visual Studio Task List to find guidance on how to complete the generated project items.
New-ViewModel will not overwrite existing files or code. If you want to recreate files or code fragments, remove the existing one(s) first.
As Described above in the usage of the ViewType parameter of the New-View command, you can add your own code and markup templates for custom view types by adding properly named files in the QuickCross\Templates folder of your application project.
The code and markup template files are named: _VIEWNAME_<view type name>View.*
If no markup file for the specified view type is found, the default markup file _VIEWNAME_View.* is used, so you do not need to have multiple copies of the same markup template.
Of course you can also modify existing templates in the QuickCross\Templates folder.
The library project also contains a viewmodel template that can be customized, at QuickCross\Templates\_VIEWNAME_ViewModel.cs.
In addition to the template files, you can also modify the inline code templates in the Application, INavigator and Navigator. Inline templates are used to add properties and methods in these files when a new viewmodel or view is added. An example of an inline template in the Application class for a view is:
public sealed class _APPNAME_Application : ApplicationBase
{
	...

    /* TODO: For each view, add a method (with any parameters needed) to initialize its viewmodel
     * and then navigate to the view using the navigator, like this:

    public void ContinueTo_VIEWNAME_()
    {
        if (_VIEWNAME_ViewModel == null) _VIEWNAME_ViewModel = new _VIEWNAME_ViewModelDesign();
        RunOnUIThread(() => _navigator.NavigateTo_VIEWNAME_View());
    }
     * Note that the New-View command adds the above code automatically
     * (see http://github.com/MacawNL/QuickCross#new-view). */
}
The format of an inline template is:
- An empty line. The instantiated code will be placed directly before this line
- A line starting with
/* TODO: For each <template name>, - Optionally some lines starting with
* - Lines of actual template code
- Optionally some lines starting with
* - A line ending with
*/
Currently the template name can be view or viewmodel.
When you run the Install-Mvvm command, the C# code snippets file QuickCross\Templates\QuickCross.snippet is added to your class library project. When you import this snippets file into Visual Studio with the Code Snippets Manager (see how), the code snippets described below become available for coding viewmodels.
Note that the code snippets and their parameters have intellisense when you invoke them in the Visual Studio C# editor.
To instantiate a code snippet, place your cursor on an empty line in the #region Data-bindable properties and commands of a viewmodel class .cs file, type the code snippet shortcut (e.g. propdb1), and press Tab twice. Now you can enter the parameters of the code snippet (press Tab to cycle through all parameters). Press Enter to complete the snippet instance.
Adds a one-way data-bindable property to a Viewmodel. You can specify the property type and name.
Adds a one-way data-bindable collection property, a corresponding (name)HasItems property and an Update(name)HasItems() method to a Viewmodel. You can specify the generic collection type (e.g. ObservableCollection or List), the collection element type and the property name.
If you want specific UI elements in your view to only be visible when the collection has elements (e.g. a list of error messages), you can use the HasItems property to bind to the visibility of those UI elements. In that case, you should also call the UpdateHasItems() method after you have added or removed items (this is necessary even if this is an ObservableCollection).
Note that if you suffix a collection property name with "List", you can benefit from the list data binding naming convention in Android.
Adds a two-way data-bindable property to a Viewmodel. You can specify the property type and name.
Adds a two-way data-bindable property and a On(name)Changed() method for custom setter code to a Viewmodel. You can specify the property type and name.
Adds a data-bindable command to a Viewmodel. You can specify the command name, which will be suffixed with "Command".
Adds a data-bindable command with a parameter to a Viewmodel. You can specify the command name, which will be suffixed with "Command", the parameter type and the parameter name.
Below is an overview of using QuickCross with Xamarin.iOS.
Here is how to create an iOS Twitter app that demonstrates simple data binding:
Note that the complete source for this Twitter app example is available in this repository, here.
This is what the Twitter app will look like in iOS:

So let's get started.
-
Create a working iOS app by following steps 1 though 4 of Getting Started above; make sure you follow the iOS notes there!
These are the project templates and project names you should use while following these steps: an
Empty Projectproject from the iOS\iPhone project templates namedTwitter, and aXamarin.iOS Library Projectproject from the iOS project templates namedTwitter.Shared.In the iOS Application tab of the application project properties window, set the Application name, Identifier and Version to some meaningful value. In the Application tab of the library project properties window, add the suffix
.iosto the Assembly name - this is useful if you want to build for multiple platforms in the same project folder. -
Remove the
Class1.csfile that was included by the Xamarin.iOS Library Project template -
Do what the TODO comments in the Visual Studio Task List say for the file AppDelegate.cs. This will ensure that on application startup QuickCross is initialized and the initial view is displayed.
-
Now you can run the app on your device and test the example MainView that was generated by the Install-Mvvm command.
If you already created the shared code library for the example Twitter app in the Create an Android App tutorial, you can include the existing C# files from the Android library project also in your iOS library project. Then skip to step 9 below.
-
Create a
Modelsfolder in your Twitter.Shared project and create thisTweet.csclass in it:using System; namespace Twitter.Shared.Models { public class Tweet { public string Text { get; set; } public string UserName { get; set; } public DateTime CreatedAt { get; set; } } }
-
In
ViewModels\MainViewModel.csin your library project, in the#region Data-bindable properties and commands, remove the example property and command add these properties and commands with the indicated code snippets:Snippet Parameters Generated code propdb2c Tweet Tweet public Tweet Tweet { ... }
private void OnTweetChanged() { ... }propdbcol ObservableCollection Tweet TweetList public ObservableCollection TweetList { ... }
public bool TweetListHasItems { ... }
protected void UpdateTweetListHasItems() { ... }cmd Delete public RelayCommand DeleteCommand { ... }
private void Delete() { ... }propdb2c string Text public string Text { ... }
private void OnTextChanged() { ... }propdb1 int CharactersLeft public int CharactersLeft { ... } cmd Send public RelayCommand SendCommand { ... }
private void Send() { ... } -
Add this code in the generated
MainModelmethods:public MainViewModel() { TweetList = new ObservableCollection<Tweet>(); OnTweetChanged(); Text = ""; } private void OnTweetChanged() { DeleteCommand.IsEnabled = (Tweet != null); } private void Delete() { TweetList.Remove(Tweet); Tweet = null; } private void OnTextChanged() { CharactersLeft = 140 - Text.Length; SendCommand.IsEnabled = (Text.Length > 0 && CharactersLeft >= 0); } private void Send() { var newTweet = new Tweet { Text = this.Text, CreatedAt = DateTime.Now, UserName="Me" }; TweetList.Insert(0, newTweet); Tweet = newTweet; Text = ""; }
-
The
MainViewModel.csfile also contains aMainViewModelDesignclass where you can put some hardcoded viewmodel data. Put this code in the MainViewModelDesign constructor:public MainViewModelDesign() { Text = "Text for a new tweet"; var now = DateTime.Now; TweetList.Insert(0, new Tweet { Text = "Creating a simple Twitter app with QuickCross", UserName = "Me", CreatedAt = now.AddSeconds(-115) }); TweetList.Insert(0, new Tweet { Text = "Created a solution with an application and a library project", UserName = "Me", CreatedAt = now.AddSeconds(-63) }); TweetList.Insert(0, new Tweet { Text = "Added Tweet model class", UserName = "Me", CreatedAt = now.AddSeconds(-45) }); TweetList.Insert(0, new Tweet { Text = "Added viewmodel properties and commands with code snippets", UserName = "Me", CreatedAt = now.AddSeconds(-25) }); TweetList.Insert(0, new Tweet { Text = "Added some hardcoded design data for the viewmodel", UserName = "Me", CreatedAt = now.AddSeconds(-1) }); }
-
We are going to replace the MainView, which was generated as a Code view, with a Storyboard view. First delete the file
MainView.csin the application project, and then enter this command in the Package Manager Console:New-View Main -ViewType StoryBoard
This will generate a MainView.TODO.cs file, with TODO comments on how to complete the view with Xamarin Studio and XCode.
-
Make your source accessible from your build Mac (e.g. on a network share, via source control or just copy it with a USB stick), and open your solution on the Mac in Xamarin Studio.
-
In Xamarin Studio, set the build configuration for the application project to Debug | iPhoneSimulator or Debug | iPhone, and set the application project as the startup project.
-
In Xamarin Studio, add an Empty iPhone Storyboard and name it
Main(could be any name). Open the storyboard with the Source Code Editor and then replace its contents by copy+pasting the contents from this Main.storyboard file. Save the storyboard and close its editor window. The storyboard now contains only the Twitter UI, without any custom classes or bindings.You could create this file yourself by adding an Empty iPhone Storyboard project item named
Main(this could be any name) in Xamarin Studio, double-clicking to open it in XCode and then adding a view controller, with a view at the bottom containing a text field, label and two buttons. Then add a table view with a table cell and add three labels in the cell content. -
Now follow the guidance in the MainView.TODO.cs comments to create the MainView.cs and MainView.designer.cs (you can skip adding your view in XCode since it is already in the downloaded storyboard).
-
Open the Info.plist file in Xamarin Studio, and set the Main Interface to the Main storyboard.
-
To dismiss the onscreen keyboard when you tap outside the edit view, add a KeyboardDismissGestureRecognizer to your main window in FinishedLaunching. Now you can run the app - the Twitter UI should display (without data, because we still need to add bindings).
-
Now let's add the data binding parameters in XCode to complete the app. In XCode, add the Bind custom runtime attribute to these controls (see how) and set it's value as indicated:
View Bind value Round Style Text Field - What's up? Text, Mode=TwoWay Label - 140 CharactersLeft Button - Send SendCommand, Mode=Command Button - Delete DeleteCommand, Mode=Command Table View Tweet, Mode=TwoWay {List ItemsSource=TweetList} Label - Me UserName Label - 10/25/2013 1:28:25 PM CreatedAt Label - My tweet text Text As described here, the default value for the List ItemTemplate binding parameter for our table view is TweetListItem (because we specified TweetList for the ItemsSource). Now set the (reuse) Identifier of the Table View Cell to to match the List ItemTemplate value:
TweetListItem. Now the QuickCrossDataBindableUITableViewSourcecan load the prototype cell that should be used for the tweet list items. -
Save the storyboard, switch back to Xamarin Studio and run the app. Test the MainView. Notice how the Send and Delete buttons are enabled and disabled based on the text length and selected item state, and how the characters remaining count is updated as you type. Also note how the selected list item is highlighted both from the UI when tapped, and from code when adding a new tweet.
You have created a working app with QuickCross. Note that the only code that you needed to write is in the viewmodel; no view controller or table view controller code is needed. To get data binding working, the markup specifies some binding parameters in the Bind.
An iOS data binding is a one-on-one binding between an iOS UIView, such as a UITextField or UIButton, and a viewmodel property or command. You can specify bindings with (a combination of):
- Code in the controller that creates the containing view
- Segue identifiers
- Binding parameters in the
Binduser-defined runtime attribute (of typeString) in XCode (this is supported in iOS 5.0 or later)
Note that for performance reasons, iOS data binding allows no more than one view (within the same rootview) to be bound to a property. If you need to update multiple views with the same property value, you can do that by overriding the UpdateView() method in your view controller class, and adding a few lines of code.
Finally, note that you do not need to use the QuickCross implementation of iOS data binding if you prefer not to. You can subscribe to the standard .NET data binding events (PropertyChanged on viewmodels, CanExecuteChanged on RelayCommand viewmodel commands, and CollectionChanged on ObservableCollection viewmodel properties) from your code in any view type, and handle data binding any way you like. In this case you can keep using the New-View command, if you add your own view template files.
iOS UIViews do not have a native general-purpose property that can be used to specify binding parameters (such as the Tag property on Android Views). QuickCross solves this by adding support for a user-defined runtime attribute named Bind, of type String. In addition to using the Bind attribute, you can bind a Storyboard Segue to a command in XCode by setting the Segue identifier to the name of a viewmodel command.
To specify binding parameters in XCode through the Bind attribute:
- Select the object for which you want to specify the binding parameters (e.g. a
UILabel, aUIButtonor aUITableView). - In the Identity Inspector (in the utility area), under the User Defined Runtime Attributes header, click on the + to add an attribute.
- Change the Key Path of the new attribute to
Bind, set the Type toString, and specify the binding parameters (see below for details) in Value.
These are the binding parameters that you can specify in the Bind attribute (linebreaks added for readability):
.|propertyName, Mode=OneWay|TwoWay|Command
{List ItemsSource=listPropertyName, ItemTemplate=listItemTemplateName,
      AddCommand=addCommandName, RemoveCommand=removeCommandName,
      CanEdit=false|true|propertyName|fieldName, CanMove=false|true|propertyName|fieldName}
All of these parameters except the . or propertyName are optional. The iOS syntax is similar to the Android binding parameters syntax, however the {Binding ... } delimiters around .|propertyName and Mode are optional in iOS, since the Bind attribute will never contain anything else than binding parameters.
Note that you can specify binding parameters through code in addition to / instead of in the Bind attribute.
You can specify a property name to bind to the property of a viewmodel. For bindings in list items that are not viewmodels, you can also specify the name of a field. Specify . to bind to the ToString() value of the viewmodel or list item object. Note that viewmodel commands are just a special type of viewmodel property, so you can use the propertyName to specify a command name as well.
Is OneWay by default. The mode specifies:
OneWaydata binding where the viewmodel property updates the view - e.g. a display-only UILabel. The bound property can be generated with the propdb1 or propdbcol code snippet.TwoWaydata binding where the viewmodel property updates the view and vice versa, e.g. an editable UITextField. The bound property can be generated with the propdb2, propdb2c or propdbcol code snippet.Commandbinding (e.g. a UIButton). The bound command can be generated with the cmd or cmdp code snippet.
Note that you can also bind to the selected item in a UITableView with binding modes TwoWay or Command. When an item in the list is selected, the bound two-way property is set to the selected list item, or the bound command is invoked with the selected item as the command parameter. E.g. you can bind to a command to navigate to a detail view for the selected list item.
The List binding parameters are for use with views derived from UITableView. Support for collection views will be added soon.
Specifies the name of the viewmodel collection property that contains the list items. The property must implement the standard .NET IList interface. If the property also implements the standard .NET INotifyCollectionChanged interface (e.g an ObservableCollection), the view will automatically reflect added, replaced or removed items. The default value of ItemsSource is propertyName + "List".
The items in an ItemsSource viewmodel collection property can be:
- An object with fields or properties (e.g. a POCO model object)
- An value object, meaning an object that implements
ToString()to present the value of the entire object as a human-readable text - A viewmodel object that has data-bindable properties and/or commands. This is also called composite viewmodels, which makes it possible to e.g. automatically display changes of individual fields within existing list item objects.
Specifies the reuse identifier of the UITableViewCell that represents a list item. E.g. the value "TweetListItem" corresponds to the UITableViewCell with reuse identifier TweetListItem. You can specify the reuse identifier in XCode by selecting the UITableViewCell and then specifying the indentifier field in the Attributes Inspector. The default value of the ItemTemplate binding parameter is the value of ItemsSource + "Item".
Specifies the name of the viewmodel command (e.g. AddProductCommand) that must be executed when the user selects the Insertion control in table editing mode. The command parameter will be the list item object at the insert position, if any. If this binding parameter is not specified, no command will be executed.
Specifies the name of the viewmodel command (e.g. RemoveProductCommand) that must be executed when the user selects the Deletion control in table editing mode. The command parameter will be the list item object to be deleted. If this binding parameter is not specified, no command will be executed.
Specifies whether list items can be edited in table view editing mode. The value true or false enables resp. disables editing for all items in the list. You can also enable or disable editing per item by adding a boolean property or field to each list item and then specifying the name of that property or field, e.g. CanEdit=ProductIsEditable. The default value of the CanEdit binding parameter is false.
Specifies whether list items can be moved in table view editing mode. The value true or false enables resp. disables moving for all items in the list. You can also enable or disable moving per item by adding a boolean property or field to each list item and then specifying the name of that property or field, e.g. CanMove=ProductCanBeReordered. The default value of the CanMove binding parameter is false.
You can bind a Storyboard Segue to a Command in XCode by selecting the Segue and then setting the Storyboard Segue identifier field to the name of the command, e.g. ShowDetail. When preparing for the segue, the controller base class will call it's GetCommandParameter() method, which you can override in your controller class to provide a parameter for the command, and then the base class will execute the command (if a command with the same name as the Segue identifier exists in the viewmodel).
As an alternative to using the Bind attribute in XCode, you can also specify bindings in code in an optional parameter of the InitializeBindings() method. The InitializeBindings method is implemented in the view controller base classes (e.g. ViewBase and TableViewBase), and it is called in your controller code from the ViewDidLoad() method. Here is an example of specifying binding parameters in code:
public override void ViewDidLoad()
{
	base.ViewDidLoad();

    var button = ...
    var label = ...

    var bindingsParameters = new BindingParameters[] {
        new BindingParameters { View = button, PropertyName = MainViewModel.COMMANDNAME_IncreaseCountCommand, Mode = BindingMode.Command },
        new BindingParameters { View = label,  PropertyName = MainViewModel.PROPERTYNAME_Count }
    };

    InitializeBindings(View, ViewModel, bindingsParameters);
}
You can specify bindings in code for views created in code as well as views loaded from a xib or storyboard file (with outlets). You can specify some or all of the bindings, and in each binding some or all of the binding parameters. If you also specify parameters for a binding in Bind attribute in XCode, those will override or supplement any parameters that you specify in code.
When you specify a binding for a UITableView, and it does not have it's Source property set, a new DataBindableUITableViewSource is created and assigned to the UITableView Source property automatically when you call InitializeBindings(). Alternatively, you can create an instance of a DataBindableUITableViewSource (derived) class in code and set that as the Source before you call InitializeBindings().
QuickCross allows you to simply modify or extend it with overrides in the view controller base classes ViewBase and TableViewBase, and in the ViewDataBindings class. You can also add more view controller base classes if you need to derive your controllers from other classes besides UIViewController and UITableViewController.
By overriding the OnPropertyChanged() method in your view controller class, you can handle changes for specific properties yourself instead of with the standard data binding. E.g:
// Example of how to handle specific viewmodel property changes in code instead of with (or in addition to) data binding:
protected override void OnPropertyChanged(string propertyName)
{
    switch (propertyName)
    {
        case OrderViewModel.PROPERTYNAME_DeliveryLocationListHasItems:
            var hasItems = ViewModel.GetPropertyValue<bool>(OrderViewModel.PROPERTYNAME_DeliveryLocationListHasItems);
            DeliveryLocationPicker.Hidden = !hasItems;
            break;
        default:
            base.OnPropertyChanged(propertyName); break;
    }
}
You can also override the UpdateView() method to change how the data binding mechanism sets a property value to a specific view (or modify multiple views based on the value etc.). E.g. to display a count value as a color, you could bind a UILabel named CountColorLabel to the Count property of a viewmodel, and then override UpdateView() like this:
public override void UpdateView(UIView view, object value)
{
    if (Object.ReferenceEquals(view, CountColorLabel))
    {
        int count = (int)value;
		view.BackgroundColor = count > 0 ? UIColor.Green : UIColor.Red;
        return;
    }
    base.UpdateView(view, value);
}
Note that
UpdateView()is also called for data bindings in all list items for all data-bound lists in your view. This makes it possible to customize data binding within list items with code in a normal view, instead of writing a custom data bindable table view source to put that customization code in.
Another scenario for overriding UpdateView() is when you want to update more than one view (within the same root view) from the same viewmodel property:
public override void UpdateView(UIView view, object value)
{
    if (Object.ReferenceEquals(view, ProductNameLabel))
    {
        base.UpdateView(view, value); // Set the single data-bound view
        string text = value == null ? "" : value.ToString();
        if (ProductName2Label.Text != text) ProductName2Label.Text = text;
        return;
    }
    base.UpdateView(view, value);
}
You can also react to changes in lists that implement INotifyCollectionChanged (e.g. ObservableCollections) by overriding OnCollectionChanged() in your view:
public override void OnCollectionChanged(object sender, NotifyCollectionChangedEventArgs e)
{
    ...
}
The sender parameter is the collection. You could use this e.g. if you want to do some animation when items are added or removed in a list.
Finally, you can modify or provide a parameter for a command when it is invoked, by overriding GetCommandParameter() in your view. E.g. you can pass the currently selected item in a table view to a command:
public override object GetCommandParameter(string commandName, object parameter = null)
{
    if (commandName == MainViewModel.COMMANDNAME_ViewItemCommand)
    {
        var indexPath = TableView.IndexPathForSelectedRow;
        if (indexPath != null) return ViewModel.Items[indexPath.Row];
    }
    return base.GetCommandParameter(commandName);
}
Note that
GetCommandParameter()is also called for commands in all list items that are viewmodels for all data-bound lists in your view. This makes it possible to customize command parameter handling within list items with code in a normal view controller, instead of writing a custom data bindable table view source to put that customization code in.
The built-in QuickCross DataBindableUITableViewSource class supports a simple list with one section, that can be data-bound to collections that implement the standard .NET interfaces IList and optionally INotifyCollectionChanged, such as ObservableCollection<T>. The collection items can be viewmodels or they can be simple .NET objects with properties and/or fields. If you implement ToString() on the list item object, you can also bind to . to display the value of an entire list item as text.
The DataBindableUITableViewSource class also supports using the native iOS table view editing mode to add, remove, edit and move items within a table view.
You can create specialized table view sources (e.g. if you want to display a table with multiple sections), by implementing a class derived from DataBindableUITableViewSource and then overriding methods from DataBindableUITableViewSource and/or the underlying UITableViewSource class. The inline documentation on the virtual methods (e.g. AddHandlers, RemoveHandlers, OnCollectionChanged and UpdateView) in the DataBindableUITableViewSource source provides guidance on this.
As described above, you can create an instance of your custom table view source and assign it to the Source property on a table view in the ViewDidLoad() method of your view controller, before you call InitializeBindings().
Out of the box QuickCross has default data binding support for these view types:
Note: in 2.0 beta these are very minimal, more will be added in 2.0 final release. Don't let this discourage you to try out the beta; it is really simple to add view types on the fly when you need them.
One-Way binding:
UILabel
Two-way binding:
UITextFieldUITextViewUITableViewand derived types
Command binding:
UIButtonUITableViewand derived types
To make more control types data bindable, you can simply add a case to the appropriate switch statements in the QuickCross\ViewDataBindings.UI.cs file in your application project, as indicated by the // TODO: comments. E.g.:
public static void UpdateView(View view, object value)
{
    if (view != null)
    {
        string viewTypeName = view.GetType().FullName;
        switch (viewTypeName)
        {
            // TODO: Add cases here for specialized view types, as needed
            case "Macaw.UIComponents.MultiImageView":
                {
                    if (value is Uri) value = ((Uri)value).AbsoluteUri;
                    var multiImageView = (Macaw.UIComponents.MultiImageView)view;
                    multiImageView.LoadImageList(value == null ? null : new[] { (string)value });
                }
                break;
			...
		}
	}
}
To prevent memory leaks, be sure that if you register an event handler on a view in AddCommandHandler() or AddTwoWayHandler(), you also unregister that handler in RemoveCommandHandler() resp. RemoveTwoWayHandler().
If you need to derive your view controllers from other classes besides UIViewController and UITableViewController, you can simply copy the existing QuickCross\ViewBase.cs or QuickCross\TableViewBase.cs class and change the class that it derives from to the one that you need.
E.g. to support data bindable classes derived from UIPageViewController, you would copy ViewBase.cs to PageViewBase.cs and just change "UIViewController" to "UIPageViewController" in these lines:
public class PageViewBase : UIPageViewController, ViewDataBindings.ViewExtensionPoints
{
    public PageViewBase() { }
    public PageViewBase(string nibName, NSBundle bundle) : base(nibName, bundle) { }
    public PageViewBase(IntPtr handle) : base(handle) { }

    ...
}
And then you can add some new constructor overloads to pass parameters to the base class constructor. Now you can use the new base class in your view:
public partial class ProductView : PageViewBase
{
	...
}
It should take no more than a minute. To complete this, you could also add a custom view template for this new view type.
To prevent memory leaks, you should remove and re-add any handlers in your view controller code that you register for external events. External means: events that are not defined on the view controller itself (or on contained objects that are only referenced in the view controller such as a UIButton). E.g. an event handler for a viewmodel event or a service event needs to be removed and re-added like this. The QuickCross view controller base classes do this removing and re-adding automatically at the ViewWillAppear() and ViewDidDisappear() view lifecycle events. To have your own external event handlers added, removed and re-added at the appropriate times, you only need to override the AddHandlers() and RemoveHandlers() methods and add/remove your handlers there. E.g.:
protected override void AddHandlers()
{
    base.AddHandlers();
    SomeExternalService.SomeEvent += SomeExternalService_SomeEvent;
}

protected override void RemoveHandlers()
{
    SomeExternalService.SomeEvent -= SomeExternalService_SomeEvent;
    base.RemoveHandlers();
}
Note: Be sure to always call the base class method as well!
You should not call AddHandlers() yourself - that would mess up the base class tracking of added handlers. AddHandlers() is initially called by the view controller base class in the InitializeBindings() method, which you call in your view controller code in the ViewDidLoad() method.
Below is an overview of using QuickCross with Xamarin.Android.
Here is how to create an Android Twitter app that demonstrates simple data binding:
Note that the complete source for this Twitter app example is available in this repository, here. For a more elaborate example, see this blog post on the Android version of the Cloud Auction example application.
This is what the Twitter app will look like in Android:

So let's get started.
-
Create a working Android app by following steps 1 though 4 of Getting Started above - create an
Android Applicationproject namedTwitterand anAndroid Class Libraryproject namedTwitter.Shared. -
Remove the
Activity1.cs,Resources\Layout\Main.axmlandClass1.csfiles that were included by the Xamarin.Android project templates -
Now you can run the app on your device and test the example MainView that was generated by the Install-Mvvm command.
If you already created the shared code library for the example Twitter app in the Create an iOS App tutorial, you can include the existing C# files from the iOS library project also in your Android library project. Then skip to step 8 below.
-
Create a
Modelsfolder in your Twitter.Shared project and create thisTweet.csclass in it:using System; namespace Twitter.Shared.Models { public class Tweet { public string Text { get; set; } public string UserName { get; set; } public DateTime CreatedAt { get; set; } } }
-
In
ViewModels\MainViewModel.csin your library project, in the#region Data-bindable properties and commands, remove the example property and command add these properties and commands with the indicated code snippets:Snippet Parameters Generated code propdb2c Tweet Tweet public Tweet Tweet { ... }
private void OnTweetChanged() { ... }propdbcol ObservableCollection Tweet TweetList public ObservableCollection TweetList { ... }
public bool TweetListHasItems { ... }
protected void UpdateTweetListHasItems() { ... }cmd Delete public RelayCommand DeleteCommand { ... }
private void Delete() { ... }propdb2c string Text public string Text { ... }
private void OnTextChanged() { ... }propdb int CharactersLeft public int CharactersLeft { ... } cmd Send public RelayCommand SendCommand { ... }
private void Send() { ... } -
Add this code in the generated
MainModelmethods:public MainViewModel() { TweetList = new ObservableCollection<Tweet>(); OnTweetChanged(); Text = ""; } private void OnTweetChanged() { DeleteCommand.IsEnabled = (Tweet != null); } private void Delete() { TweetList.Remove(Tweet); Tweet = null; } private void OnTextChanged() { CharactersLeft = 140 - Text.Length; SendCommand.IsEnabled = (Text.Length > 0 && CharactersLeft >= 0); } private void Send() { var newTweet = new Tweet { Text = this.Text, CreatedAt = DateTime.Now, UserName="Me" }; TweetList.Insert(0, newTweet); Tweet = newTweet; Text = ""; }
-
The
MainViewModel.csfile also contains aMainViewModelDesignclass where you can put some hardcoded viewmodel data. Put this code in the MainViewModelDesign constructor:public MainViewModelDesign() { Text = "Text for a new tweet"; var now = DateTime.Now; TweetList.Insert(0, new Tweet { Text = "Creating a simple Twitter app with QuickCross", UserName = "Me", CreatedAt = now.AddSeconds(-115) }); TweetList.Insert(0, new Tweet { Text = "Created a solution with an application and a library project", UserName = "Me", CreatedAt = now.AddSeconds(-63) }); TweetList.Insert(0, new Tweet { Text = "Added Tweet model class", UserName = "Me", CreatedAt = now.AddSeconds(-45) }); TweetList.Insert(0, new Tweet { Text = "Added viewmodel properties and commands with code snippets", UserName = "Me", CreatedAt = now.AddSeconds(-25) }); TweetList.Insert(0, new Tweet { Text = "Added some hardcoded design data fot the viewmodel", UserName = "Me", CreatedAt = now.AddSeconds(-1) }); }
-
In the application project, in the file
Resources\Layout\MainView.axml, replace the existing markup with this:<?xml version="1.0" encoding="utf-8"?> <LinearLayout xmlns:android="http://schemas.android.com/apk/res/android" android:id="@+id/MainView" android:orientation="vertical" android:layout_width="fill_parent" android:layout_height="fill_parent"> <ListView android:layout_width="fill_parent" android:layout_height="0dp" android:layout_weight="1" android:cacheColorHint="#FFDAFF7F" android:choiceMode="singleChoice" android:id="@+id/MainView_Tweet" android:tag="{Binding Mode=TwoWay}" /> <EditText android:id="@+id/MainView_Text" android:tag="{Binding Mode=TwoWay}" android:text="*" android:textAppearance="?android:attr/textAppearanceLarge" android:layout_width="fill_parent" android:layout_height="wrap_content" /> <LinearLayout android:orientation="horizontal" android:layout_width="fill_parent" android:layout_height="wrap_content"> <TextView android:text="Characters left: " android:textAppearance="?android:attr/textAppearanceSmall" android:layout_width="wrap_content" android:layout_height="wrap_content" /> <TextView android:id="@+id/MainView_CharactersLeft" android:text="14*" android:textAppearance="?android:attr/textAppearanceSmall" android:layout_width="0dp" android:layout_weight="1" android:layout_height="wrap_content" /> <Button android:id="@+id/MainView_SendCommand" android:layout_width="wrap_content" android:layout_height="wrap_content" android:text="Send" /> <Button android:id="@+id/MainView_DeleteCommand" android:layout_width="wrap_content" android:layout_height="wrap_content" android:layout_gravity="right" android:text="Delete" /> </LinearLayout> </LinearLayout>
-
Add a new Android Layout named
Resources\Layout\TweetListItem.axml, with this markup:<?xml version="1.0" encoding="utf-8"?> <quickcross.CheckableLinearLayout xmlns:android="http://schemas.android.com/apk/res/android" android:id="@+id/TweetListItem" android:orientation="vertical" android:background="@drawable/CustomSelector" android:addStatesFromChildren="true" android:layout_width="fill_parent" android:layout_height="wrap_content"> <LinearLayout android:orientation="horizontal" android:layout_width="fill_parent" android:layout_height="wrap_content"> <TextView android:id="@+id/TweetListItem_UserName" android:text="Me*" android:textAppearance="?android:attr/textAppearanceSmall" android:layout_width="40dp" android:layout_height="wrap_content" /> <TextView android:id="@+id/TweetListItem_CreatedAt" android:text="friday october 11, 2013 14:08:2*" android:textAppearance="?android:attr/textAppearanceSmall" android:gravity="right" android:layout_width="0dp" android:layout_weight="1" android:layout_height="wrap_content" /> </LinearLayout> <TextView android:id="@+id/TweetListItem_Text" android:text="Some example text*" android:textAppearance="?android:attr/textAppearanceMedium" android:layout_width="wrap_content" android:layout_height="wrap_content" /> </quickcross.CheckableLinearLayout>
Note that the CheckableLinearLayout view is a simple extension of the standard LinearLayout view that implements the ICheckable to better support highlighting checked list items; this view does not add anything specific for data-binding. If you dont care about highlighting checked items, you can use the standard LinearLayout (or any other layout view) for data binding as well.
-
Add a new XML File named
Resources\Drawable\CustomSelector.xml, with this markup:<?xml version="1.0" encoding="utf-8"?> <selector xmlns:android="http://schemas.android.com/apk/res/android"> <item android:state_checked="true" android:drawable="@color/cellchecked" /> <item android:drawable="@color/cellback" /> </selector>
-
Add a new XML File named
Resources\Values\Colors.xml, with this markup:<?xml version="1.0" encoding="utf-8"?> <resources> <color name="cellback">#00000000</color> <color name="cellchecked">#FF0000FF</color> </resources>
-
Run the app and test the MainView. Notice how the Send and Delete buttons are enabled and disabled based on the text length and selected item state, and how the characters remaining count is updated as you type. Also note how the selected list item is highlighted both from the UI when tapped, and from code when adding a new tweet.
You have created a working app with QuickCross. Note that the only code that you needed to write is in the viewmodel; no Android view or list adapter code is needed. To get data binding working, the markup follows some naming conventions and specifies some binding parameters in the Tag.
An Android data binding is a one-on-one binding between an Android view, such as a TextBox or Button, and a viewmodel property or command. You can specify bindings with (a combination of):
- Code in the activity or fragment that creates the containing view
- Id naming convention in the view markup
- Tag binding parameters in the view markup
Note that for performance reasons, Android data binding allows no more than one view (within the same rootview) to be bound to a property. If you need to update multiple views with the same property value, you can do that by overriding the UpdateView() method in your activity or fragment class, and adding a few lines of code.
Finally, note that you do not need to use the MvvmQuickCross implementation of Android data binding if you prefer not to. You can subscribe to the standard .NET data binding events (PropertyChanged on viewmodels, CanExecuteChanged on RelayCommand viewmodel commands, and CollectionChanged on ObservableCollection viewmodel properties) from your code in any view type, and handle data binding any way you like. In this case you can keep using the New-View command, if you add your own view template files.
To bind a view to a viewmodel property without using code, name the view id like this:
android:id="@+id/<activity-or-fragment-class-name>_<viewmodel-property-or-command-name>"E.g, the MainView in the Twitter example above is created by this class:
public class MainView : ActivityViewBase<MainViewModel> { ... }And in the markup this is how a child view is bound to the CharactersLeft property on the viewmodel:
<TextView android:id="@+id/MainView_CharactersLeft" ... />Note that instead of using this id naming convention, you can specify the view in code. You can also change the default name prefix.
These are the binding parameters that you can specify in the view tag (linebreaks added for readability):
<ViewType android:tag="...
 {Binding propertyName, Mode=OneWay|TwoWay|Command}
 {CommandParameter ListId=<view-Id>}
 {List ItemsSource=listPropertyName, ItemIsValue=false|true,
       ItemTemplate=listItemTemplateName, ItemValueId=listItemValueId}
 ..." />
All of these parameters are optional. You can also put any additional text outside the { } in the tag if you want to. Note that you can also specify binding parameters through code instead of in the tag attribute.
Is known by default from the naming convention for the view id = <rootview prefix><propertyName>; the default for the rootview prefix is the rootview class name + "_". Note that viewmodel commands are just a special type of viewmodel property, so you can use the propertyName to specify a command name as well.
Is OneWay by default. The mode specifies:
- OneWay data binding where the viewmodel property updates the view - e.g. a display-only TextView. The bound property can be generated with the propdb1 or propdbcol code snippet.
- TwoWay data binding where the viewmodel property updates the view and vice versa, e.g. an editable EditText. The bound property can be generated with the propdb2, propdb2c or propdbcol code snippet.
- Command binding (e.g. a Button). The bound command can be generated with the cmd or cmdp code snippet.
Note that you can also use the binding mode Command in a view that derives from AdapterView (ListView, Spinner etc). When an item in the list is selected or checked, the bound command is invoked with the selected item as the command parameter. E.g. in below markup, selecting an item in the list navigates to a detail view of the item:
<ListView
    android:id="@+id/ProductsView_ProductList"
    android:tag="{Binding SelectProductCommand, Mode=Command} {List ItemsSource=ProductList}"
... />Passes the selected item of the specified adapter view as the command parameter. The specified view can be any view type that is derived from AdapterView (ListView, Spinner etc). E.g. this Remove button passes the selected item from the view with id=SampleItemListView_Items as the command parameter, when the button is tapped:
<ListView
    android:id="@+id/SampleItemListView_Items"
    android:tag="{List ItemsSource=Items, ItemTemplate=ListItem}"
    android:choiceMode="singleChoice"
    android:listSelector="@android:color/holo_blue_dark"
	... />
<Button
    android:id="@+id/SampleItemListView_RemoveItemCommand"
    android:text="Remove"
    android:tag="{Binding Mode=Command} {CommandParameter ListId=SampleItemListView_Items}"
	... />
The passed command parameter is the selected item object from the bound list, e.g. see the corresponding viewmodel code:
public ObservableCollection<SampleItem> Items { ... }
public RelayCommand RemoveItemCommand { ... }

private void RemoveItem(object parameter)
{
    var item = (SampleItem)parameter;
	...
}
The List binding parameters are for use with views derived from AdapterView (ListView, Spinner etc):
Specifies the name of the viewmodel collection property that contains the list items. The property must implement the standard .NET IList interface. If the property also implements the standard .NET INotifyCollectionChanged interface (e.g an ObservableCollection), the view will automatically reflect added, replaced or removed items. The default value of ItemsSource is propertyName + "List".
The items in an ItemsSource viewmodel collection property can be:
- An object with fields or properties (e.g. a POCO model object)
- An 'ValueItem' object, meaning an object that implements
ToString()to present the value of the entire object as a human-readable text - A viewmodel object that has data-bindable properties and/or commands. This is also called composite viewmodels, which makes it possible to e.g. automatically display changes of individual fields within existing list item objects.
Specifies the name of the Android layout that represents a list item. E.g. the value "TweetListItem" corresponds to the view markup in the file Resources\Layout\TweetListItem.axml. The default value of ItemTemplate is the value of ItemsSource + "Item".
Is a boolean flag indicating whether the list item should be displayed as a single text string, by calling the ToString() method on the object. If this flag is set to true, the ItemValueId binding parameter is also used. The default for ItemIsValue is false.
If ItemIsValue is true, this parameter specifies the id of the child view within the item template view that should be used to display the object text. The default value of ItemValueId is the value of ItemTemplate.
As an alternative to using the Id naming convention and tag texts in markup, you can also specify bindings in code in an optional parameter of the Initialize() method. The Initialize method is implemented in the view base classes, and it is called in your view code from the OnCreate() (for an activity view) or OnCreateView() (for a fragment view) method. Here is an example of specifying binding parameters in code:
var spinner = FindViewById<Android.Widget.Spinner>(Resource.Id.OrderView_DeliveryLocation);
spinner.Adapter = new DataBindableListAdapter<string>(LayoutInflater,
    itemTemplateResourceId: Resource.Layout.TextListItem,
    idPrefix:               "TextListItem_",
    itemValueResourceId:    Resource.Id.TextListItem);

var bindingsParameters = new BindingParameters[] {
   new BindingParameters {
       Mode                                    = BindingMode.TwoWay,
       View                                    = spinner,
       PropertyName                            = OrderViewModel.PROPERTYNAME_DeliveryLocation,
       ListPropertyName                        = OrderViewModel.PROPERTYNAME_DeliveryLocationList,
       CommandParameterSelectedItemAdapterView = null
   }
};

Initialize(
	FindViewById(Resource.Id.OrderView),
	CloudAuctionApplication.Instance.OrderViewModel,
	bindingsParameters,
	idPrefix: "OrderView_"
);
You can specify some or all of the bindings, and in each binding some or all of the binding parameters. If you also specify parameters for a binding in a markup tag, those will override or supplement any parameters that you specify in code.
Note that you do not need to use the view id naming convention for normal views, since you specify a view instance in the View parameter. You could create the view entirely in code and not even give it an id. If you do use the id naming convention, you can specify a custom id name prefix in the idPrefix parameter of the Initialize() method (for normal views) and the DataBindableListAdapter() constructor (for list item views).
Most binding parameters are specified in the Initialize call, while some List binding parameters are specified when constructing a data bindable list adapter for an AdapterView. When you use markup for data bindings and an AdapterView does not have an adapter assigned to it, a data bindable adapter is created and assigned to the AdapterView automatically.
Here is how the code binding parameters correspond to the tag binding parameters:
| Code | Markup | ||
| BindingParameters | Mode | Binding | Mode |
| PropertyName | Binding | property name | |
| CommandParameter SelectedItemAdapterView | CommandParameter | ListId | |
| ListPropertyName | List | ItemsSource | |
| DataBindableListAdapter | itemTemplateResourceId | List | ItemTemplate |
| itemValueResourceId | List | ItemValueId | |
QuickCross allows you to simply modify or extend it with overrides in the view base classes, and in the ViewDataBindings class. You can also add more view base classes if you need to derive your views from other classes besides Activity and Fragment.
By overriding the OnPropertyChanged() method in your view class, you can handle changes for specific properties yourself instead of with the standard data binding. E.g:
// Example of how to handle specific viewmodel property changes in code instead of with (or in addition to) data binding:
protected override void OnPropertyChanged(string propertyName)
{
    switch (propertyName)
    {
        case OrderViewModel.PROPERTYNAME_DeliveryLocationListHasItems:
            var hasItems = ViewModel.GetPropertyValue<bool>(
							  OrderViewModel.PROPERTYNAME_DeliveryLocationListHasItems);
            var spinner = FindViewById<Android.Widget.Spinner>(
							  Resource.Id.OrderView_DeliveryLocation);
            spinner.Visibility = hasItems ? ViewStates.Visible : ViewStates.Invisible;
            break;
        default:
            base.OnPropertyChanged(propertyName); break;
    }
}
You can also override the UpdateView() method to change how the data binding mechanism sets a property value to a specific view (or modify multiple views based on the value etc.). E.g., an alternative to the OnPropertyChanged() code above is to add a containing FrameLayout around the spinner, data-bind the FrameLayout to the DeliveryLocationListHasItems property, and then override UpdateView() like this:
<FrameLayout
    android:id="@+id/OrderView_DeliveryLocationListHasItems"
    android:layout_width="fill_parent"
    android:layout_height="wrap_content">
    <Spinner
        android:layout_width="fill_parent"
        android:layout_height="wrap_content"
        android:id="@+id/OrderView_DeliveryLocation"
        android:tag="{Binding Mode=TwoWay} {List ItemIsValue=true, ItemTemplate=TextListItem}" />
</FrameLayout>
public override void UpdateView(Android.Views.View view, object value)
{
switch (view.Id)
{
case Resource.Id.OrderView_DeliveryLocationListHasItems:
view.Visibility = (bool)value ? ViewStates.Visible : ViewStates.Invisible; break;
default:
base.UpdateView(view, value); break;
}
}Note that
UpdateView()is also called for data bindings in all list items for all data-bound lists in your view. This makes it possible to customize data binding within list items with code in a normal view, instead of writing a custom data bindable adapter to put that customization code in.
Another scenario for overriding UpdateView() is when you want to update more than one view (within the same root view) from the same viewmodel property:
public override void UpdateView(Android.Views.View view, object value)
{
    switch (view.Id)
    {
        case Resource.Id.OrderView_ProductName:
            base.UpdateView(view, value); // Set the single data-bound view
			string text = value == null ? "" : value.ToString();
            if (ProductName2TextView.Text != text) ProductName2TextView.Text = text;
			break;
        default:
            base.UpdateView(view, value); break;
    }
}
Finally, you can react to changes in lists that implement INotifyCollectionChanged (e.g. ObservableCollections) by overriding OnCollectionChanged() in your view:
public override void OnCollectionChanged(object sender, NotifyCollectionChangedEventArgs e)
{
    ...
}
The sender parameter is the collection. You could use this e.g. if you want to do some animation when items are added or removed in a list.
Out of the box QuickCross has default data binding support for these view types:
One-Way binding:
Android.Widget.ProgressBarAndroid.Webkit.WebViewTextViewand derived typesAbsListViewand derived typesAdapterViewand derived types
Two-way binding:
AbsSpinnerand derived typesAbsListViewand derived typesEditTextand derived types
Command binding:
AbsSpinnerand derived typesAdapterViewand derived typesViewand derived types
To make more control types data bindable, you can simply add a case to the appropriate switch statements in the QuickCross\ViewDataBindings.UI.cs file in your application project, as indicated by the // TODO: comments. E.g.:
public static void UpdateView(View view, object value)
{
    if (view != null)
    {
        string viewTypeName = view.GetType().FullName;
        switch (viewTypeName)
        {
            // TODO: Add cases here for specialized view types, as needed
            case "Macaw.UIComponents.MultiImageView":
                {
                    if (value is Uri) value = ((Uri)value).AbsoluteUri;
                    var multiImageView = (Macaw.UIComponents.MultiImageView)view;
                    multiImageView.LoadImageList(value == null ? null : new[] { (string)value });
                }
                break;
			...
		}
	}
}
To prevent memory leaks, be sure that if you register an event handler on a view in AddCommandHandler() or AddTwoWayHandler(), you also unregister that handler in RemoveCommandHandler() resp. RemoveTwoWayHandler().
If you need to derive your views from other classes besides Activity and Fragment, you can simply copy the existing QuickCross\ActivityViewBase.cs or QuickCross\FragmentViewBase.cs class and change the class that it derives from to the one that you need.
E.g. to support data bindable classes derived from ListActivity, you would copy ActivityViewBase.cs to ListActivityViewBase.cs and just change "Activity" to "ListActivity" in these lines:
public abstract class ListActivityViewBase : ListActivity
{
	...
}

public class ListActivityViewBase<ViewModelType> :
			     ListActivityViewBase,
                 ViewDataBindings.ViewExtensionPoints
                 where ViewModelType : ViewModelBase
{
	...
}
Now you can use the new base class in your view:
[Activity(Label = "Order")]
public class OrderView : ListActivityViewBase<OrderViewModel>
{
	...
}
It should take no more than a minute. To complete this, you could also add a custom view template for this new view type.
As described by Xamarin, under "3.1. Removing Event Handlers in Activities" here, you need to remove and re-add any external event handlers that you register in your view code to prevent memory leaks (external meaning not tied to the view itself or to an object contained within that view). The QuickCross view base classes do this removing and re-adding automatically at the appropriate lifecycle events. To have your own event handlers added, removed and re-added at the appropriate times, you only need to override the AddHandlers() and RemoveHandlers() methods and add/remove your handlers there. E.g.:
protected override void AddHandlers()
{
    base.AddHandlers();
    foreach (var tab in tabs) tab.TabSelected += Tab_TabSelected;
}

protected override void RemoveHandlers()
{
    foreach (var tab in tabs) tab.TabSelected -= Tab_TabSelected;
    base.RemoveHandlers();
}
Note: Be sure to always call the base class method as well!
You should not call AddHandlers() yourself - that would mess up the base class tracking of added handlers. AddHandlers() is initially called by the base class in the Initialize() method, which you call in your view code in the OnCreate() or OnCreateView() method.
In the QuickCross\AndroidHelpers.cs file in your application project, you will find a few simple helpers that are of general use in Android development. Noteable helpers are:
-
CurrentActivitysometimes you need to code against the current activity from code that is not part of that activity. This static property is kept up to date by the Activity view base class, in such a way that no memory leaks can occur. -
Wrapper<T>sometimes you need to provide aJava.Lang.Objectto a Xamarin.Android method or property, but what you actually have is aSystem.Object. This wrapper allows you to cast between any .NET Object and Java Object, e.g.:rootView.Tag = (Wrapper<ListDictionary>)viewHolder; ... var viewHolder = (ListDictionary)rootView.Tag;
Note that the Tag property of an Android View in Xamarin is a
Java.Lang.Object.
To upgrade QuickCross to a later version, follow these steps:
-
For all your QuickCross solutions: open your solution, make sure that you have no editor windows open, and then enter these commands in the package manager console:
Remove-Module QuickCross
Uninstall-Package QuickCross
-
Delete the QuickCross folders from your application project and your library project.
Note: if you made any customizations to the QuickCross files, save those first and re-apply them to the new QuickCross files after you have upgraded.
-
Install the latest QuickCross version by following steps 2 through 4 in Getting Started
This will add the latest version of the QuickCross folders to your projects, but it will not overwrite any of your exiting code (Application, Navigator).
Now your app is upgraded. NJoy QuickCross!
To upgrade from MvvmQuickCross 1.6 to QuickCross 2.0, follow these steps:
-
For all your MvvmQuickCross solutions: open your solution, make sure that you have no editor windows open, and then enter these commands in the package manager console:
Remove-Module MvvmQuickCross
Uninstall-Package MvvmQuickCross
-
Uninstall the MvvmQuickCross Visual Studio code snippets:
- In Visual Studio Code Snippets Manager, select the folder where the MvvmQuickCross snippets are listed.
- Copy the folder path from Location and open it in Windows Explorer
- Delete the MvvmQuickCross file there
- Close the Code snippets manager; the MvvmQuickCross snippets should be gone now
-
Delete the MvvmQuickCross folders from your application project and your library project, and then rename MvvmQuickCross to QuickCross in all files in your solution.
Note: if you made any customizations to the MvvmQuickCross files, save those first and re-apply them to the QuickCross files after you have upgraded.
-
Rename your existing MyAppNavigator.cs, IMyAppNavigator.cs and MyAppApplication.cs source files to end on .old.cs and set their Build Action property to None.
-
Install QuickCross by following steps 2 through 4 in Getting Started
This will add the QuickCross folders to your projects and generate a new MyAppNavigator, IMyAppNavigator and MyAppApplication, but it will not overwrite any of your existing code.
-
Copy your
NavigateTo...()method signatures from IMyAppNavigator.old.cs to IMyAppNavigator.cs, and remove thenavigationContextparameter. -
Copy your
NavigateTo...()method implementations from MyAppNavigator.old.cs to MyAppNavigator.cs, and remove thenavigationContextparameter there as well. -
Copy your
...ViewModelproperties, yourContinueTo...()methods and any code you added manually from MyAppApplication.old.cs to MyAppApplication.cs. Remove theskipNavigationparameter from theContinueTo...()methods; it is now safe to always call theNavigateTo...()methods because the Navigator now checks if navigation should be skipped. Finally, remove thenavigationContextparameter from theNavigateTo...()method invocations. -
Build your solution; you will get errors from the code that creates your application and navigator instances. This is because the
navigationContextparameter was moved from theApplicationto theNavigatorfor more flexibility when using multiple navigation contexts (e.g. in iOS Universal apps). The navigator now is a singleton, accessible through it's staticInstanceproperty. The navigator now also has a publicNavigationContextproperty that you need to set to the navigation context. To fix this:Where the old code reads:
new MyAppNavigator(), update it to:MyAppNavigator.InstanceWhere the old code reads:
new MyAppApplication(..., navigationContext), update it to:MyAppNavigator.Instance.NavigationContext = navigationContext; new MyAppApplication(...) -
In your Android Activity views, in
OnCreate()you need to add the following code before the call to one of theMyAppApplication.Instance.ContinueTo...()methods:MyAppNavigator.Instance.NavigationContext = this; -
Once your app compiles and runs, remove the MyAppNavigator.old.cs, IMyAppNavigator.old.cs and MyAppApplication.old.cs
Now your app is upgraded. NJoy QuickCross!