![]()


Resonance is a high-performance real-time C# communication library with built-in support for several different transcoding and delivery methods. This library provides an intuitive API for asynchronous communication between machines and devices by exposing a set of easy to use, pluggable components.
| Module | Nuget | Description | Frameworks |
|---|---|---|---|
| Resonance |  |
Core components | .NET Standard 2.0 |
| Resonance.Protobuf |  |
Protobuf Encoder & Decoder | .NET Standard 2.0 |
| Resonance.MessagePack |  |
MessagePack Encoder & Decoder | .NET Standard 2.0 |
| Resonance.USB |  |
USB Adapter support. | .NET 4.6.1, .NET 5, Xamarin.Forms |
| Resonance.SignalR |  |
SignalR (core and legacy) Adapters and Hubs. | .NET Standard 2.0 |
| Resonance.WebRTC |  |
WebRTC Adapter support. | .NET Standard 2.0 |
| Resonance.LZ4 |  |
LZ4 Compression support. | .NET Standard 2.0 |
| Resonance.Bluetooth |  |
Bluetooth Communication Adapter, Server and Discovery. | .NET 4.6.1, .NET 5, Xamarin.Forms |
Resonance is a feature-rich communication framework, designed to bring complex, real-time communication methodologies, down to a solid, intuitive API that will provide you with all the tooling you need, out of the box. Get started implementing advanced communication applications with minimal effort.
Resonance provides support for the following key features.
- ✅ One-way messages - send a message from one side to another with or without acknowledgement.
- ✅ Request-Response messages - send a request while expecting a response.
- ✅ Continuous response streams - send a single request and receive multiple response messages.
- ✅ Integrated encryption, compression and keep alive mechanism.
- ✅ Built-in support for RPC - use a common interface for communication by calling standard methods, properties and events!
- ✅ Built-in servers and services for handling incoming connections.
- ✅ Built-in support for various communication methods -whether you want to communicate between applications on the same device, on the local area network or across the internet.
- ✅ Built-in support for various encoding and decoding interfaces.
- ✅ Standard and Fluent APIs for clear construction of objects.
- ✅ Support for both synchronous and asynchronous operations.
- ✅ Output communication logs to any logging library of your choice.
- ✅ Work with standard C# objects and types without the need to handle all the bits and bytes.
🔗 Check out the Wiki page for tutorials and fully working demos!
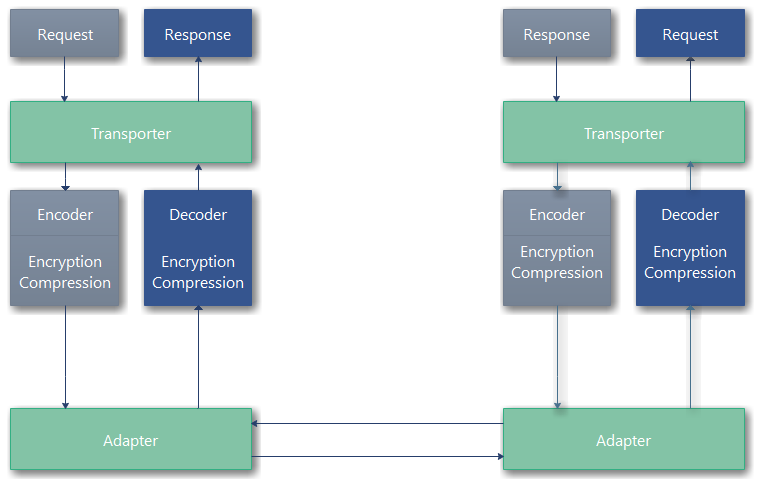
The resonance library might be described by these 3 basic layers:
A Transporter responsibility is to provide the API for sending and receiving messages, managing those messages, and propagating the required information to other components.
Encoders and Decoders are components that can be plugged to a transporter, they determine how outgoing/incoming messages should be encoded and whether the data should be encrypted and/or compressed. The Following built-in transcoding methods are currently supported by the library:
- Json
- Bson
- Protobuf
- MessagePack
- Xml
Adapters can also be plugged to a transporter to determine how outgoing/incoming encoded data is going to be transmitted and where. The following built-in adapters are currently supported by the library:
- TCP
- UDP
- USB
- In-Memory
- SignalR
- WebRTC
- Bluetooth
- Named Pipes
- Shared Memory
The following diagram described a simple request-response scenario.
The first step is deciding about the communication and transcoding methods that we are going to use. For this demonstration, we are going to use JSON transcoding over TCP/IP as the means of communication between two Transporters.
Here is how we can create the first Transporter with JSON encoding/decoding and TCP/IP adapter.
public async void Init()
{
    IResonanceTransporter transporter = new ResonanceTransporter();

    transporter.Adapter = new TcpAdapter("127.0.0.1", 8888);
    transporter.Encoder = new JsonEncoder();
    transporter.Decoder = new JsonDecoder();

    await transporter.ConnectAsync();
}
A Transporter can also be instantiated using the fluent syntax builder.
public async void Init()
{
    IResonanceTransporter transporter = ResonanceTransporter.Builder
        .Create()
        .WithTcpAdapter()
        .WithAddress("127.0.0.1")
        .WithPort(8888)
        .WithJsonTranscoding()
        .Build();

    await transporter.ConnectAsync();
}
Now, since we are using TCP/IP as the means of communication, we need a TCP server/listener to accept incoming connections.
For that, we are going to use the built-in ResonanceTcpServer class.
Although, you can use any other TCP/IP listener.
Here, we are going to create a new TCP server and wait for incoming connections.
Once a new connection is available, the ConnectionRequest event will be triggered.
The event arguments contains the Accept and Decline methods for accepting or declining the new connection.
The accept method returns an initialized TcpAdapter that can be used to create the "other side" second Transporter.
public async void Init_TcpServer()
{
    ResonanceTcpServer server = new ResonanceTcpServer(8888);
    server.ConnectionRequest += Server_ConnectionRequest;
    await server.StartAsync();
}

private async void Server_ConnectionRequest(object sender, ResonanceListeningServerConnectionRequestEventArgs<TcpAdapter> e)
{
    IResonanceTransporter transporter2 = ResonanceTransporter.Builder
        .Create()
        .WithAdapter(e.Accept()) //Call the Accept method to get a new TcpAdapter.
        .WithJsonTranscoding()
        .Build();

    await transporter2.ConnectAsync();
}
Now that we have both transporters connected, we can start sending messages.
Let's define two simple request and response messages.
CalculateRequest:
public class CalculateRequest
{
    public double A { get; set; }
    public double B { get; set; }
}CalculateResponse:
public class CalculateResponse
{
    public double Sum { get; set; }
}
Here is how we can send a CalculateRequest from the first Transporter, while expecting a CalculateResponse from the "other-side" second Transporter.
var response = await transporter1.SendRequestAsync<CalculateRequest, CalculateResponse>(new CalculateRequest()
{
    A = 10,
    B = 5
});

Console.WriteLine(response.Sum);
Finally, we need to handle the incoming CalculateRequest on the second Transporter.
Handling incoming requests can be achieved using any of the following method:
- Registering a
RequestReceivedevent handler. - Registering a request handler using the
RegisterRequestHandlermethod. - Using remote procedure calls. (see the RPC section on this document)
We are going to cover the first two methods.
Handling incoming requests using the RequestReceived event:
Let's go back to where we accepted the first Transporter connection and initialized the second one.
Here is how we would register for the RequestReceived event and respond to the CalculateRequest with a CalculateResponse.
private async void Server_ConnectionRequest(object sender, ResonanceListeningServerConnectionRequestEventArgs<TcpAdapter> e)
{
    IResonanceTransporter transporter2 = ResonanceTransporter.Builder
        .Create()
        .WithAdapter(e.Accept())
        .WithJsonTranscoding()
        .Build();

    //Register an event handler..
    transporter2.RequestReceived += Transporter2_RequestReceived;

    await transporter2.ConnectAsync();
}

private async void Transporter2_RequestReceived(object sender, ResonanceRequestReceivedEventArgs e)
{
    if (e.Message.Object is CalculateRequest calculateRequest)
    {
        if (calculateRequest.A > 0 && calculateRequest.B > 0)
        {
            await e.Transporter.SendResponseAsync(new CalculateResponse()
            {
                Sum = calculateRequest.A + calculateRequest.B
            }, e.Request.Token);
        }
        else
        {
            await e.Transporter.SendErrorResponseAsync("A & B must be greater than zero", e.Request.Token);
        }
    }
}
Notice, when using this method, we need to explicitly call the Transporter SendResponse method while specifying the request token.
If there are any errors, we can trigger an exception on the other-side Transporter by calling the SendErrorResponse method.
Handling incoming request using a Request Handler:
A better and more intuitive approach is to register a request handler method that will require far less coding, filtering and error handling.
Let's go back again and see how we might register a request handler.
private async void Server_ConnectionRequest(object sender, ResonanceListeningServerConnectionRequestEventArgs<TcpAdapter> e)
{
    IResonanceTransporter transporter2 = ResonanceTransporter.Builder
        .Create()
        .WithAdapter(e.Accept())
        .WithJsonTranscoding()
        .Build();

    //Register a request handler method...
    transporter2.RegisterRequestHandler<CalculateRequest, CalculateResponse>(HandleCalculateRequest);

    await transporter2.ConnectAsync();
}


private ResonanceActionResult<CalculateResponse> HandleCalculateRequest(CalculateRequest request)
{
    if (request.A > 0 && request.B > 0)
    {
        return new CalculateResponse() { Sum = request.A + request.B };
    }
    else
    {
        throw new ArgumentException("A & B must be greater than zero");
    }
}
Notice, when using this method, we don't need to specify the request token,
and, we are just returning a CalculateResponse as the result of the method.
Also, we don't need to explicitly report any errors, we can just throw an exception.
Actually, any exception that occurs while handling a request, will trigger an automatic error response.
Congratulations! we have successfully completed a fully working request-response pattern.
You can continue reading if you want to explore some more advanced topics.
Testing your communication is easier without initializing an actual known communication method. The library implements a special InMemoryAdapter which can be used for testing.
All you need to do is assign each of the adapters the same address.
public async void Demo()
{
    IResonanceTransporter transporter1 = ResonanceTransporter.Builder
        .Create()
        .WithInMemoryAdapter()
        .WithAddress("TEST")
        .WithJsonTranscoding()
        .Build();

    IResonanceTransporter transporter2 = ResonanceTransporter.Builder
        .Create()
        .WithInMemoryAdapter()
        .WithAddress("TEST")
        .WithJsonTranscoding()
        .Build();

    await transporter1.ConnectAsync();
    await transporter2.ConnectAsync();
}The continuous response pattern is simply the concept of sending a single request and expecting multiple response messages.
We are basically opening a constant stream of response messages.
This pattern is useful if we want to track some state of a remote application.
In this example, we are going to track a simple made up progress.
The first Transporter will send a ProgressRequest using the SendContinuousRequest method.
Continuous request tracking is made using the Reactive programming style. Meaning, the request sender will need to Subscribe and provide Next, Error and Completed callbacks.
First, let's create our ProgressRequest and ProgressResponse messages.
ProgressRequest:
public class ProgressRequest
{
    public int Count { get; set; }
    public TimeSpan Interval { get; set; }
}ProgressResponse:
public class ProgressResponse
{
    public int Value { get; set; }
}
Now, we are going to initialize two Transporters, send a continuous request from the first one, and respond with multiple response messages from the other.
public async void Send_Continuous_Request()
{
    IResonanceTransporter transporter1 = ResonanceTransporter.Builder
       .Create()
       .WithInMemoryAdapter()
       .WithAddress("TEST")
       .WithJsonTranscoding()
       .Build();

    IResonanceTransporter transporter2 = ResonanceTransporter.Builder
        .Create()
        .WithInMemoryAdapter()
        .WithAddress("TEST")
        .WithJsonTranscoding()
        .Build();

    await transporter1.ConnectAsync();
    await transporter2.ConnectAsync();

    transporter2.RegisterRequestHandler<ProgressRequest>(async (t, request) =>
    {
        for (int i = 0; i < request.Message.Count; i++)
        {
            await t.SendResponseAsync(new ProgressResponse() { Value = i }, request.Token);
            Thread.Sleep(request.Message.Interval);
        }
    });

    transporter1.SendContinuousRequest<ProgressRequest, ProgressResponse>(new ProgressRequest()
    {
        Interval = TimeSpan.FromSeconds(1),
        Count = 10
    }).Subscribe((response) =>
    {
        Console.WriteLine(response.Value);
    }, (ex) =>
    {
        Console.WriteLine($"Error: {ex.Message}");
    }, () =>
    {
        Console.WriteLine($"Continuous Request Completed!");
    });
}In all previous examples we have seen how we can send a request and receive a response in various ways.
Actually, you can also send a message without expecting any response by using the Send method.
Here is how you might send a message with no response and handle it on the other side.
private async void Send_Example()
{
    IResonanceTransporter t1 = ResonanceTransporter.Builder
        .Create()
        .WithInMemoryAdapter()
        .WithAddress("TST")
        .WithJsonTranscoding()
        .Build();

    IResonanceTransporter t2 = ResonanceTransporter.Builder
        .Create()
        .WithInMemoryAdapter()
        .WithAddress("TST")
        .WithJsonTranscoding()
        .Build();

    t1.Connect();
    t2.Connect();

    t2.RegisterMessageHandler<SomeObject>((t, message) =>
    {
        Console.WriteLine(message.Object.SomeValue);
    });

    await t1.SendAsync(new SomeObject() { SomeValue = "some value"});
}
Notice, there is a distinct separation between requests and one-way messages methods, events and handling.
- One-way messages are sent using the
Sendmethod and not theSendRequestmethod. - One-way messages are received using the
MessageReceivedevent and not theRequestReceivedevent. - One-way messages handlers are registered using the
RegisterMessageHandlerand not theRegisterRequestHandler.
By default, one-way message is sent with no acknowledgment, meaning, there is no certainty that it was received by the other side, but you can configure a one-way message to require an acknowledgment.
To do this, you need to set the message configuration RequireACK property to true.
await t1.SendAsync(new SomeObject() { SomeValue = "some value"}, new ResonanceMessageConfig()
{
     RequireACK = true
});
When setting RequireACK = true, the SendAsync will wait until an acknowledgment is received.
One-way message acknowledgment can also carry any error that might occur at the receiving side and throw an exception .
To enable this functionality, you need to configure both transporters MessageAcknowledgmentBehavior property to ResonanceMessageAckBehavior.ReportErrors.
Here is an example:
private async void SendWithErrorExample()
{
    IResonanceTransporter t1 = ResonanceTransporter.Builder
        .Create()
        .WithInMemoryAdapter()
        .WithAddress("TST")
        .WithJsonTranscoding()
        .Build();

    IResonanceTransporter t2 = ResonanceTransporter.Builder
        .Create()
        .WithInMemoryAdapter()
        .WithAddress("TST")
        .WithJsonTranscoding()
        .Build();

    //Enable error reporting.
    t1.MessageAcknowledgmentBehavior = ResonanceMessageAckBehavior.ReportErrors;
    t2.MessageAcknowledgmentBehavior = ResonanceMessageAckBehavior.ReportErrors;

    t1.Connect();
    t2.Connect();

    t2.RegisterMessageHandler<SomeObject>((t, message) =>
    {
        throw new Exception("Test Error");
    });

    try
    {
        await t1.SendAsync(new SomeObject() { SomeValue = "some value" }, new ResonanceMessageConfig()
        {
            RequireACK = true
        });
    }
    catch (Exception ex)
    {
        Console.WriteLine(ex.Message);
    }
}In all previous example we used the Transporter to send request and response messages by providing the request or response objects, but actually, we can specify additional configuration to each request or response message.
For example, by specifying a request configuration, we can change the default timeout for the request, or priority of the message.
Here is how you would specify the configuration of a simple request message.
var response = await transporter1.SendRequest<CalculateRequest, CalculateResponse>(new CalculateRequest()
{
    A = 10,
    B = 5
}, new ResonanceRequestConfig()
{
    //After 5 seconds and no response, a TimeoutException will be thrown.
    Timeout = TimeSpan.FromSeconds(5),

    //This message has high priority in the message queue.
    Priority = Threading.QueuePriority.High,
});
A continuous request configuration also allows specifying the continuous timeout, meaning, the maximum time interval between each response.
The Resonance library implements an automatic internal keep alive mechanism.
The keep alive mechanism helps detect lost connection between adapters.
We can enable/disable and control a Transporter's keep alive behavior by changing its KeepAliveConfiguration property.
Here is how we would change a Transporter's keep alive configuration.
IResonanceTransporter t = new ResonanceTransporter();

//Enable keep alive.
t.KeepAliveConfiguration.Enabled = true;

//Frequency of keep alive messages.
t.KeepAliveConfiguration.Interval = TimeSpan.FromSeconds(5);

//Maximum failed attempts.
t.KeepAliveConfiguration.Retries = 4;

//Respond to the other-side transporter keep alive messages.
t.KeepAliveConfiguration.EnableAutoResponse = true;

//Transporter state will change to 'Failed' when keep alive times out.
t.KeepAliveConfiguration.FailTransporterOnTimeout = true;
Here is how you can configure the keep alive using the Transporter fluent builder.
IResonanceTransporter transporter1 = ResonanceTransporter.Builder
    .Create()
    .WithTcpAdapter()
    .WithAddress("127.0.0.1")
    .WithPort(8888)
    .WithJsonTranscoding()
    .WithKeepAlive(interval: TimeSpan.FromSeconds(5), retries: 4)
.Build();The Resonance transcoding system provides the ability to compress messages and reduce network bandwidth.
Compression and decompression is performed by the Transporter's Encoder and Decoder.
To enable the encoder compression, you can access the encoder's CompressionConfiguration.
IResonanceTransporter t = new ResonanceTransporter();
t.Encoder = new JsonEncoder();
t.Encoder.CompressionConfiguration.Enabled = true; //Enable compression.
Or, using the fluent builder...
IResonanceTransporter transporter1 = ResonanceTransporter.Builder
    .Create()
    .WithInMemoryAdapter()
    .WithAddress("TST")
    .WithJsonTranscoding()
    .NoKeepAlive()
    .NoEncryption()
    .WithCompression() //Enable compression
    .Build();
Once the Encoder is configured for compression, all sent messages will be compressed.
There is no need to configure the receiving Decoder as it automatically detects the compression from the message header.
The base library uses GZip for compression, but you can use the faster LZ4 compression algorithm by installing the Resonance.LZ4 nuget package and specifying it as the Encoder's compressor.
IResonanceTransporter transporter1 = ResonanceTransporter.Builder
    .Create()
    .WithInMemoryAdapter()
    .WithAddress("TST")
    .WithJsonTranscoding()
    .NoKeepAlive()
    .NoEncryption()
    .WithLZ4Compression() //Enable LZ4 compression.
.Build();The Resonance transcoding system also provides the ability to encrypt and decrypt outgoing and incoming messages.
Although some of the adapters already supports their internal encryption like the SignalR and WebRTC adapters, you might want to implement your own.
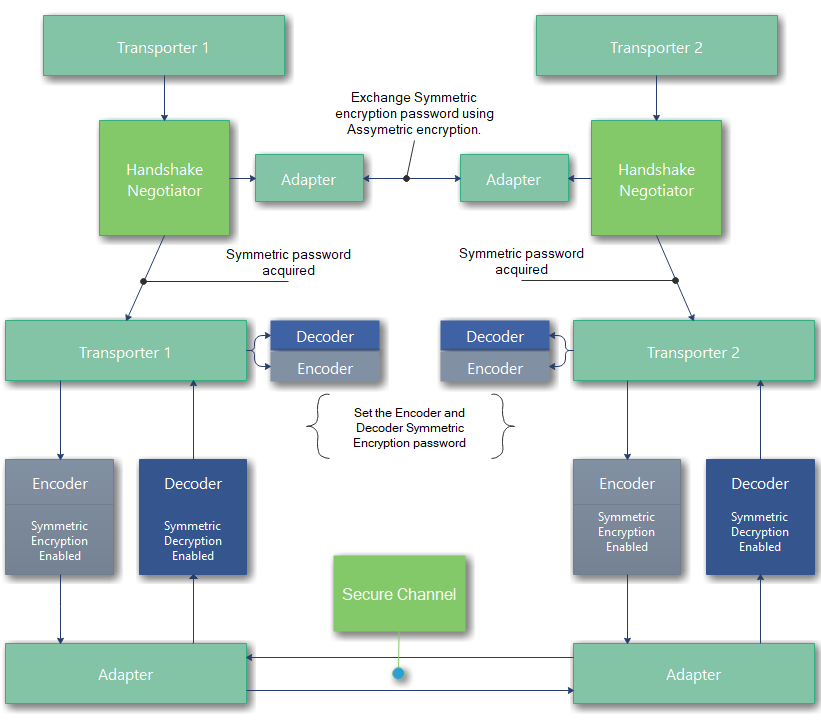
The Resonance library implements its own automatic SSL style encryption using a handshake that is initiated in order to exchange encryption information.
The handshake negotiation is done by the IHandshakeNegotiator interface.
In order to secure a communication channel, each participant needs to create an Asymmetric RSA private-public key pair, then share that public key with the remote peer.
Next, both participants needs to agree on a Symmetric encryption configuration based on a shared password.
The actual password is shared and encrypted using the initial RSA public key.
Once the password is acquired by both participants, they can start send and receive messages using the faster Symmetric encryption based on the shared password.
After we understand what happens behind the scenes, let's see how to configure a Transporter to encrypt messages.
IResonanceTransporter t = new ResonanceTransporter();
t.CryptographyConfiguration.Enabled = true; //Enable encryption.
You can also configure encryption using the fluent builder.
IResonanceTransporter transporter1 = ResonanceTransporter.Builder
    .Create().WithTcpAdapter()
    .WithAddress("127.0.0.1")
    .WithPort(8888)
    .WithJsonTranscoding()
    .WithKeepAlive()
    .WithEncryption() //Enable encryption.
    .Build();
In order to establish a secure communication, both Transporters CryptographyConfiguration must be enabled.
In case encryption is disabled on both transporters, no handshake will occur at all.
It is very important to be able to trace your communication through logs.
The Resonance library takes advantage of structured logs by attaching log properties
that can later be used to trace and aggregate each request and response path.
Communication logs are delivered using Microsoft's Logging.Abstractions interfaces.
That makes it easy to hook up your favorite logging library to expose Resonance communication logs.
In order to route Resonance logging to your logging infrastructure, you need to provide an instance of ILoggerFactory .
Here is how you can hookup Resonance to Serilog logging library.
public void InitLogging()
{
    var loggerFactory = new LoggerFactory();
    var logger = new LoggerConfiguration()
        .MinimumLevel.Debug()
        .WriteTo.Console()
        .WriteTo.Seq("http://localhost:5341")
        .CreateLogger();

    loggerFactory.AddSerilog(logger);

    ResonanceGlobalSettings.Default.LoggerFactory = loggerFactory;
}
Once you have your logging configured, you can also specify each request logging mode through the RequestConfig object.
The logging mode of a request determines whether the request and its response should be logged and how.
None(will not log the request)Title(logs the request and its response message name)Content(logs the request and its response message name along with the actual message content)
Note, when the minimum log level is "Debug" request and response messages will always be logged in Title mode, unless the Content logging mode was specified.
Here is how you would configure the logging mode of a request.
public async void Demo()
{
IResonanceTransporter transporter1 = ResonanceTransporter.Builder
.Create().WithTcpAdapter()
.WithAddress("127.0.0.1")
.WithPort(8888)
.WithJsonTranscoding()
.WithKeepAlive()
.NoEncryption()
.WithCompression()
.Build();
await transporter1.ConnectAsync();
CalculateRequest request = new CalculateRequest() { A = 10, B = 5 };
//Log request and response names
var response = await transporter1.SendRequestAsync<CalculateRequest, CalculateResponse>(request,
new ResonanceRequestConfig() { LoggingMode = ResonanceMessageLoggingMode.Title });
//Log request and response names and content
response = await transporter1.SendRequestAsync<CalculateRequest, CalculateResponse>(request,
new ResonanceRequestConfig() { LoggingMode = ResonanceMessageLoggingMode.Content });
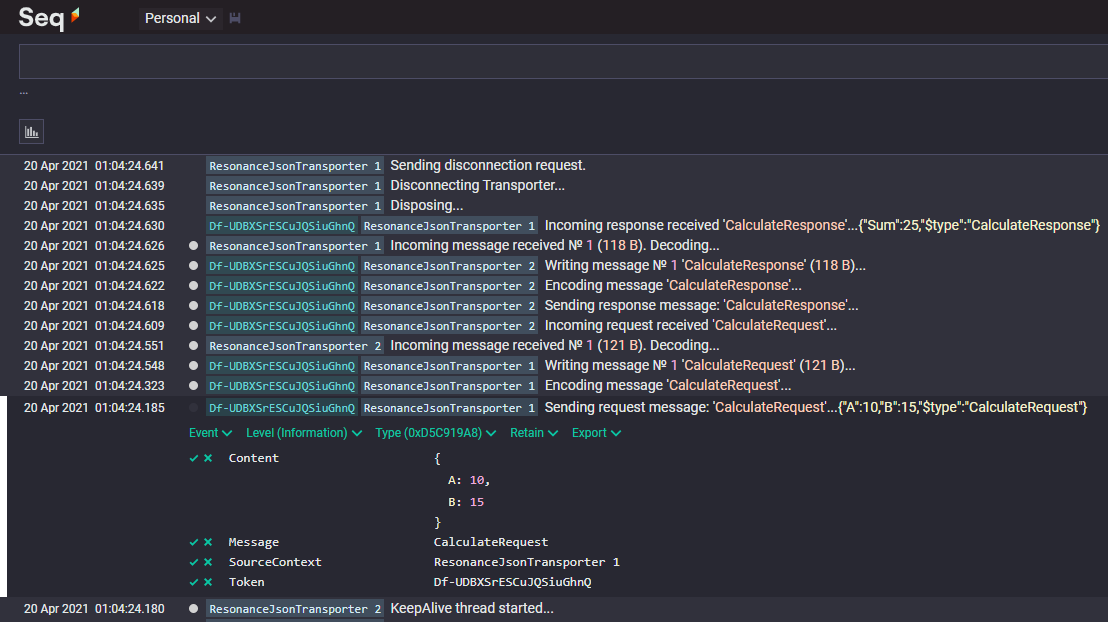
}The recommended way of viewing the Resonance communication logs is using Seq with the Serilog Seq sink.
The Seq logs viewer supports structured logs that fits nicely with Resonance logging implementation.
Here is a screenshot of a request being traced using its Token property through Seq.
Remote procedure call is basically executing a method on another machine as if it was on your machine. The Resonance framework provides a very advanced built-in RPC mechanism with support for methods, properties and even events! This is done by defining a common interface between the caller and the callee (server-client), implementing the interface on the server side, registering it with a transporter then creating a client proxy on the client side.
The following is a short example of an RPC implementation.
First let's create the common interface.
public interface ICalcService
{
    event EventHandler<EventArgs> CalculationCompleted;
    int TotalCalculations { get; }
    double Add(double a, double b);
    double Subtract(double a, double b);
    Task<double> AddAsync(double a, double b);
    Task<double> SubtractAsync(double a, double b);
}
Now, let's create the server implementation.
public class CalcServiceImpl : ICalcService
{
    public int TotalCalculations { get; private set; }

    public event EventHandler<EventArgs> CalculationCompleted;

    public double Add(double a, double b)
    {
        OnCalculationCompleted();
        return a + b;
    }

    public Task<double> AddAsync(double a, double b)
    {
        return Task.FromResult(Add(a, b));
    }

    public double Subtract(double a, double b)
    {
        OnCalculationCompleted();
        return a - b;
    }

    public Task<double> SubtractAsync(double a, double b)
    {
        return Task.FromResult(Subtract(a, b));
    }

    protected virtual void OnCalculationCompleted()
    {
        TotalCalculations++;
        CalculationCompleted?.Invoke(this, new EventArgs());
    }
}
All we need to do now is to register the implementation with the server Transporter and create a client proxy using the client Transporter.
Here is an example.
public async void TestRPC()
{
    //Server transporter
    IResonanceTransporter t1 = ResonanceTransporter.Builder
        .Create()
        .WithInMemoryAdapter()
        .WithAddress("TST")
        .WithJsonTranscoding()
        .Build();

    //Client transporter
    IResonanceTransporter t2 = ResonanceTransporter.Builder
        .Create()
        .WithInMemoryAdapter()
        .WithAddress("TST")
        .WithJsonTranscoding()
        .Build();

    await t1.ConnectAsync();
    await t2.ConnectAsync();

    //Register the calc service with the server transporter.
    t1.RegisterService<ICalcService, CalcServiceImpl>(RpcServiceCreationType.Singleton);

    //Create the client proxy using the client transporter.
    ICalcService client = t2.CreateClientProxy<ICalcService>();

    client.CalculationCompleted += (sender, e) =>
    {
        //Event should be raised here!
        Debug.WriteLine(client.TotalCalculations);
    };

    //Execute a remote method and get the result.
    var result = await client.AddAsync(10, 15);
}
That simple! no pre generated code is required, the client proxy code is generated at runtime.
Now, as we have seen in previous examples, when sending a request, it is possible to customize some aspects like logging and timeouts.
When using RPC, you can achieve that by attaching the ResonanceRpc attribute for a method or property.
For example, if we would want to specify a custom timeout for the "Add" method on our interface we could do that.
[ResonanceRpc(Timeout = 5)]
double Add(double a, double b);1000 Roundtrips (request -> response), Intel Core i7-6700HQ CPU 2.60GHz (Skylake)
Transcoding
| Method | Mean | Error | StdDev |
|---|---|---|---|
| Json | 205.6 ms | 4.09 ms | 9.96 ms |
| Protobuf | 180.3 ms | 4.07 ms | 3.81 ms |
Encryption / Compression
| Method | Mean | Error | StdDev |
|---|---|---|---|
| Normal | 183.4 ms | 2.87 ms | 2.40 ms |
| Compressed | 421.9 ms | 8.25 ms | 13.32 ms |
| Encrypted | 260.9 ms | 5.18 ms | 12.41 ms |
| Compressed / Encrypted | 517.2 ms | 9.12 ms | 8.08 ms |
more benchmarks will be added soon..