A tool for creating styled YouTube subtitles.

YouTube's built-in subtitle editor doesn't support styling of any kind. If you want formatting such as bold, italic and coloring, you need to upload a subtitle file instead. The site accepts a number of file formats such as RealText, WebVTT and TTML, but all of these come with their own limitations - and most importantly, none of them give access to the full array of features offered by the YouTube player. For that, you need to use a YouTube-specific format called YTT (YouTube Timed Text). It supports the following:
- Bold/italic/underline
- Text coloring and transparency
- Background coloring and transparency (including hiding the background box completely)
- Outlines, glows and drop shadows
- Fonts and font sizes
- Positioning (place your subtitles anywhere on the video)
- Karaoke timing (make the syllables of a song lyric light up as they're sung)
- Vertical text
- Ruby text
YTSubConverter can produce this file format for you.
YTSubConverter is an .ass -> .ytt converter. You can create .ass subtitles using e.g. Aegisub, which allows you to set up and preview the styling before uploading.
Conversion is straightforward: launch the program, open your .ass file and click Convert. Alternatively, drag the .ass straight onto the .exe. In both cases, you'll get a .ytt file that's ready for upload.
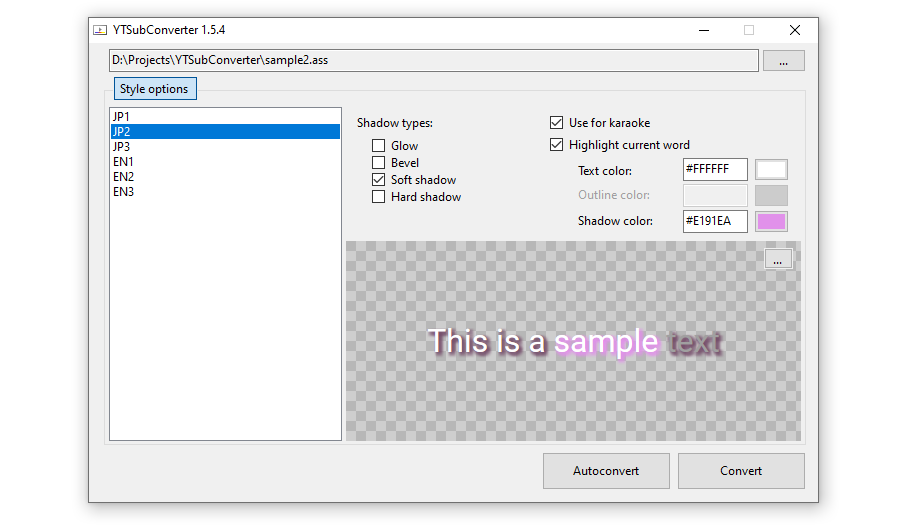
The program tries to approximate the look of the Aegisub subtitles as closely as possible on YouTube:

You'll notice that each .ass shadow can turn into one of three different YouTube shadow types: glow (same as outline), soft shadow and hard shadow. You can even combine multiple shadow types if you want - just choose from the checkboxes in the conversion UI. This is also where you can configure current word highlighting for karaoke (example video).
Apart from converting from .ass to .ytt, the tool can also convert from .sbv (the format you get when downloading subs from YouTube's built-in editor) to .srt. This allows you to download existing, unstyled subs and add styling to them. Simply open the .sbv file, click Convert, and open the resulting .srt file in Aegisub.
YTSubConverter supports the following .ass style features:
- Font name. YouTube only allows the following fonts:
- Carrois Gothic SC
- Comic Sans MS
- Courier New
- Deja Vu Sans Mono
- Monotype Corsiva
- Times New Roman
- Roboto (YouTube default; the tool will automatically pick this if the specified font is not allowed)
- Bold, italic, underline
- Primary, secondary, outline and shadow color
- Alignment
- Outline and shadow thickness (only checking whether the value is 0 or greater than 0)
It also supports the following override tags:
{\b}- bold{\i}- italic{\u}- underline{\fn}- font. (See above for list of allowed fonts){\fs}- font size. If you set it to e.g. twice the size defined in the style, the YouTube subtitle will be twice the default size. Note that you can't go lower than 75% and that this tag has no effect on Android.{\c}or{\1c}- regular text color{\2c}- unsung karaoke text color{\3c}- outline color{\4c}- shadow color{\1a}- regular text transparency{\2c}- unsung karaoke text transparency{\3a}- background transparency{\4a}- shadow transparency. Due to YouTube limitations, this only works if the shadow color is &H222222& and the shadow transparency equals the text transparency.{\pos}- position{\an}- alignment{\k}- karaoke segment duration{\r}- reset to current or specified style{\fad}- simple fade. Due to YouTube limitations, shadows don't fade along unless their color is &H222222&.{\fade}- complex fade. Due to YouTube limitations, shadows don't fade along unless their color is &H222222&.{\move}- move from one point to another{\t}- animate colors, transparencies and font sizes.{\ytsub}- start using subscript (only works on PC){\ytsup}- start using superscript (only works on PC){\ytsur}- switch back to regular script{\ytruby}- enable ruby text.{\ytruby}これは[漢/かん][字/じ]ですwill result in a 漢 with a かん above it, followed by a 字 with a じ above it. You can change the position of the ruby text:{\ytruby8}will display it above the line (default), while{\ytruby2}will display it below. Due to a YouTube limitation, text with ruby is always shown in the default style (black background, white text). Also, this tag only works on PC; mobile apps will display これは漢(かん)字(じ)です instead.{\ytvert}- enable vertical text (only works on PC):{\ytvert9}- characters are placed vertically in columns, with those columns going from right to left.{\ytvert7}- characters are placed vertically in columns, with those columns going from left to right.{\ytvert1}- the whole subtitle is rotated 90° counter-clockwise so that the lines that used to go from top to bottom now go from left to right.{\ytvert3}- the whole subtitle is rotated 90° counter-clockwise and the order of the lines is inverted so they go from right to left.
{\ytpack}- start ({\ytpack1}) or stop ({\ytpack0}) packing text into the space of a single full-width character. Only works on PC in vertical text.{\ytshake}- make the subtitle randomly jump around.{\ytshake}- shake for the duration of the subtitle, staying within 20px of the original position.{\ytshake(radius)}- stay withinradiuspixels of the original position.\ytshake(radiusX, radiusY)- stay withinradiusXpixels of the original position on the X axis andradiusYpixels on the Y axis.{\ytshake(radius, t1, t2)}- start shaking att1and stop att2(both numbers are in milliseconds relative to the subtitle start time).{\ytshake(radiusX, radiusY, t1, t2)}
{\ytchroma}- adds a chromatic abberation effect. At the start, a red, a green and a blue copy of the subtitle come together and merge into the regular subtitle. At the end, the subtitle splits up into its three copies again which then disperse.{\ytchroma}- copies start at a distance of 20px and converge/disperse over 270ms.{\ytchroma(intime, outtime)}- copies converge overintimemilliseconds at the start and disperse overouttimemilliseconds at the end.{\ytchroma(offsetX, offsetY, intime, outtime)}- the first copy starts atoffsetXpixels to the left of andoffsetYpixels above the subtitle position. (The last copy starts at the same distance in the opposite direction.) Both offsets can be negative.{\ytchroma(color1, color2..., alpha, offsetX, offsetY, intime, outtime)}- replace the default red/green/blue by any number of custom colors. Both the colors and the alpha value should be specified in hexadecimal (&H...&).
{\ytkt}- enables advanced Karaoke Types. Warning: using these will result in large files that may require multiple upload attempts before YouTube will accept them.{\ytktFade}- Configure the line to use fading karaoke (example video).{\ytktGlitch}- Configure the line to use karaoke with glitching text (example video). Looks for Latin, Chinese, Japanese and Korean characters in each syllable and generates random ones accordingly. Works best with left-aligned text and invisible unsung lyrics (= fully transparent secondary color).
Unsupported tags are ignored.
The repository contains two sample .ass files:
After you upload a subtitle file, YouTube gives you a preview so you can try it out before submitting. This is nice, except that the preview only shows the file's text; it doesn't show the styling. This complicates testing: each time you make a change and want to see the result, you'd have to actually publish the subtitles so you can see them in the “real” player. This is especially bothersome if you're contributing to someone else's channel, as you'd have to get the subtitles approved each time (or make a copy of the video on your own channel).
Fortunately, there's an easier way to test your subtitles - one which doesn't require you to upload them at all. It works by using Fiddler, a program which can intercept web requests from your browser and send back a file from your hard drive (rather than one from YouTube's servers). By redirecting your browser's request for subtitles to your local .ytt file, you can see those local subtitles in your browser as though you uploaded them. Since you're not actually uploading them, you can test your changes much more quickly.
While this approach can save you a lot of time, it does require some initial setup:
- Download and install Fiddler.
- Launch the program.
- Open the menu Tools → Options.
- On the “HTTPS” tab, enable “Capture HTTPS CONNECTs” as well as “Decrypt HTTPS traffic.”
- Allow the program to install the security certificate. (Note: if you're using Firefox, some additional steps are needed)
- Click OK.
- In the toolbar, change “Keep: All sessions” to “Keep: 100 sessions.” (This is to keep the request log from growing too much if you leave the program open for a long time)
- Switch to the “AutoResponder” tab in the right hand panel.
- Put checkmarks in “Enable rules” and “Unmatched requests passthrough.”
- Click “Add Rule.”
- In the “Rule Editor” at the bottom, put the following text in the top textbox:
regex:^https://www.youtube.com/api/timedtext - Click “Save.”
Once this initial setup is done, you only need to do the following whenever you want to test subtitles:
- Launch Fiddler
- Select the rule on the “AutoResponder” tab
- Put the path to your local .ytt file in the bottom textbox in the “Rule Editor”
- Click “Save.”
As long as Fiddler is running (and “Capture Traffic” is enabled in the “File” menu), any YouTube video you view will have the specified .ytt file as its subtitles. If you make a change to the file, you don't even need to refresh the page in your browser to see it; simply disable and re-enable subtitles in the video, which will cause the YouTube player to “redownload” them.
Each variant of the YouTube player (web, Android, iOS...) displays subtitles in its own unique way. For this reason, it can be useful to test your subtitles in more places than one; after all, subs that look fine on PC might overlap on mobile (because of the bigger font size). This section describes how to test your subtitles in the Android app, again without actually having to upload them - or owning an Android device.
Initial setup is as follows:
- Install and configure Fiddler as described above.
- Go to Tools -> Options.
- On the “HTTPS” tab, click Actions -> Export Root Certificate to Desktop.
- On the “Connections” tab, enable “Allow remote computers to connect.”
- Restart Fiddler.
- Install an Android emulator. Plenty of free ones are available; the steps below are based on KOPLAYER.
- Launch the emulator.
- Click “Shared Folder” in the left-hand toolbar and select your Desktop. This will open a file explorer in the emulator.
- Longpress “FiddlerRoot.cer”, click “Move”, navigate to /sdcard/Download and click “Move here” in the top menu.
- Go to the Home screen and click System tool -> Settings -> Security. From there, click “Install from SD card”, navigate to Internal storage -> Download and click the FiddlerRoot.cer to install it. Give it a name (e.g. “Fiddler”) and leave “Credential use” at “VPN and apps.”
- Click System tool -> Settings -> Wi-Fi, longpress the network and click “Modify network.” Expand the Advanced Options, set the proxy type to Manual, enter your PC's host name in “Proxy hostname” and the number 8888 in “Proxy port.” If you don't know your PC's host name, you can find it out by pressing Windows key + Pause and noting the “PC name.”
- Install the YouTube app from the Play Store.
From then on, the YouTube app in the emulator will be subject to the same .ytt redirecting as the YouTube player in your browser. Just like with the browser player, loading a changed file into the app is as simple as turning subtitles off and on again.
Another useful trick to know is that you can enter video ID's (the string of letters and numbers after “watch?v=”) in the app's search field. This allows you view, say, unlisted videos.
Styled subtitles work on your own videos, but also on those made by others: if a content creator enabled community subtitles on a video, you can upload styled subtitles for it.
You can upload subtitles through the “Actions” dropdown in YouTube's built-in subtitle editor.

Once the upload is complete, click “Submit contribution” while making sure not to change anything in the built-in editor. If you do, all styling information will be lost. (YouTube warns you about this when uploading to your own channel, but not when uploading to others').
YouTube has some bugs and limitations when it comes to styled subtitles. Please be aware of the following:
- Subtitles positioned off-center will move out towards the sides in theater mode, possibly even hanging out of the video frame.
- The mobile apps don't support background customization; they show a black rectangle no matter what color or transparency you specify. This means you need to be careful with dark text, because while it'll be perfectly readable on a custom bright background on PC, it'll be barely readable on the default background on mobile.
- YTSubConverter detects dark text and adds an invisible, brighter subtitle on top of it. Because the Android app ignores transparency, (only) Android users will see this bright version and be able to read the subtitle. iOS users, however, are not so lucky - the app doesn't show the invisible subtitle, leaving only unreadable black-on-black text.
- Download the video using e.g. youtube-dl. (Tip: because YT-DL picks the highest resolution by default, you can save time by using
-Fto discover the available video resolutions and then downloading with-f<number>to download a smaller file.)- If you're planning on doing karaoke timing, you may want to check if the video has Opus-encoded audio and explicitly download that - reason being that the m4a audio you normally get is ever so slightly shifted in time. Example:
-f137+251
- If you're planning on doing karaoke timing, you may want to check if the video has Opus-encoded audio and explicitly download that - reason being that the m4a audio you normally get is ever so slightly shifted in time. Example:
- Open the locally saved video in a player that supports global hotkeys (e.g. VLC). If you haven't yet, set up hotkeys for pausing, resuming and rewinding the video.
- Open Notepad and type out the subtitles, using the global hotkeys to control the video without having to switch between windows.
- While typing, prefix each line with a “special” character (such as
*,+...) to identify the speaker. Use\Nfor manual line breaks. (Example:*Huh, that sign has an evil rabbit on it\N+That does look evil) - When done, do a search/replace of each special character by the corresponding .ass color code (e.g.
*->{\c&HA92EED&}); note that the color is in the format BBGGRR, that is, in the opposite order as it would be in HTML. - Copy the text document and paste it into Aegisub's subtitle grid.
- Set up the timings and (if needed) additional formatting.
- Save the subtitles as an .ass file.
- Convert the .ass to .ytt using YTSubConverter.
- Upload the .ytt to YouTube.
Thanks to the following people for providing the UI translations:
- Mali (@mali_5157) - Chinese
- tototo (@vvto33) - Japanese
- Kasaka-117 (@kasaka_117) - Korean