Table of Contents
- Overview
- My App Installation
- iOS Apps Installation
- Android, Cordova and Xamarin Repair Apps AAD Application
- Android App Installation
- Cordova App Installation
- Xamarin App Installation
- Mail App for Office Installation
- Installing the MyApp on an Azure Web Site
- Running the sample end to end
- API Notes
- Mail App for Office Notes
- Links that open native iOS Apps Notes
- License
The Property Inspection Code Sample demonstrates how to create a line of business system with O365 and mobile technologies.
You can see the demo in action in the [Office 365 Developer Kick Off session] (http://channel9.msdn.com/events/TechEd/Europe/2014/DEV-B207) from TechEd Europe 2014.

The MS Open Tech's open source project Office 365 SDK for iOS is used to integrate the iOS Apps with several O365 services.
Where can I find things in this repo?
- The iOS Repair App is located in the iOSInspectionApp folder.
- The iOS Inspection App is located in the iOSRepairApp folder.
- The Property Manager My App is located in the PropertyManagerMyApp folder.
- The Mail App for Office is located in the MailApp folder.
Property Management My App - A Line Of Business Application
The Property Manager My App demonstrates many different patterns used in real world scenarios. At a high level, the Property Manager My App does the following things.
- Provisions the Site Collection used by the Property Manager My App
- Provisions information architecture and supporting components into the new Site Collection
- Provisions content into the new Site Collection
- Serves as a line of business application
This Property Manager My App provides a dashboard application used in a property management scenario. This dashboard is used by dispatchers at the property management company's home office to coordinate inspections and repairs. The dashboard uses O365 APIs and the SharePoint REST APIs to read and write information in Exchange and SharePoint.
The sections below provide more information about these patterns and how to get up and running.
iOS Applications
The iOS Apps demonstrate many different patterns used in real world scenarios. At a high level, the iOS Apps do the following things.
- Provide property inspectors and repair people information about properties they are scheduled to inspect and repair.
- Allow property inspectors and repair people to submit photos and comments about inspections, incidents, and repairs.
The sections below provide more information about these iOS Apps and how to get up and running.
Mail App for Office
The Mail App for Office uses Outlook and Outlook Web Access to display data from Office 365 SharePoint lists. The Mail App for Office is implemented with two main components.
- Mail App for Office – xml file installed on the O365 tenancy as an Exchange App
- Web pages – Part of the Property Manager My App running on ASP.NET MVC
These files contain the code which implements the Mail App for Office:
- /Controllers/MailAFOController.cs
- /Views/MailAFO/Redir.cshmtl
- /Views/MailAFO/Index.cshtml
- /Models/MailAFOModel.cs
- /Models/Dashboard.cs
The sections below provide more information about these components and how to get up and running.
To set up and configure the demo first download the Property Manager My App and open it in Visual Studio 2013.
Important Note: Save the PropertyManagerMyApp directory to the root of one of your drives to ensure all Nuget functionality will work and your file paths will not become too long. Minimum requirement is Visual Studio 2013 Update 4 with Microsoft Office 365 API Tools extension.
Register the Property Manager My App with your Azure Active Directory
To register the Property Manager My App with your Azure Active Directory follow these steps.
-
Right click on the PropertyManagerMyApp project and select Build
-
Right click the PropertyManagerMyApp project and select Add -> Connected Service.
-
Authenticate with the administrator credentials associated with your tenancy.
-
Use the wizard to configure the appropriate O365 permissions.
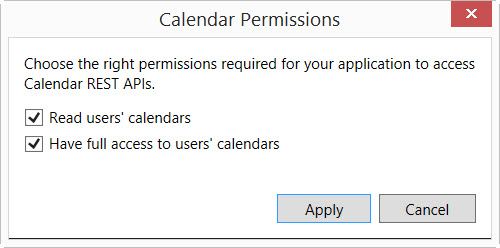
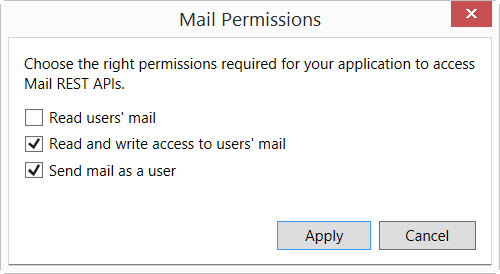
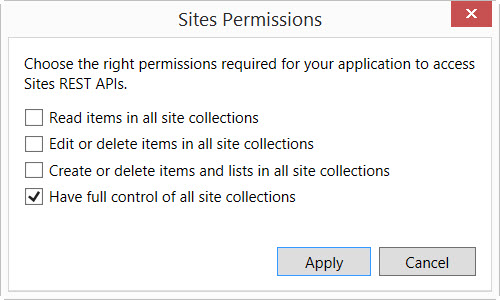
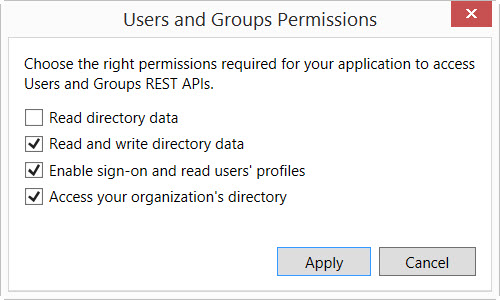
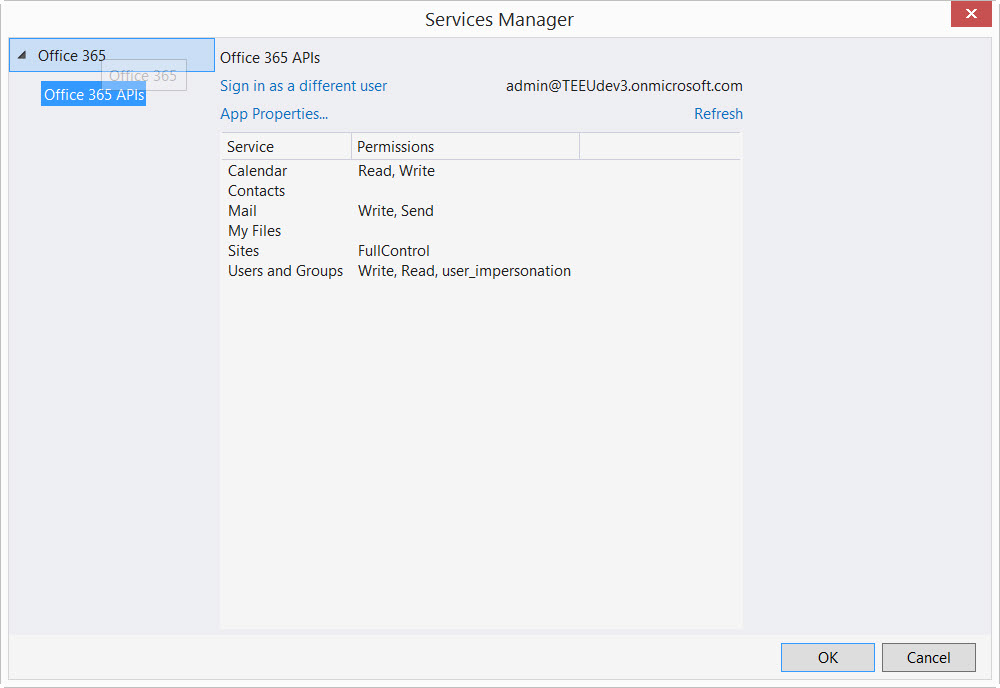
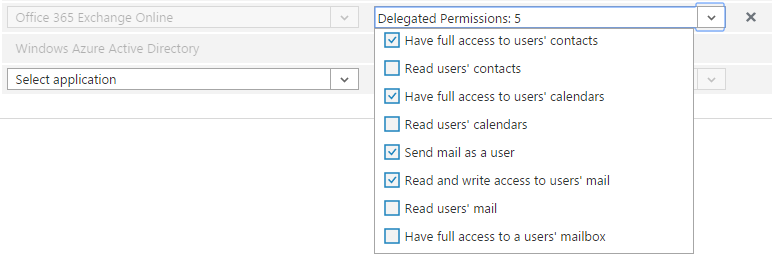
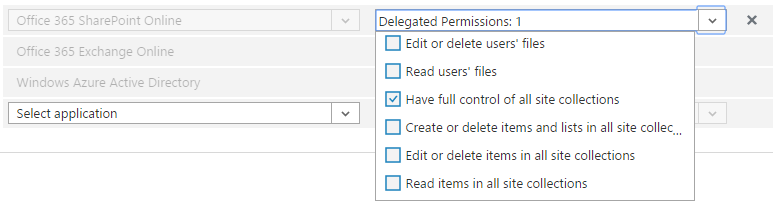
The following images demonstrate how your app settings and api permissions should be configured for the Property Manager My App to work.
O365 API Calendar Permissions
O365 API Mail Permissions
O365 API Sites Permissions
O365 API AD Permissions
O365 App Settings
-
Click OK in the Add Connected Services wizard to commit the changes.
At this point VS will add the appropriate O365 Nuget packages to the Visual Studio Solution.
Edit web.config The Property Manager My App stores configuration settings in the web.config file. These settings must be configured for your environment in order for the Property Manager My App to work. The Add Connected Service wizard creates some of these settings in the web.config file when it registers you app with Azure Active Directory. These settings the Add Connected Service wizard creates include:
- ida:ClientID
- ida:Password
- ida:AuthorizationUri
In addition to the settings above, other settings exist that you must configure to match your tenancy. These settings include:
-
ServiceResourceId Url for the O365 tenant admin site
Example: https://contoso-admin.sharepoint.com
-
DashboardServiceResourceId Url for the root Site Collection in the O365 Tenancy
Example: https://contoso.sharepoint.com
-
DashboardServiceEndpointUri Api Endpoint for the Site Collection used by the Property Manager My App
Example: https://contoso.sharepoint.com/sites/SuiteLevelAppDemo/_api/
-
DemoSiteServiceResourceId Url for the root Site Collection in the O365 Tenancy
Example: https://contoso.sharepoint.com
-
DemoSiteCollectionUrl Url used to create the Site Collection used by Property Manager My App
Example: https://contoso.sharepoint.com/sites/SuiteLevelAppDemo
-
DemoSiteCollectionOwner Email address for Site Collection owner (admin@<Your Tenancy>.onmicrosoft.com)
Example: ADMIN@contoso.onmicrosoft.com
-
DispatcherName Display Name for Dispatcher (Katie Jordan)
Example: Katie Jordan
-
DispatcherEmail Email address for Dispatcher (katiej@<Your Tenancy>.onmicrosoft.com)
Example: katiej@contoso.onmicrosoft.com
- Configure these settings in the web.config file to match your O365 / Azure Tenancy by replacing the TENANCY placeholders in the web.config with your tenancy name. In the examples above, the TENANCY placeholder was replaced with contoso.
- Edit the DemoSiteCollectionOwner setting in the web.config file to match your O365 / Azure Tenancy global administrator account.
- Right click the PropertyManagerMyApp project and select Manage Nuget Packages.
- Click the Updates tab and select nuget.org.
- Click Update All.
Configure Trusted Sites
- Add http://localhost to the Trusted Sites list in Internet Explorer.
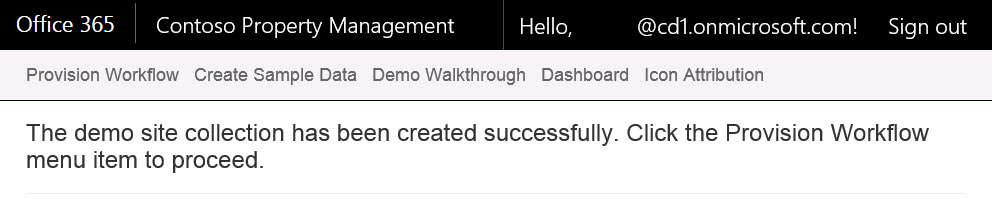
Site Collection Provisioning
The O365SiteProvisingController is used to create the Site Collection used to store data and facilitate workflow for the Property Manager My App.
First, this controller retrieves an access token for the tenancy admin Site Collection. Then it uses the access token to authenticate the call to determine if the Site Collection exists.
If the Site Collection exists this controller then redirects to the DashboardController.
If the Site Collection does not exist then the controller creates the Site Collection.
After the Site Collection is created the controller signs out from O365 and retrieves an access token for the new Site Collection.
Then it uses the access token to authenticate the calls to create the information architecture and supporting components in the new Site Collection.
Finally, the controller creates content in the new site collection to support the demo and redirects to the DashboardController.
These files contain the code which implements the Site Collection provisioning functionality:
- /Controllers/O365SiteProvisioningController.cs
- /Util/csomUtil.cs
- /Util/SiteProvisioning.cs
- /Views/O365SiteProvisioning/CreateSiteCollection.cshmtl
- /Views/O365SiteProvisioning/Index.cshtml
- /Views/O365SiteProvisioning/ProvisioningSiteComponents.cshmtl
- /Content/SampleData.xml
After you have performed the configuration steps described above, provision the Site Collection and content.
-
In Visual Studio, press F5 to run the project.
When you are prompted to log in you must use your O365 admin account. This allows you to grant consent to the Azure Active Directory application so the demo users will be able to use it.
-
When prompted, click the Accept button.

After you successfully build and run the project and login, ignore the error you see in the web browser. The error occurs because the Site Collection has not been provisioned yet.
Provision Site Collection and information architecture
-
In your web browser, navigate to http://localhost:44312/O365SiteProvisioning to invoke the O365SiteProvisioning controller and create the Site Collection and information architecture.
Note: This process can take up to 20 minutes to complete. Do not refresh the page during this process. The page will refresh every minute and display the current time to let you know it is still running. When the process completes you will see this screen:
Provision Workflow
-
Next, click the Provision Workflow link in the top menu. Then, click the Populate button.
When the process completes you will see this screen:
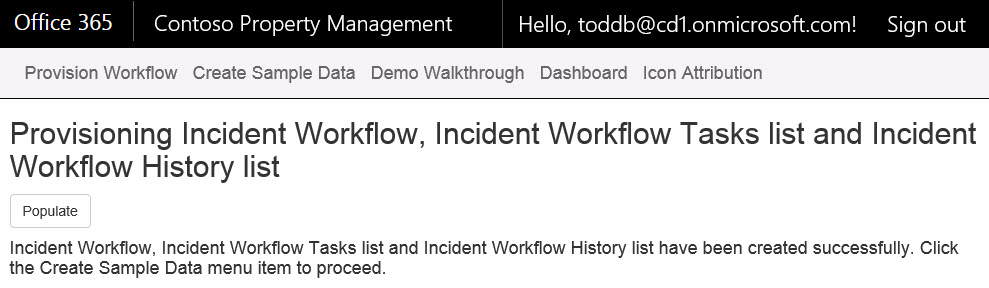
If you navigate to the Site Contents page in the Site Collection you will see the new Workflow History and Workflow Tasks lists.
Use this URL to access the Site Contents page:
https://<Your Tenancy>.sharepoint.com/sites/SuiteLevelAppDemo/_layouts/15/viewlsts.aspx
Provision Azure Active Directory Groups, Users, and demo data
Finally, you will create the Azure Active Directory Groups, Users, and demo data to support the demo. This process creates the following AD Users and Groups.
Groups
- Repair People
- Inspectors
Users
-
Inspector: Rob Barker alias: robb
-
Dispatcher: Katie Jordan alias: katiej
-
Repair Person: Ron Gabel alias: rong
-
Property Owner: Margaret Au alias: marga
-
Inspector: Alisa Lawyer alias: alisal
-
Repair Person: Chris Gray alias: chrisg
-
Property Owner: Steven Wright alias: stevenw
Running Demo With A Single User Account
If your tenancy does not support multiple users because you do not have 7 licenses available you can run the demo with a single user account. In this case, the account must meet the following requirements:
- User is a global tenant admin
- User is is granted the licenses necessary to support the scenario (See the Grant Licenses section below for more details)
- User is added to the Inspectors and Repair People Azure Active Directory Groups
Additionally, in a single user scenario, the accounts set in the web.config file for the My App, as well as all the configuration variables for all the mobile apps should use the single user account.
-
Next, click the Create Sample Data link in the top menu. Then, click the Populate button.
-
Enter the date when you plan to execute the demo, then click the Populate button.
When the process completes you will see this screen:
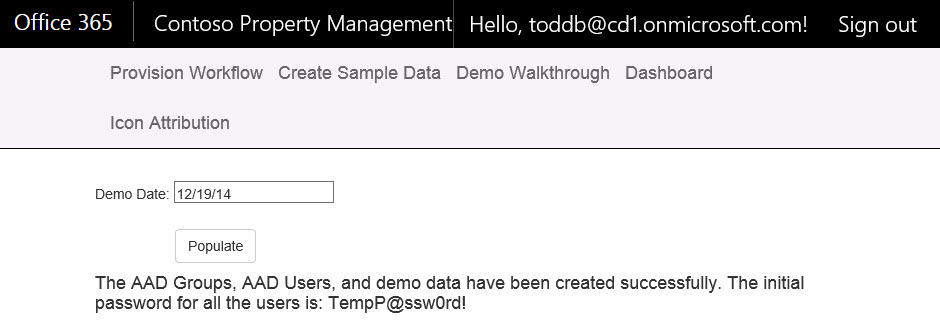
If you navigate to the Site Contents page in the Site Collection you will see the lists and libraries which indicate they just had sample data added to them.
Use this URL to access the Site Contents page:
https://<Your Tenancy>.sharepoint.com/sites/SuiteLevelAppDemo/_layouts/15/viewlsts.aspx
If you open the Admin app and browse to your active directory you will see the groups and users are created.
Add Users to Groups Currently, an issue has been discovered when trying to add users to groups via ADAL. While we resolve this issue you will need to manually add some users to the Azure Active Directory Groups.
- Open the O365 Admin app.
- Add the following users to the Inspectors Azure Active Directory Group:
- Rob Barker alias: robb
- Alisa Lawyer alias: alisal
- Add the following users to the Repair People Azure Active Directory Group:
- Ron Gabel alias: rong
- Chris Gray alias: chrisg
Passwords
The initial password for all the users is TempP@ssw0rd!
You will need to specify a new password for each user the first time you log in with them.
Grant Licenses
Next, you must grant licenses to the Active Directory User Accounts. This must be done manually because currently no APIs exist to automate this process.
-
Open the O365 admin app.
-
Expand the USERS menu and select Active Users.
-
For each user in the list below, perform the following actions.
-
Select the user by clicking the checkbox next to the user's Name.
-
Click the edit link in the Assigned license section on the right portion of the page.
-
Select a license for the user by clicking the checkbox next to the available license.
-
Expand the license to show the different capabilities the license offers.
-
Select the Office Online, Office 365 Business, Exchange Online, and SharePoint Online checkboxes.

-
Click SAVE.
List of users to grant licenses to
- Rob Barker alias: robb
- Katie Jordan alias: katiej
- Ron Gabel alias: rong
- Margaret Au alias: marga
- Alisa Lawyer alias: alisal
- Chris Gray alias: chrisg
- Steven Wright alias: stevenw
Grant Member Access To Site Collection Next you must grant access member to the Inspector, Dispatcher, and Repair People accounts.
- Log into the site collection with you O365 Global Administrator account.
- Navigate to the Site Settings Page.
- In the Users and Permissions section, click the People and Groups link.
- Select the member group.
- Add the following users to the members group.
- Inspector: Rob Barker alias: robb
- Dispatcher: Katie Jordan alias: katiej
- Repair Person: Ron Gabel alias: rong
- Inspector: Alisa Lawyer alias: alisal
- Repair Person: Chris Gray alias: chrisg
Mailbox setup
- Next, log in with each user to your tenancy and access Outlook to set up their email.
Note: It may take up to 24 hours for the O365 infrastructure to create an Exchange Mailbox and Calendar. Usually, it takes 10 seconds.
Property Manager My App Configuration This step is optional. If you wish to add a custom logo to your Property Manager My App you can update the logo corresponding to the AAD App Visual Studio creates in your AAD.
- To do this, access the AAD App in the Azure Management Portal and use the image file you can find in the PropertyManagementMyApp Visual Studio Solution. /Content/Images/AADAppLogos/logo-prop-man.jpg
Property Manager My App Installation Complete!
- Access the Property Manager My App dashboard landing page by clicking the Dashboard link in the top menu. You can also access the dashboard by navigating to http://localhost:44312/Dashboard in your web browser.
This is what the dashboard looks like. In this screenshot, the Need Repair tab is selected.
The demo also relies upon iOS Apps to function end to end. Some configuration is required to enable the iOS Apps to work with an O365 environment. Read on to learn about the configuration process.
Azure Active Directory Apps The iOS Apps use O365 APIs and SharePoint REST APIs to interact with an O365 / Azure tenancy. The Azure Active Directory Applications are used to authorize the iOS Apps. To register the iOS Apps with an Azure Active Directory follow these instructions.
Create Azure Active Directory App for the iPad Apps
- Open the Azure Management Portal
- Select Active Directory
- Click on your AAD
- Click Applications
- Click Add
- Click Add an application my organization is developing
- In the Name textbox enter PropertyManagementiOSiPadApp
- For Type, select NATIVE CLIENT APPLICATION
- Click the Arrow button
- In the Redirect URI textbox enter http://PropertyManagementiOSiPadApp
- Click the Checkmark button
- Expand the update your code section and copy the Redirect URI and Client ID values and paste them into a text file. You will use these values when you configure the iPad app on your iPad.
- Click Configure
- In the permissions to other applications section, click the dropdown list next to Windows Azure Active Directory and select the following permissions. 
- Configure the permissions to Exchange, use the screenshot below for reference.
 - Configure the permissions to SharePoint, use the screenshot below for reference.
 - Click Save
iOS App Installation
Now you are ready to install the iOS Apps.
In the iOSInspectionApp and iOSRepairApp folder you will find runnable sample code for iOS Apps.
- On a Mac machine, clone the GitHub repository.
The samples utilize Cocoapods to configure both the Office365 SDKs and ADAL. To use Cocoapods to add the SDKs to the workspaces perform these steps for both the Inspection and Repair iOS Apps.
- Open Terminal.
- Navigate to inside the project's folder.
- Run
pod install. - Run
open iOSInspectionApp.xcworkspaceoropen iOSRepairApp.xcworkspaceto open the workspace with all projects and dependencies loaded appropriately.
For more info on Cocoapods setup see the Office 365 SDK for iOS wiki and their site.
iOS App Configuration After the iOS Apps are deployed, you need to configure them to work with an O365 / Azure Tenancy and the Azure Active Directory Applications you created. This section describes how to do it.
Configure iPad Apps settings
To configure the iPad Apps settings follow these instructions. You need to perform these same steps for both the Inspection and Repair iOS apps.
- In XCode, run the iPad App.
- Tap the iPad App on the iPad to open it.
- After the iPad App is loaded and the Sign In screen is displayed, push the home button two times and close/terminate the running instance of the application.
- Next, open the native iOS Settings App.
- In the left column, tap the name of the app.
- Enter the values which correspond to the Azure Active Directory application you created for the iPad Apps.
- Enter the URL to the Site Collection created by the Property Manager My App.
- Enter the email address for the Dispatcher. (katiej@<Your Tenancy>.onmicrosoft.com)
These are the values that must be configured.
- clientID This is the value you copied and pasted in the steps above. This value is also displayed in the CONFIGURE page for the iOSiPadApp Azure Active Directory Application in the Azure Management Portal.
- redirectUriString This is the value you copied and pasted in the steps above. This value is also displayed in the CONFIGURE page for the iOSiPadApp Azure Active Directory Application in the Azure Management Portal.
- authority This value is partially displayed in the VIEW ENDPOINTS popup page for the Azure Active Directory Application in the Azure Management Portal. Use the domain associated with the OAUTH 2.0 TOKEN ENDPOINT. If you are running on production O365 this value is https://login.windows.net.
- resourceId This value is partially displayed in the VIEW ENDPOINTS popup page for the Azure Active Directory Application in the Azure Management Portal. Use the domain associated with the OAUTH 2.0 TOKEN ENDPOINT and append /common to it. If you are running on production O365 this value is https://login.windows.net/common.
- demoSiteCollectionUrl Url for the Site Collection created by the Property Manager My App. Use the same value you configured in the web.config for the Property Manager My App for the DemoSiteCollectionUrl app setting.
- dispatcherEmail Email address for the dispatcher account you created.
iOS Apps Installation Complete!
Azure Active Directory Apps The Android, Cordova, and Xamarin Repair Apps use O365 APIs and SharePoint REST APIs to interact with an O365 / Azure tenancy. The Azure Active Directory Applications are used to authorize the Android Repair Apps. To register the Android Repair Apps with an Azure Active Directory follow these instructions.
Create Azure Active Directory App for the Android, Crodova, and Xamarin Repair Apps
- Open the Azure Management Portal
- Select Active Directory
- Click on your AAD
- Click Applications
- Click Add
- Click Add an application my organization is developing
- In the Name textbox enter PropertyManagementRepairApp
- For Type, select NATIVE CLIENT APPLICATION
- Click the Arrow button
- In the Redirect URI textbox enter http://PropertyManagementRepairApp
- Click the Checkmark button
- Expand the update your code section and copy the Redirect URI and Client ID values and paste them into a text file. You will use these values when you configure the Android Repair App in Android Studio.
- Click Configure
- In the permissions to other applications section, click the dropdown list next to Windows Azure Active Directory and select the following permissions. 
- Configure the permissions to Exchange, use the screenshot below for reference.
 - Configure the permissions to SharePoint, use the screenshot below for reference.
 - Click Save
The mobile Repair App in the demo may also be run on Android in addition to the iOS version. The Android version of the Repair App is written in Java, the native language for an Android device.
Some configuration is required to enable the Android Repair App to work with an O365 environment. Read on to learn about the configuration process.
Android Repair App Installation
Now you are ready to install the Android App.
In the AndroidRepairApp folder you will find runnable sample code for Android Repair App.
- On a PC or Mac machine, clone the GitHub repository.
Configure Android Repair App settings
To configure the Android Repair App follow these instructions.
-
Open Android Studio.
-
In the Quick Start menu, select Import Non-Android Studio project.
-
Select the AndroidRepairApp\RepairApp directory you cloned from the GitHub repository.
-
Click OK.
-
Open the \app\java\com.canviz.repairapp\Constants.java file.
-
Edit the SHAREPOINT_URL variable to match your O365 / Azure Tenancy by replacing the TENANCY placeholder with your tenancy name. In the example below, the TENANCY placeholder was replaced with contoso.
SHAREPOINT_URL is the URL for the Site Collection created by the Property Manager My App. Use the same value you configured in the web.config for the Property Manager My App for the DemoSiteCollectionUrl app setting.
Example: contoso.onmicrosoft.com
-
Edit the DISPATCHEREMAIL variable to match your O365 / Azure Tenancy by replacing the TENANCY placeholder with your tenancy name. In the example below, the TENANCY placeholder was replaced with contoso.
DISPATCHEREMAIL is the email address for the dispatcher account you created.
Example: katiej@contoso.onmicrosoft.com
-
Edit the AAD_CLIENT_ID variable. This is the Client ID value you copied and pasted in the steps above. This value is also displayed in the CONFIGURE page for the PropertyManagementRepairApp Azure Active Directory Application in the Azure Management Portal.
-
Edit the AAD_REDIRECT_URL variable. This is the Redirect URI value you copied and pasted in the steps above. This value is also displayed in the CONFIGURE page for the PropertyManagementRepairApp Azure Active Directory Application in the Azure Management Portal.
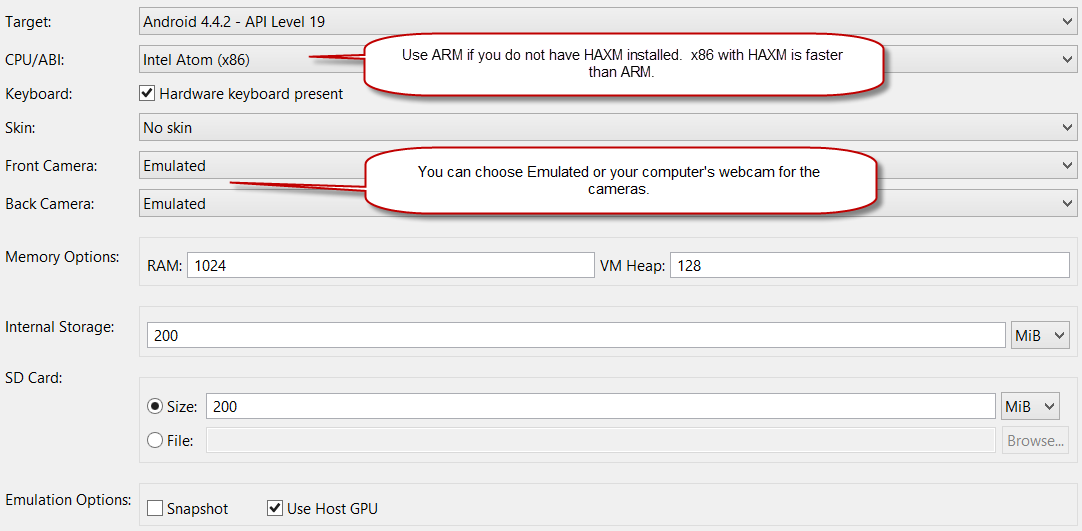
Set Up Android Virtual Device The Android Repair App targets the Nexus 9 device. These steps describe how to configure an Android Virtual Device that replicates the Nexus 9.
-
In Android Studio, click the Tools menu, select Android, and click AVD Manager to open the Android Virtual Device Manager.
-
Use the Android Virtual Device Manager to configure the Nexus 9 device. Refer to the image below.
-
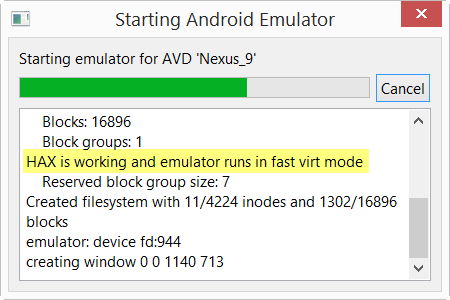
In the Android Virtual Device Manager, start the Nexus 9 Android Virtual Device.
Note: When the device is starting you can see if HAXM is enabled on your system and if the emulator is taking advantage of it.
-
Wait for the device to boot, unlock it, and click the OK button.
Note: This can take a long time, even up to 20 minutes if you have a slow computer or if you are using the ARM version of the device.
Run the Repair App on the Nexus 9 Android Virtual Device
-
In Android Studio, click the Run menu and select Run app.
-
Select the Nexus 9 Android Virtual Device you already started
-
Click OK.
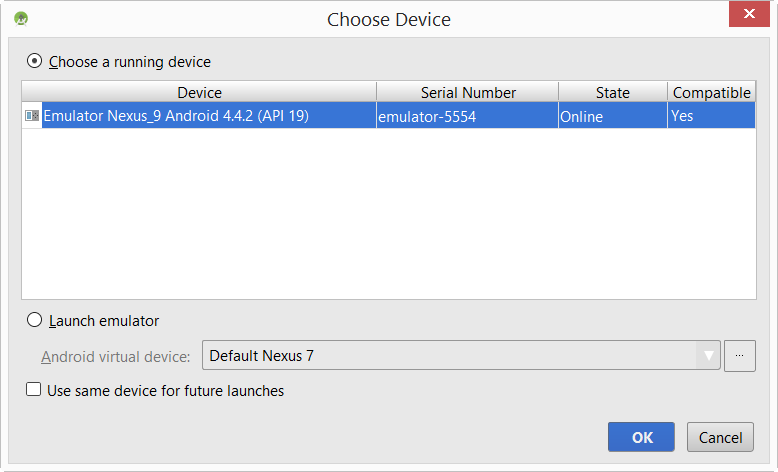
The Sign in screen will appear and you can now use the Android Repair App during the demo.
Android Repair App Installation Complete!
The mobile Repair App in the demo may also be run on Cordova in addition to the iOS version. The Cordova version of the Repair App is written in HTML, JavaScript and CSS. It uses the Knockout.js framework for data binding.
The Cordova Repair App supports iOS, Android, and Windows devices.
Some configuration is required to enable the Cordova Repair App to work with an O365 environment. Read on to learn about the configuration process.
Cordova Repair App Installation
Now you are ready to install the Cordova App.
In the CordovaRepairApp folder you will find runnable sample code for Cordova Repair App.
- On a PC, clone the GitHub repository.
Configure Cordova Repair App settings
To configure the Cordova Repair App follow these instructions.
-
Open Visual Studio 2013 Studio.
-
Open the CordovaRepairApp.sln Visual Studio 2013 Solution you cloned from the GitHub repository.
Note: There are three different settings files which allow you to configure each version of the Cordova App separately. This is helpful when your emulator redirect URIs are not all the same and also when you wish to use different Azure Active Directory applications when testing the applications in a larger development and testing team in separate environments.
-
To configure the iOS version of the Cordova Repair App, open the \CordovaRepairApp\services\office365\settings\settings.js file.
-
To configure the Android version of the Cordova Repair App, open the \CordovaRepairApp\merges\android\services\office365\settings\settings.js file.
-
To configure the Cordova version of the Cordova Repair App, open the \CordovaRepairApp\merges\windows\services\office365\settings\settings.js file.
In each file make the following edits and corresponding Azure Active Directory App modifications.
-
Edit the Settings.sitecollectionUrl variable to match your O365 / Azure Tenancy by replacing the TENANCY placeholder with your tenancy name. In the example below, the TENANCY placeholder was replaced with contoso.
Settings.sitecollectionUrl is the URL for the Site Collection created by the Property Manager My App. Use the same value you configured in the web.config for the Property Manager My App for the DemoSiteCollectionUrl app setting.
Example: https://contoso.sharepoint.com/sites/SuiteLevelAppDemo
-
Edit the Settings.dispatcherEmail variable to match your O365 / Azure Tenancy by replacing the TENANCY placeholder with your tenancy name. In the example below, the TENANCY placeholder was replaced with contoso.
Settings.dispatcherEmail is the email address for the dispatcher account you created.
Example: katiej@contoso.onmicrosoft.com
-
Edit the Settings.resourceId variable to match your O365 / Azure Tenancy by replacing the TENANCY placeholder with your tenancy name. In the example below, the TENANCY placeholder was replaced with contoso.
Settings.resourceId is the URL for the root site collection in your O365 tenancy.
Example: https://contoso.sharepoint.com/
-
Edit the Settings.clientId variable. This is the Client ID value you copied and pasted in the steps above. This value is also displayed in the CONFIGURE page for the PropertyManagementRepairApp Azure Active Directory Application in the Azure Management Portal.
-
Copy the Settings.redirectUri variable. In the Windows Azure Management Portal, open the CONFIGURE page for the PropertyManagementRepairApp Azure Active Directory Application in the Azure Management Portal.
-
Paste the copied Settings.redirectUri value into the Redirect URIs section.
-
Save the PropertyManagementRepairApp Azure Active Directory Application.
Run the Repair App on the Windows Simulator
The Cordova Windows Repair App targets the Windows Surface Pro device. This is the easiest emulator to set up.
-
In Visual Studio, right click the CordovaRepairApp solution and select Clean.
-
In Visual Studio, select the Windows-AnyCPU Configuration and the Simulator.

-
Click the green arrow to run the application.
The Sign in screen will appear and you can now use the Cordova Windows Repair App during the demo.
Set Up Android Virtual Device The Cordova Android Repair App targets the Nexus 9 device. These steps describe how to configure an Android Virtual Device that replicates the Nexus 9.
-
In Visual Studio, click the Tools menu, select Android, and click Open Android Emulator Manager to open the Android Virtual Device Manager.
-
Use the Android Virtual Device Manager to configure the Nexus 9 device. Refer to the image below.

-
In the Android Virtual Device Manager, start the Nexus 9 Android Virtual Device.
Note: When the device is starting you can see if HAXM is enabled on your system and if the emulator is taking advantage of it.

-
Wait for the device to boot, unlock it, and click the OK button.
Note: This can take a long time, even up to 20 minutes if you have a slow computer or if you are using the ARM version of the device.
Run the Repair App on the Nexus 9 Android Virtual Device
-
In Visual Studio, right click the CordovaRepairApp solution and select Clean.
-
In Visual Studio, select the Android Configuration and the Android Emulator.

-
Click the green arrow to run the application.
The Sign in screen will appear and you can now use the Cordova Android Repair App during the demo.
Run the Repair App on the iOS Simulator
The Cordova iOS Repair App targets the iPad Air device. Using the iOS Sumlator for iPad requires a Mac in addition to your PC. Follow the steps in the following MSDN articles to configure your PC and Mac to enable you to build the Cordova iOS Repair App on your PC and run it in the iOS Simulator on your Mac.
- Installing: http://msdn.microsoft.com/en-us/library/dn757054.aspx
- Configuring: http://msdn.microsoft.com/en-us/library/dn771551.aspx
- Running: http://msdn.microsoft.com/en-us/library/dn757056.aspx
-
In Visual Studio, right click the CordovaRepairApp solution and select Clean.
-
In Visual Studio, select the iOS Configuration and the Simulator - iPad Air.

-
Click the green arrow to run the application.
The Sign in screen will appear and you can now use the Cordova Windows Repair App during the demo.
Cordova Repair App Installation Complete!
The mobile Repair App in the demo has also been built for Android devices with Xamarin. The Xamarin version of the Repair App is written in .NET.
Some configuration is required to enable the Cordova Repair App to work with an O365 environment. Read on to learn about the configuration process.
Xamarin Android Repair App Installation
Now you are ready to install the Xamarin Android App.
In the XamarinRepairApp folder you will find runnable sample code for Xamarin Android Repair App.
- On a PC, clone the GitHub repository.
Configure Xamarin Android Repair App settings
To configure the Xamarin Android Repair App follow these instructions.
-
In Visual Studio, right click the XamarinRepairApp solution and select Clean.
-
Open Visual Studio 2013 Studio.
-
Open the XamarinRepairApp.sln Visual Studio 2013 Solution you cloned from the GitHub repository.
-
In the XamarinRepairApp project, open the Constants.cs file.
-
Edit the SHAREPOINT_URL variable to match your O365 / Azure Tenancy by replacing the TENANCY placeholder with your tenancy name. In the example below, the TENANCY placeholder was replaced with contoso.
SHAREPOINT_URL is the URL for the Site Collection created by the Property Manager My App. Use the same value you configured in the web.config for the Property Manager My App for the DemoSiteCollectionUrl app setting.
Example: contoso.onmicrosoft.com
-
Edit the DISPATCHEREMAIL variable to match your O365 / Azure Tenancy by replacing the TENANCY placeholder with your tenancy name. In the example below, the TENANCY placeholder was replaced with contoso.
DISPATCHEREMAIL is the email address for the dispatcher account you created.
Example: katiej@contoso.onmicrosoft.com
-
Edit the AAD_CLIENT_ID variable. This is the Client ID value you copied and pasted in the steps above. This value is also displayed in the CONFIGURE page for the PropertyManagementRepairApp Azure Active Directory Application in the Azure Management Portal.
-
Edit the AAD_REDIRECT_URL variable. This is the Redirect URI value you copied and pasted in the steps above. This value is also displayed in the CONFIGURE page for the PropertyManagementRepairApp Azure Active Directory Application in the Azure Management Portal.
Set Up Android Virtual Device The Android Repair App targets the Nexus 9 device. These steps describe how to configure an Android Virtual Device that replicates the Nexus 9.
-
In Visual Studio, click the Tools menu, select Android, and click Open Android Emulator Manager to open the Android Virtual Device Manager.
-
Use the Android Virtual Device Manager to configure the Nexus 9 device. Refer to the image below.

-
In the Android Virtual Device Manager, start the Nexus 9 Android Virtual Device.
Note: When the device is starting you can see if HAXM is enabled on your system and if the emulator is taking advantage of it.

-
Wait for the device to boot, unlock it, and click the OK button.
Note: This can take a long time, even up to 20 minutes if you have a slow computer or if you are using the ARM version of the device.
Run the Xamarin Android Repair App on the Nexus 9 Android Virtual Device
-
In Visual Studio, select the Any CPU Configuration and the Nexus_9 emulator.

-
Click the green arrow to run the application.
The Sign in screen will appear and you can now use the Cordova Windows Repair App during the demo.
Xamarin Android Repair App Installation Complete!
Some configuration is required to enable the Mail App for Office to work with an O365 environment. Read on to learn about the configuration process.
Mail App for Office
The Mail App for Office runs on an ASP.NET Web site. You must configure the Mail App for Office to use the web site where you deployed the Property Manager My App. To configure the Mail App for Office to use your web site follow these instructions.
Modify Manifest
-
Open the MailApp Visual Studio Solution
-
In the MailApp project, open the MailApp.xml file
-
Replace the SourceLocation endpoints in the DesktopSettings, TabletSettings, and PhoneSettings nodes with the URL to your Property Manager My App ASP.NET web site
Use the following template for the SoureLocation URL: https://<Your Web Site>.azurewebsites.net/Mailafo/redir
Note: You must use an HTTPS URL for Mail Apps for Office.
-
Save MailApp.xml
-
Right click the MailApp project and select Publish
-
Click Package the app
Mail App for Office Installation
- Log into your O365 Tenancy with your admin account
- Click the waffle button, then click the Admin app 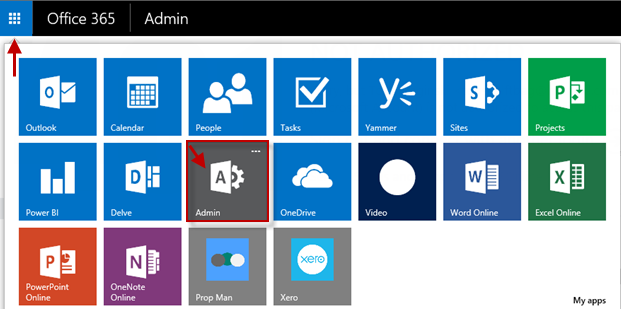
- In the left menu, click Exchange
- Under organization, click apps
- Click the + icon to add a new app
- Select Add from file
- In the dialog select the MailAppManifest.xml file you created when you published the MailApp project
- Click next
- After the Mail App is uploaded, select it in the list. It is named Property Details.
- Click the Edit button in the toolbar
- In the Specify user defaults section, select the Optional, enabled by default radio button
- Click save
Mail App for Office Installation Complete!
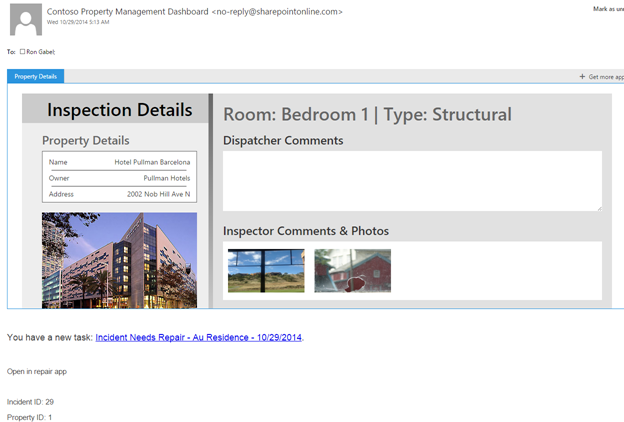
When demo users open an email with the string Incident ID: <number> in the email body they can view the Incident details in the Mail App for Office by clicking the Property Details link.
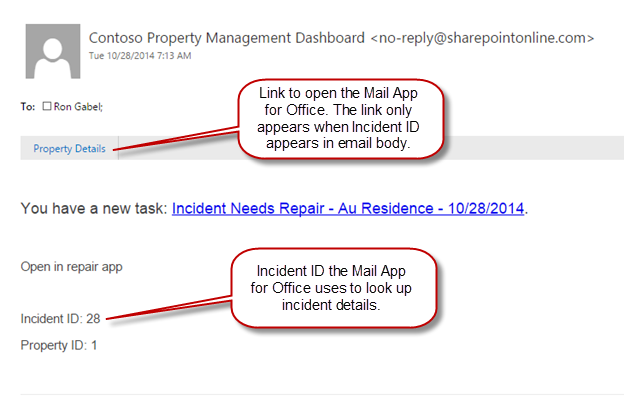
When the Mail App for Office loads, users are taken to a redirect page which uses office.js to extract the Incident ID from the email body. This page includes the text Redir so you can see it happening in the demo. In a production scenario you might display loading text or leave this page blank.
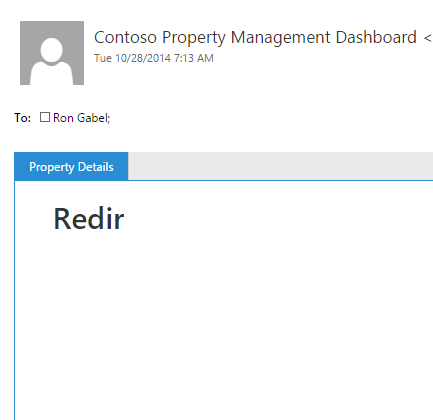
The redirect page then uses JavaScript to redirect to another controller (index.cshtml) and passes the IncidentId on the query string. The second controller uses the IncidentId passed to it to invoke the server side O365 ASP.NET APIs to retrieve the data from SP.
In addition to your localhost development environment, the MyApp may also run on an Azure Web Site.
If you wish to publish the MyApp to an Azure Web Site it is recommended that you create another AAD application for your Azure Web Site. This ensures that the registration for the App in the My Apps list in O365 has the appropriate Sign-On URL.
The following article describes how to use Visual Studio Publishing Profiles to set up publishing to an Azure Web Site and how to create separate a web.config file for your Azure Web Site.
The [PowerPoint slide deck] (https://github.com/OfficeDev/Property-Inspection-Code-Sample/blob/master/Documents/Demo%20Script.pptx) describes how to prep your environment with sample data and execute the sample scenario end to end. It also describes all of the different places where data is created or updated throughout the entire scenario. This is an excellent place to see what this demo really does and how the scenario in it unfolds.
When this demo was built the O365 SDKs for ASP.Net and iOS were in the alpha/beta stages. Consequently, some of the code in the demo uses REST based approaches to perform operations with O365 services like SharePoint and Exchange. The following parts of the sample use REST based approaches to access O365 Services.
- Working with Files in the iOS Apps and My Apps. See MS Open Tech's open source project Office 365 SDK for iOS to see how this is done.
- Sending Email with attachments in the Property Manager My App. See the Office 365 SDK for ASP.NET to see how this is done. The sample sends email from the Property Manager My App, but no attachments are included.
The Mail App for Office included in the demo renders properly in PC web browsers but it does not render in iOS devices in Safari, the OWA app, or the native iOS email client. At this time they are not supported in Safari, the OWA app, or the native iOS email client.
The links in the workflow emails which open the native iOS apps on an iOS device work when using the native iOS email client. At this time they are not supported in Safari or the OWA app.
Copyright (c) Microsoft, Inc. All rights reserved. Licensed under the Apache License, Version 2.0.