###DayBar - the LED strip that plans your day
Boost your productivity. See your day in a glance with your DayBar and take back control!
With so many meetings and all the reminders and pop ups alerts - it's becoming harder and harder to be productive! With DayBar you and your team can just look up and see your day in a single glance.
All your appointments are shown as lit up areas on the strip, with "now" a flashing green dot that moves along as the day progresses. It will even color the strips according to categories in Outlook (as long as they have the default names).
The best part is you can make it yourself! Mine cost about $150 or so.
Basically the system uses an Arduino to drive the strip, and a PC tells the Arduino which pixels to set which color via a serial USB interface. The PC app is built using Windows 10 UWP.
At the moment the app only supports using Office 365 calendars. There are plans to add Google support later. Perhaps.
####What you'll need
- Windows 10
- Visual Studio 2015 (for the UWP stuff)
- And Office 365 developer account.
- Arduino Software (or Visual Micro plugin for Visual Studio)
- An Arduino. I used a nano from a local supplier for under $10.
- A 144 pixel led strip. I used an Adafruit Neopixel strip from a local supplier (but you can probably get a cheaper non-Adafruit one if you're on a budget.)
- A 300-500 ohm resistor
- A capacitor 1000 µF, 6.3V or higher
- 5V 4amp power supply
- JST male inline power connector
- DC female barrel jack
- A solderless breadboard to prototype with
- Some jumpers / dupont connectors
You don't have to use the exact copy of these parts - get them from your preferred supplier. Tronix Labs in Sydney (near me) have been fantastic to deal with.
You can use a smaller led pixel strip - but you'll have to modify to code to support that youself!
###Before you start!! Make sure you read the [Adafruit Neopixel Uber Guide] (https://learn.adafruit.com/adafruit-neopixel-uberguide/overview) - especially the Best practices section - it might save you from killing your strip!
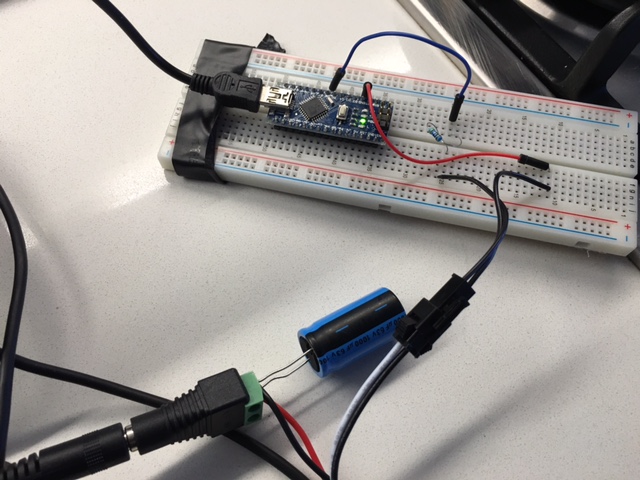
####Wiring the strip We'll start with getting some power to the strip. The led strip draws too much current for the Arduino to power it, so we have to power the leds using an external power supply.
- Connect the power leads (the big red and black ones) to the barrel jack along with the capacitor and screw in to place. The cap helps protect the strip from spikes when powering on. It's super sensitive!
- Pop your Arduino on the bread board (or not, if you're on a mega or uno etc).
- Using your make JST connector, pop the negative lead to negative on the Arduino
- Pop the positivate lead of the JST via the resistor to pin 6 on the arduino.
- In the picture above, the negative jumper cable is red - naughty!
That's it!
You'll need to download the code from this GitHub project, and install it on the Arduino.
You can use Arduino software or you can use Visual Micro (you'll still need Arduino tools installed).
The source file you need is Playground_Test.ino. Very poorly named from when this project started as a Sunday coding sesh.
You will need to add two libraries to your project.
- [Adafruit Neopixel] (https://github.com/adafruit/Adafruit_NeoPixel)
- [Serial Command] (https://github.com/kroimon/Arduino-SerialCommand)
If you don't know how to install libraries, Google it :P. Basically, grab the code and Zip the parent folder of each thing... then use add library in the menus.
Once you do that you should be able to deploy to your Adruino. If deployment is success then the strip should do a single Cylon/Knight Rider red blip thingy.
Follow the instructions on the Office 365 Windows Start GitHub page to set up an Office 365 developer account. I used this proejed as the basis for the UWP that powers the DayBar.
Once you have that all going, you'll need to link the UWP app to your Office 365 account.
Open the UWP app project from the Windows folder.
- Right click on references and select Add Connected Service
- Select Office 365 API's
- Log in
Enter the following permissions
- Calendar -> read
- Users and groups -> access directory as you, read directory data, sign you in and read your profile
Remember kids with permissions less is more.
Once you've done that you should be able to just run the app and log in!
####Exploring the code a little.
As I mentioned I based the app on the Office 365 Windows Starter example, but I only ended up using the example code to log in and get a token for O365.
Once i have that I use the direct API to get things and deserialise them using JSON.NET.
url = $"{url}/me/CalendarView?$top=30&&startDateTime={tStart.ToString("u")}&endDateTime={tEnd.ToString("u")}";Look in TransferConfigService to see where the config adds in to the token for requests to O365.