is a capability-based UI to manage multiple remote ServiceStack instances from either a Chromium Desktop App or cross-platform .NET Core Web App.
The richer metadata in ServiceStack Services allows Studio to logically group Services around Data Models, enabling its high-level semantic features like its native data-grid like UX over all AutoQuery Services to quickly discover, search, create, update and delete entities based on the available AutoQuery APIs and whether Authenticated Users have access to them.
YouTube: youtu.be/2FFRLxs7orU
Studio replaces the ServiceStack Admin UI where it provides a UX-friendly UI for accessing AutoQuery & Crud Services but will also gain UI features for taking advantage of various ServiceStack Plugins & Features, e.g. in this initial release it includes UI's for Managing DB Validation Rules & for viewing the Executable Audit History of Tables updated through AutoCrud Services.
Studio capability-based Admin UI is enabled via the /metadata/app endpoint which returns metadata information about which plugins are enabled, what features they're configured with and what User Roles they're protected behind (if any). As such it's only able to manage v5.9+ ServiceStack instances.
You'll need the latest app dotnet tool which is bundled with the latest Chromium which provides the Desktop UI:
$ dotnet tool update -g app
Which you'll need to run once to register the app:// url scheme, e.g:
$ app -version
This initial release of ServiceStack Studio primarily provides a UI around AutoQuery Services and the latest features in this release like Executable Audit History and declarative RDBMS validators.
If you don't have a project using the v5.9+ features on hand you can launch a copy of NetCoreApps/NorthwindCrud which uses the new AutoCrud features to generate AutoQuery Services around all its RDBMS tables, that can be run locally with:
$ x download NetCoreApps/NorthwindCrud
$ cd NorthwindCrud
$ dotnet run
Where you can use app URL scheme support to launch Studio & automatically register the NorthwindCrud instance with:
app://studio?connect=https://localhost:5001
This URL scheme gets translated & is equivalent to running Studio on the command-line with:
$ app open studio -connect https://localhost:5001
Which downloads the Studio Gist Desktop App, loads it as a Gist VFS whose static assets are then served by the .NET Core Server and loaded in the CEF Chromium browser.
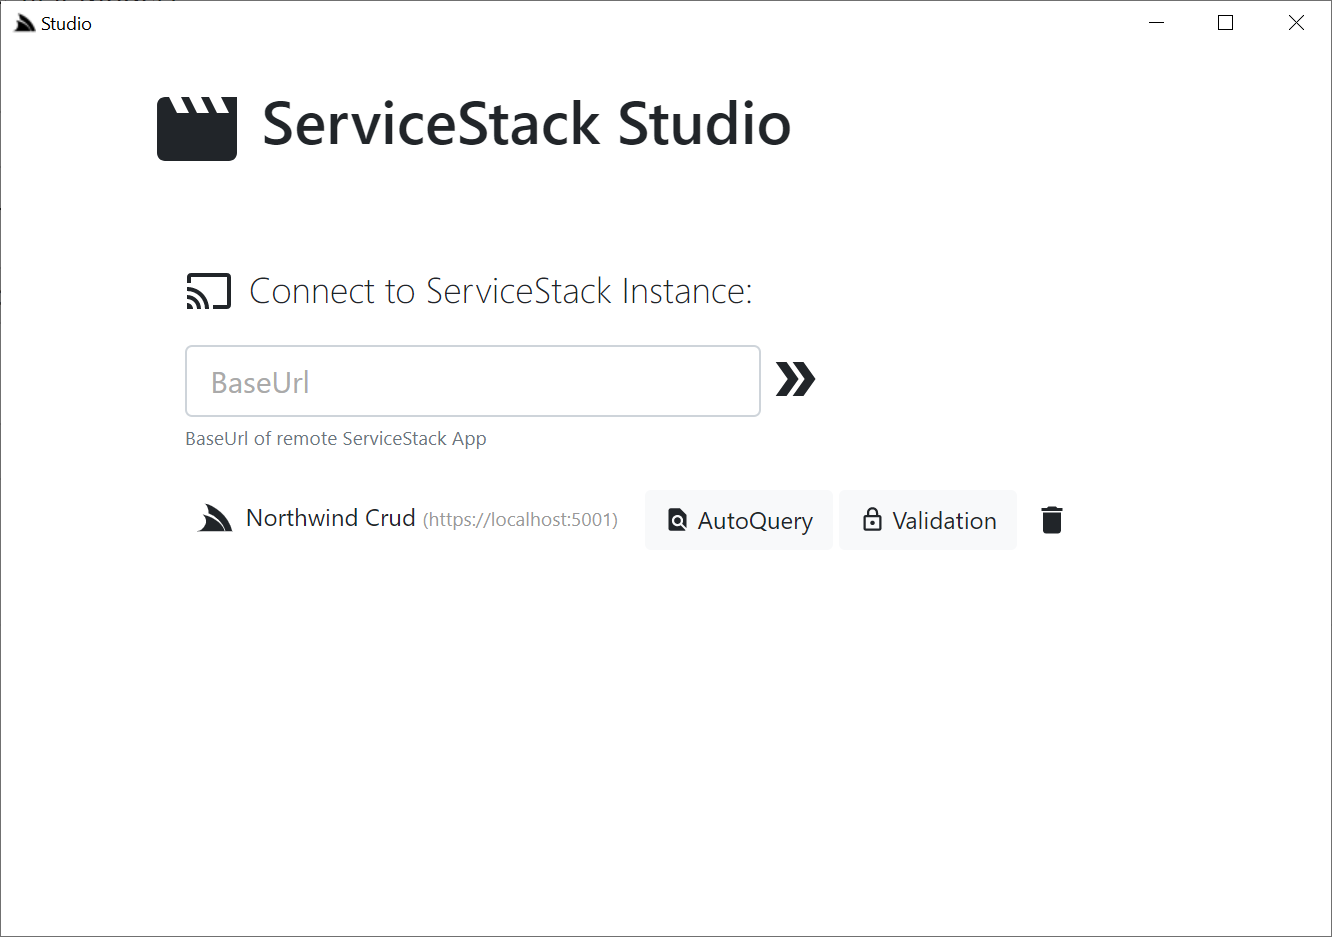
The connect param is used by Studio to auto register the remote NorthwindCrud instance where it auto downloads its App Metadata containing its enabled plugins & features & within a few seconds you should see it appear on the home page:
Whilst not optimized for it, Studio can also be launched headless in your default Browser using the x x-plat tool:
xapp://studio?connect=https://localhost:5001
$ x open studio -connect https://localhost:5001
Where you'll then be able to view it by going to https://localhost:5002. Note if not launched in a browser Studio will have limited capacity and features, but will eventually be a supported mode for accessing Studio from macOS or Linux.
From the home page you'll see all the top-level Admin Sections available that's enabled on the remote instance, in the initial release there's a UI for accessing AutoQuery Services and a UI for maintaining DB Validation Rules.
Studio uses the rich declarative metadata of AutoQuery & Crud Services to infer the data model that each AutoQuery Service operates on and the Operation Type they provide. As a result it can logically group each Service around the Data Model they operate on to provide a more intuitive & natural UI for each of the different AutoQuery/CRUD operation types.

What UI features & tables are visible is reflected by whether the AutoQuery Service for that type exists and whether the currently authenticated User has access to them (i.e. Have the role required by each Service). So an unauthenticated user will see Northwind Crud's read-only Region table with no ability to update it & the Territory table, which as it isn't protected by a role will be visible to everyone, but as all CRUD Write operations require authentication, all edit controls require authentication - as shown in the screenshot above where they're replaced with auth Sign In buttons.
Here are the relevant NorthwindCrud auto-generation rules which defines this behavior:
var readOnlyTables = new[] { "Region" };
GenerateCrudServices = new GenerateCrudServices {
    ServiceFilter = (op,req) => {
        // Require all Write Access to Tables to be limited to Authenticated Users
        if (op.IsCrudWrite())
        {
            op.Request.AddAttributeIfNotExists(new ValidateRequestAttribute("IsAuthenticated"),
                x => x.Validator == "IsAuthenticated");
        }
    },
    //Don't generate the Services or Types for Ignored Tables
    IncludeService = op => !ignoreTables.Any(table => op.ReferencesAny(table)) &&
        !(op.IsCrudWrite() && readOnlyTables.Any(table => op.ReferencesAny(table))),
}
Clicking on any of the Auth icons or the Sign In button on the top right will open up the Sign In dialog.
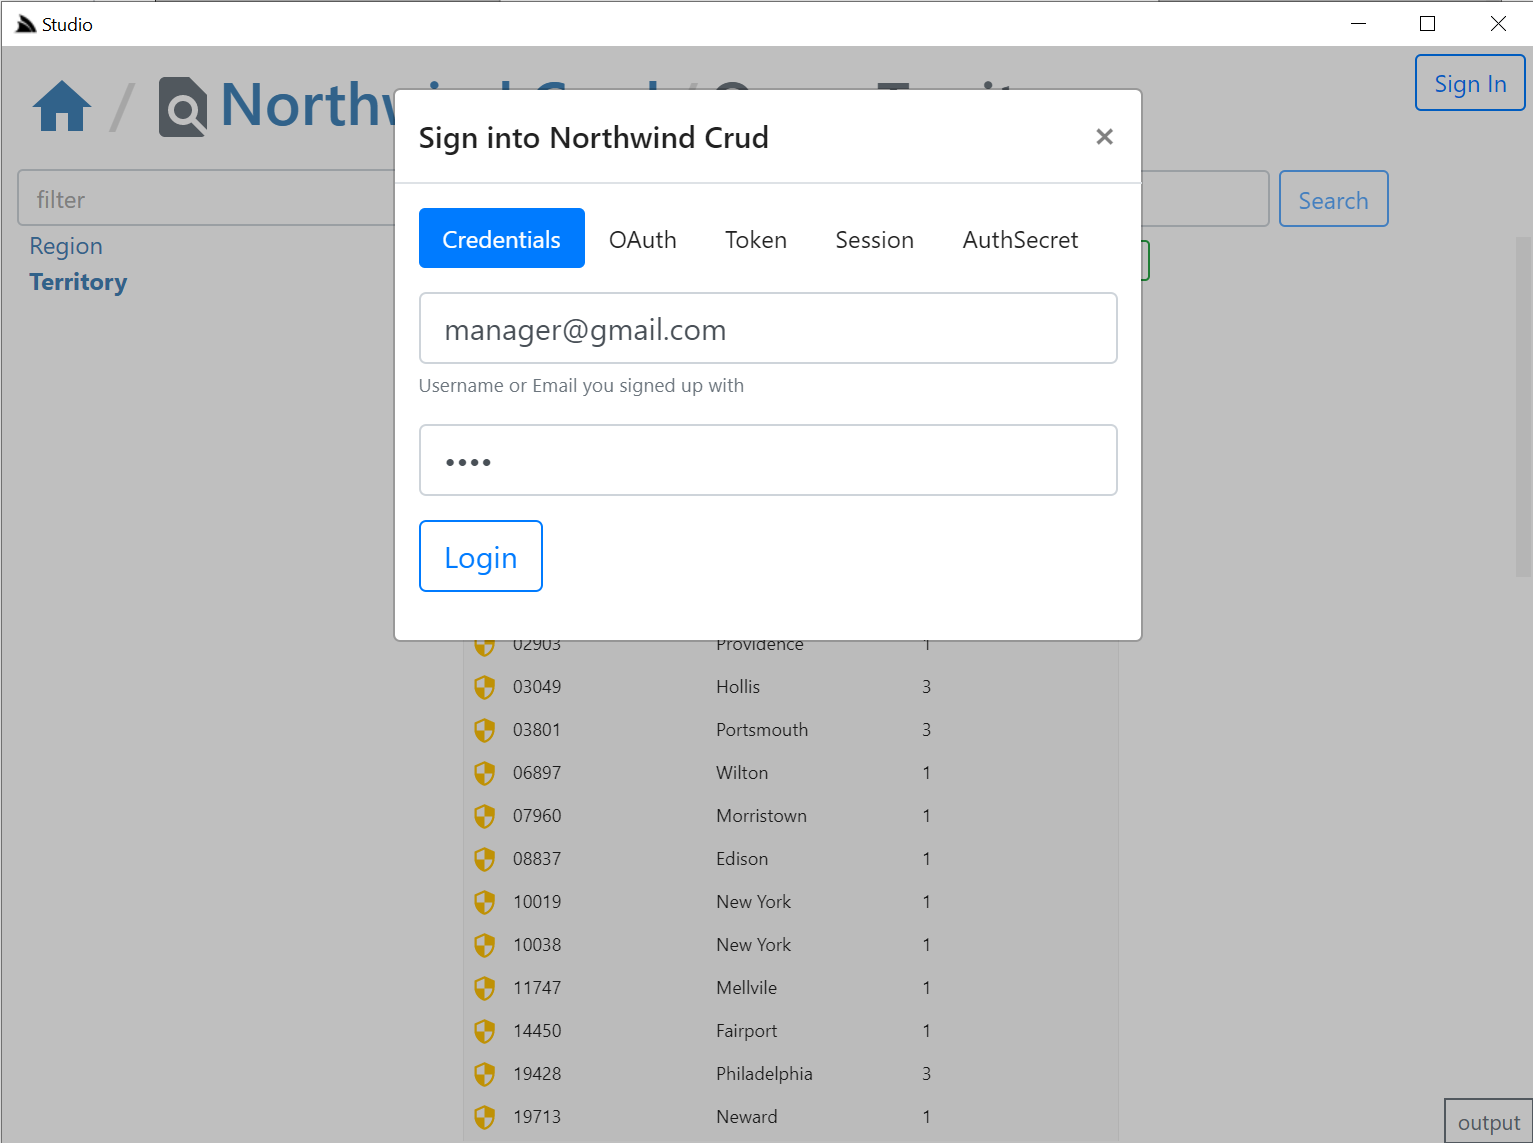
The Sign In dialog supports most of ServiceStack's built-in Auth Providers with a different Auth Dialog tab depending which Auth Providers are enabled.
It looks at "auth family type" to determine how to Authenticate with each Auth Provider so it should still support your Custom Auth Providers if they inherit from existing Auth Providers, otherwise they can explicitly specify which Type of Auth they use by overriding the Type property getter with one of the following:
- Bearer - Authenticate with HTTP Authentication Bearer Token (e.g. JWT or API Key)
- credentials - Authenticate with Username/Password at
/auth/credentials - oauth - Authenticate with OAuth
- session - Alternative session-based Auth Provider
The session tab is also displayed if a credentials or auth provider is enabled. It should serve as a fallback Auth option if your Custom Auth Provider doesn't fit into the existing family types as it opens the /auth page of the remote ServiceStack instance:
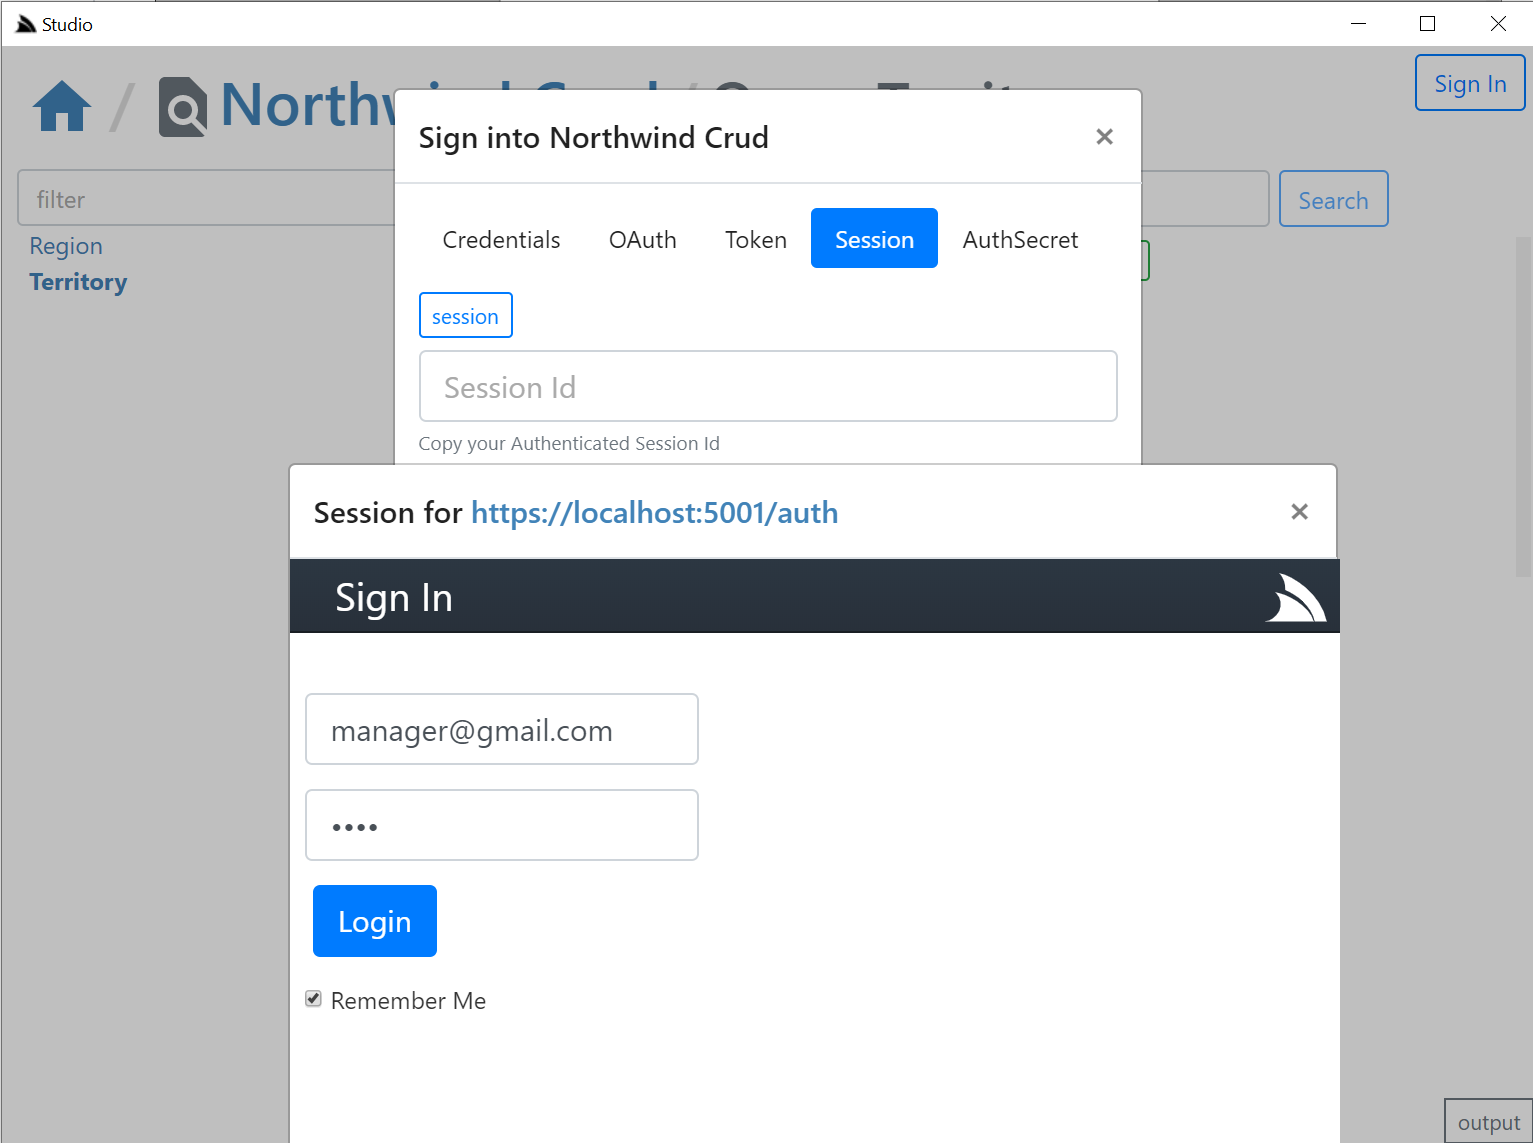
Where you can login to the remote site via the new fallback /login page or uses your custom Login Page if exists. If your remote instance is configured to allow Studio CORS access, i.e:
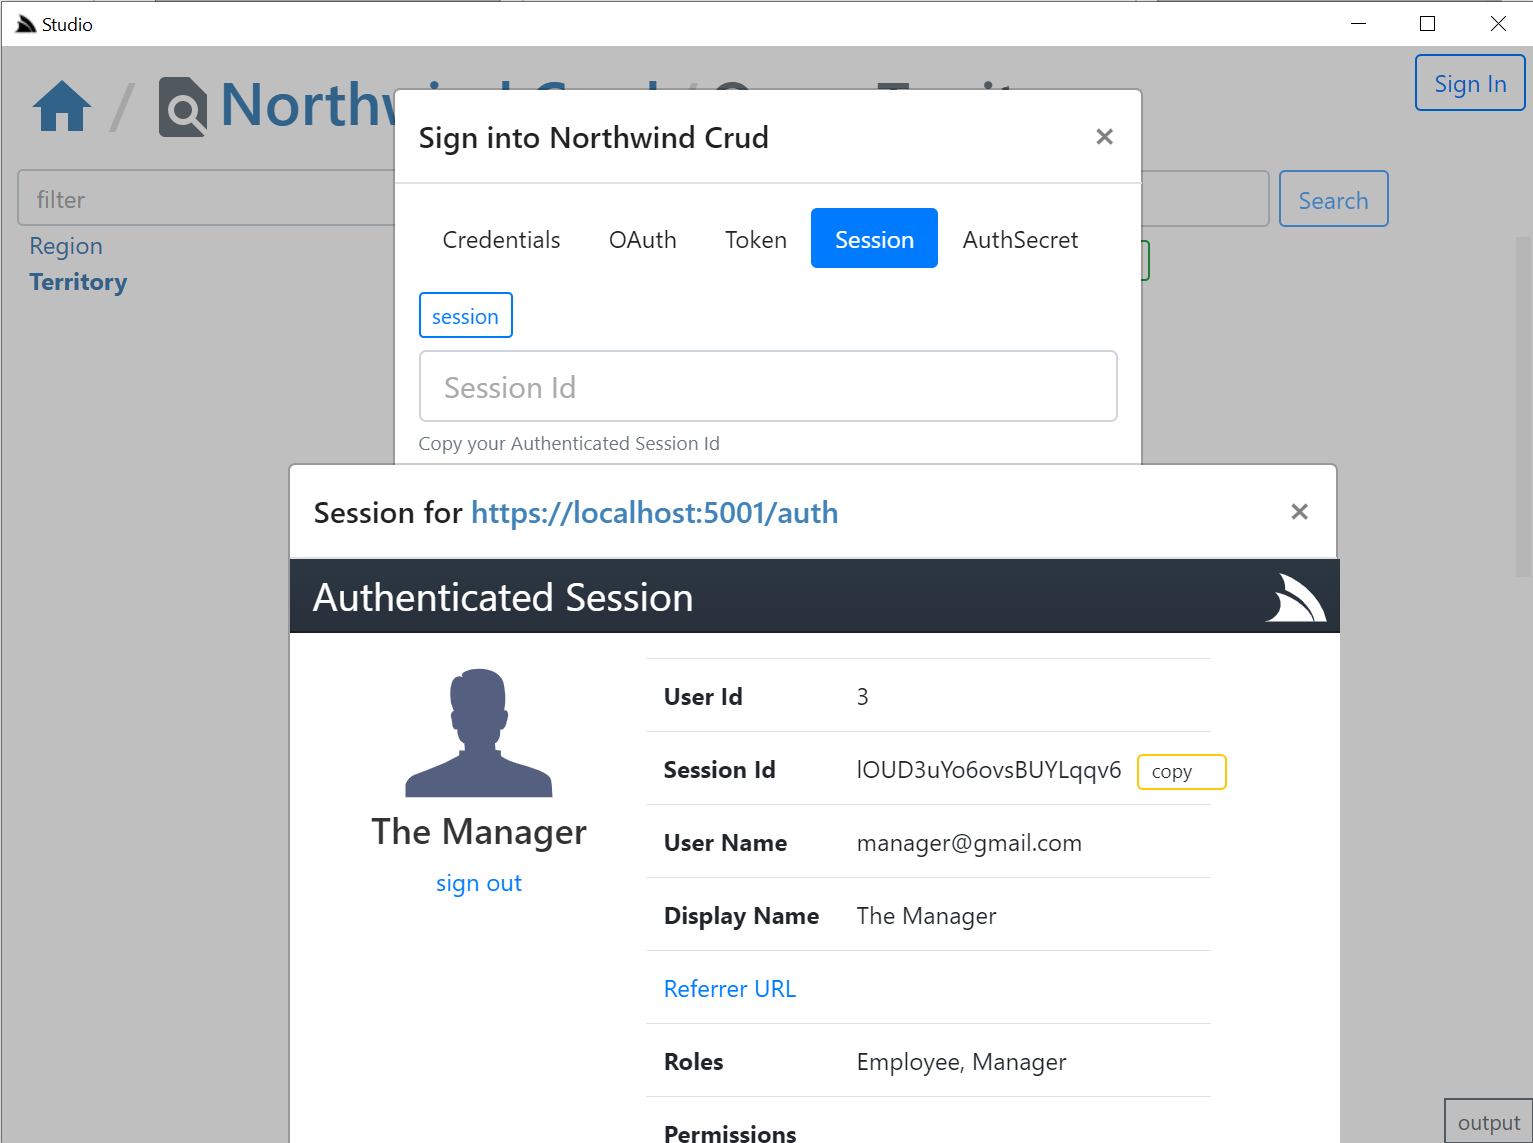
appHost.Plugins.Add(new CorsFeature(allowOriginWhitelist:new[]{ "https://localhost:5002" }));Clicking on the copy button will then be able to post the session Id back to Studio & close the auth popup otherwise you'd need to manually close the popup and paste the session in.
The OAuth tab is a little different since it requires an OAuth redirect and since most 3rd Party OAuth providers disallow embedding in iframes,
it needs to popup an external url in your default browser which still provides a nice auth UX as you'd typically already be Signed In with your
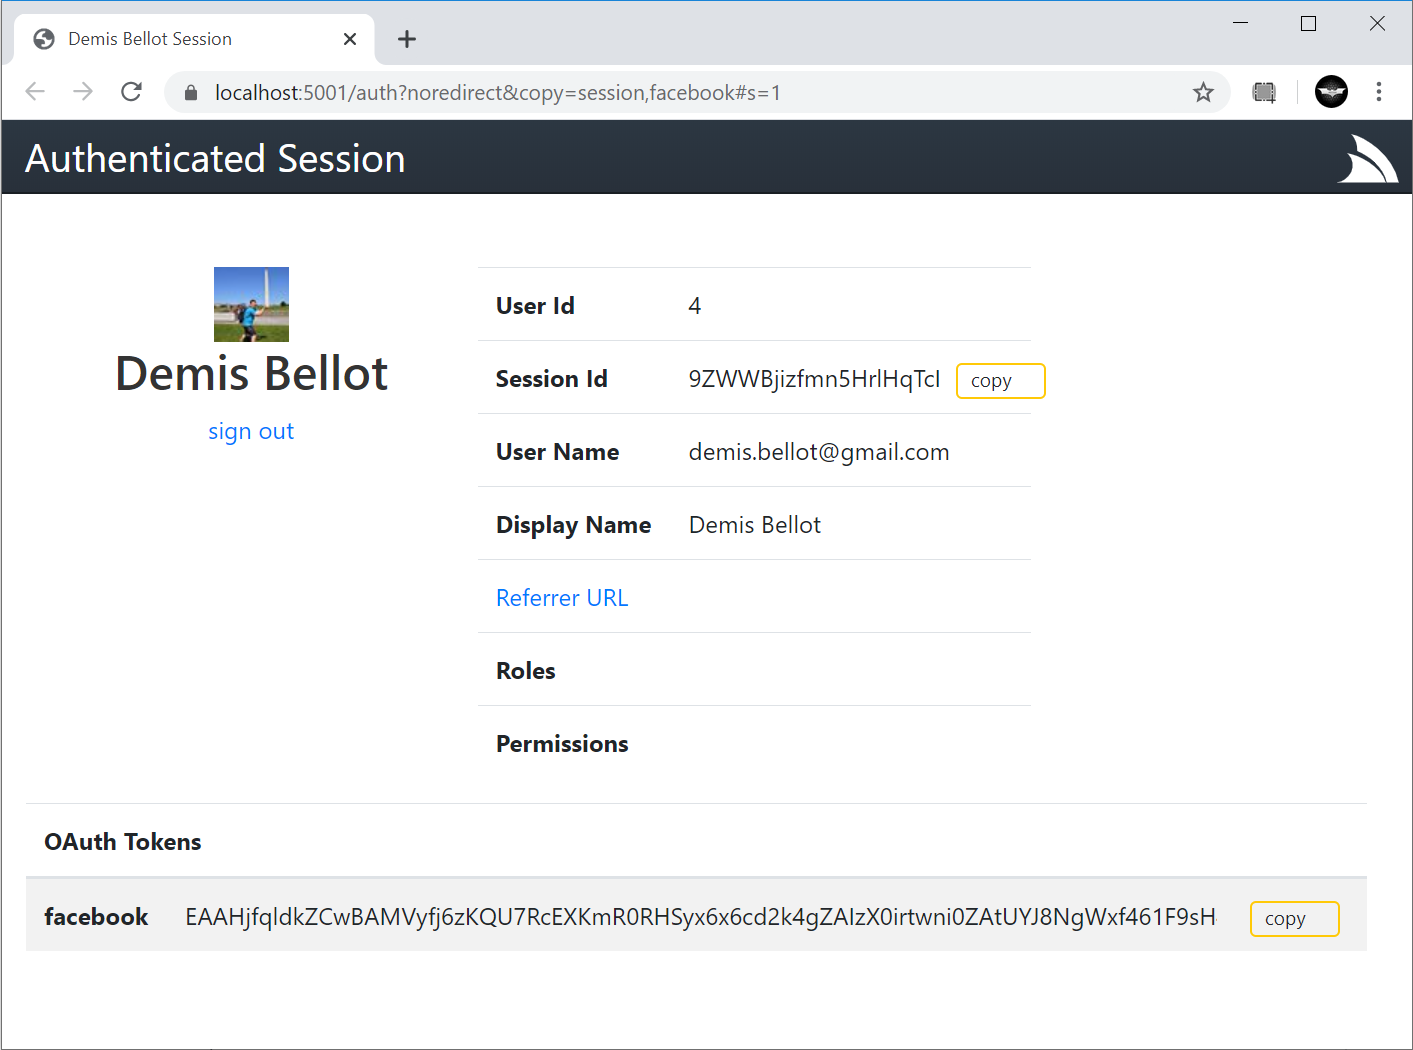
Default browser, where it will redirect you back to your /auth page where you can copy either the Session Id or the OAuth Access Token
if you enable including OAuth Access Tokens in your AuthenticateResponse DTO with:
appHost.Plugins.Add(new AuthFeature(...) {
    IncludeOAuthTokensInAuthenticateResponse = true, // Include OAuth Keys in authenticated /auth page
});
This allows you to Authenticate via OAuth Access Token where you can test the same Authentication that Mobile and Desktop using pre-existing Sign In Widgets who also authenticate via OAuth Access Tokens obtained by their native UI widget:
Studio is able to provide a seamless UX where it's able to monitor the Windows clipboard for changes & when detected close the window, return focus back to Studio who uses it to automatically Sign In with the copied token.
As is expected from a normal Desktop App, the User State of the App is preserved across restarts, which Studio maintains in its $HOME/.servicestack/studio/site.settings JSON file which preserves amongst other things what remote ServiceStack instances you've connected to & last queries made on each table, etc. When
not running in a Desktop App it will save it to your browsers localStorage. You can force a save with Ctrl+S or by clicking on the save icon on the top right.
The same querying behavior, supported filters, custom fields, paging, order by's, etc. demonstrated in SharpData above are also available in Studio, but implemented differently, where instead of calling the SharpData API directly, the filters are translated into the equivalent AutoQuery request and the remote AutoQuery Services are called instead, but as they both result in the same UX and end result, users knowledge is transferable:
- Use
=nullor!=nullto searchNULLcolumns - Use
<=,<,>,>=,<>,!=prefix to search with that operator - Use
,trailing comma to perform anIN (values)search (integer columns only) - Use
%suffix or prefix to perform aLIKEsearch
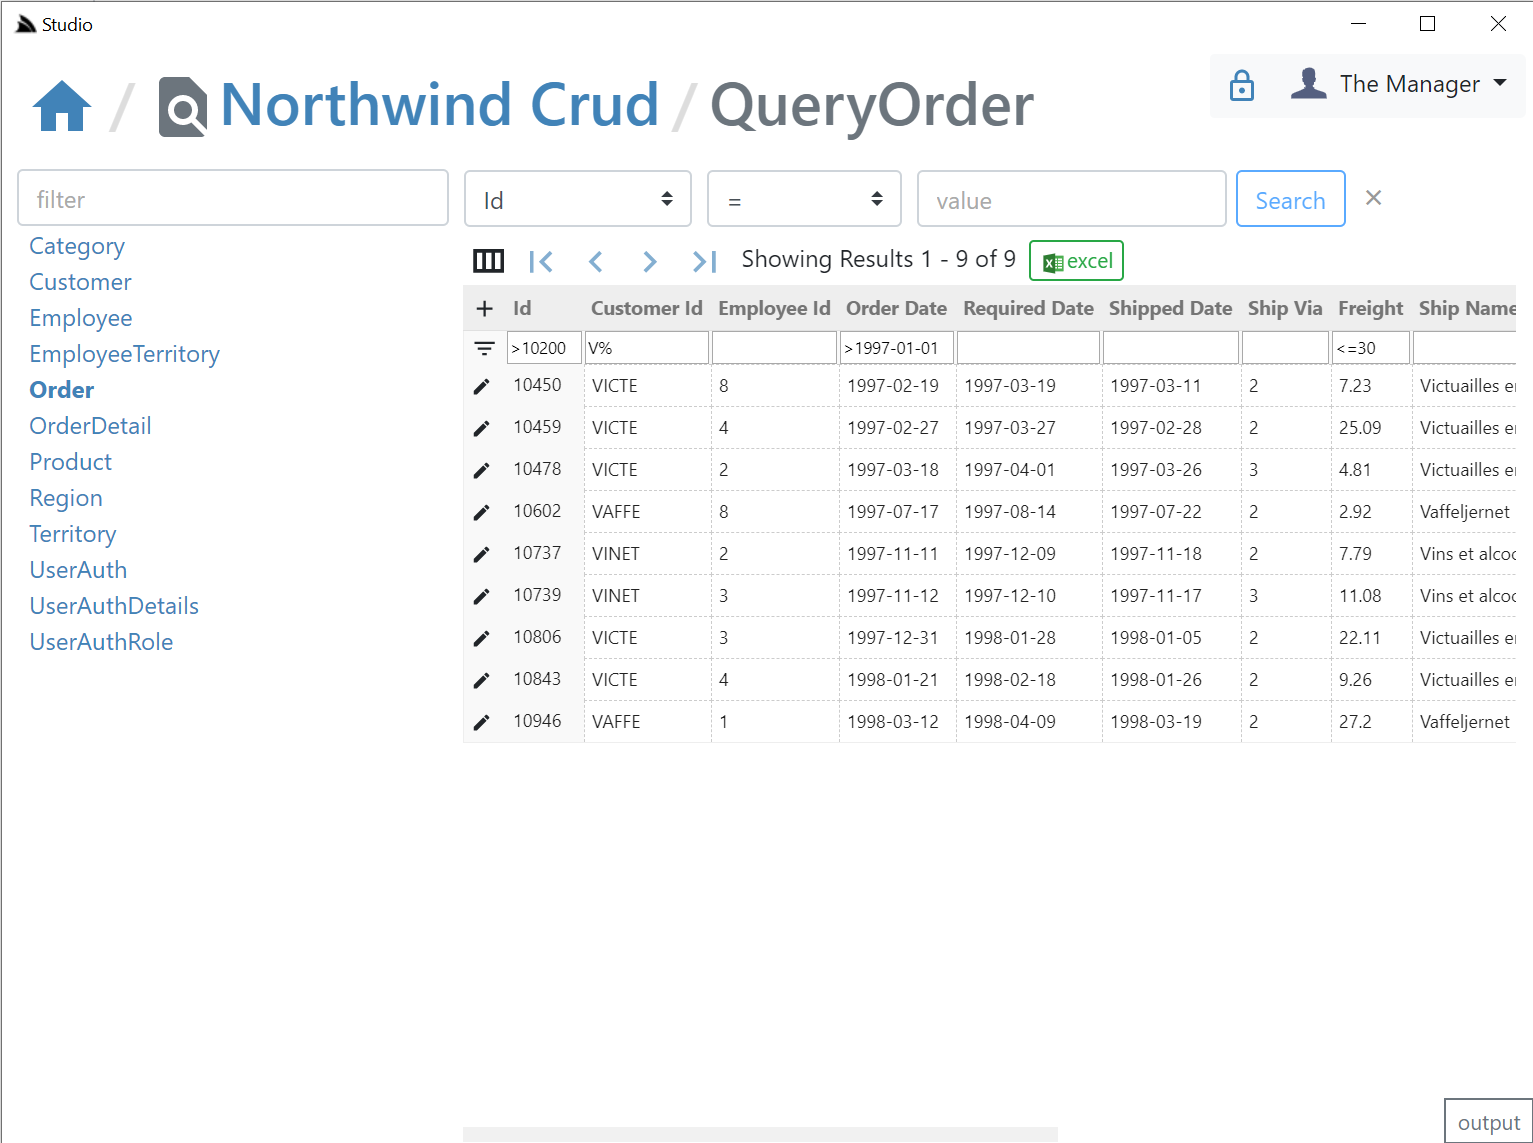
Likewise the fast, direct export into Excel is also available, one difference is that the total results returned in a query is controlled by the remote ServiceStack AutoQuery plugin whereas SharpData allows for unlimited sized queries:

The UI is designed to look similar to a generic RDBMS Admin UI Table Editor where you can edit records in a table grid. If a IPatchDb<Table> AutoQuery Service exists for the Data Model & the Authenticated User has access to it.
If enabled all fields (excl PK) on that Request DTO will be editable in the UI, otherwise they'll appear Read-only like the Id column:
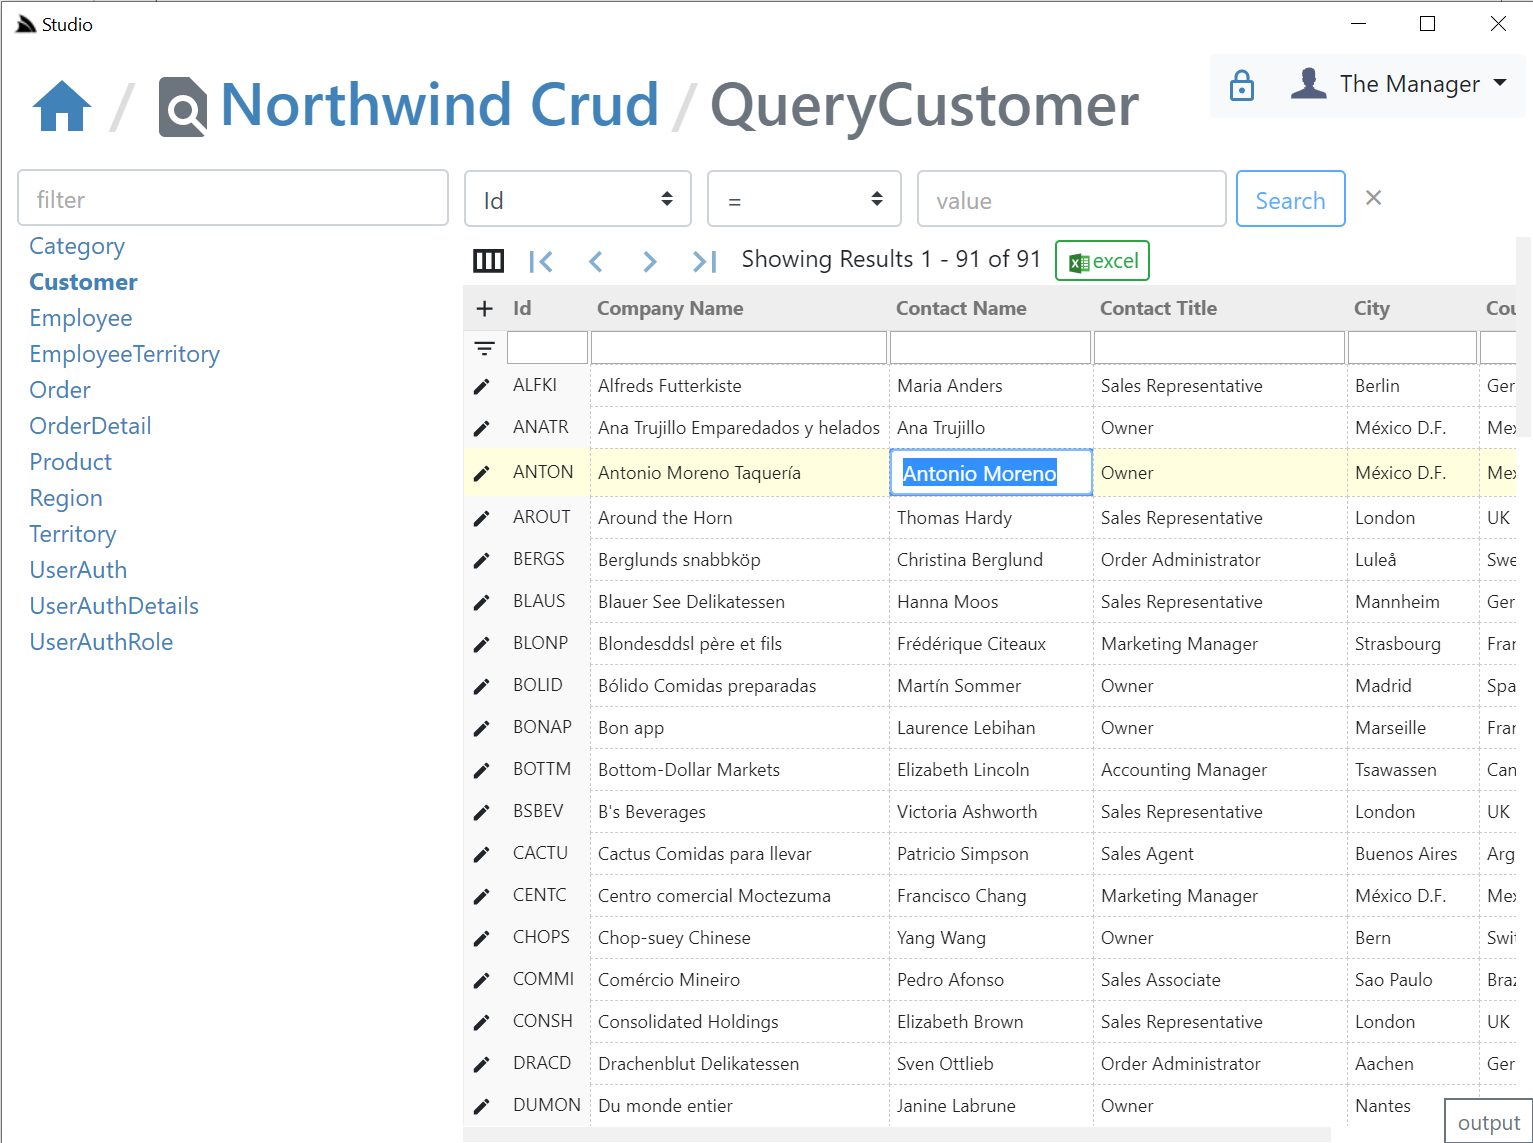
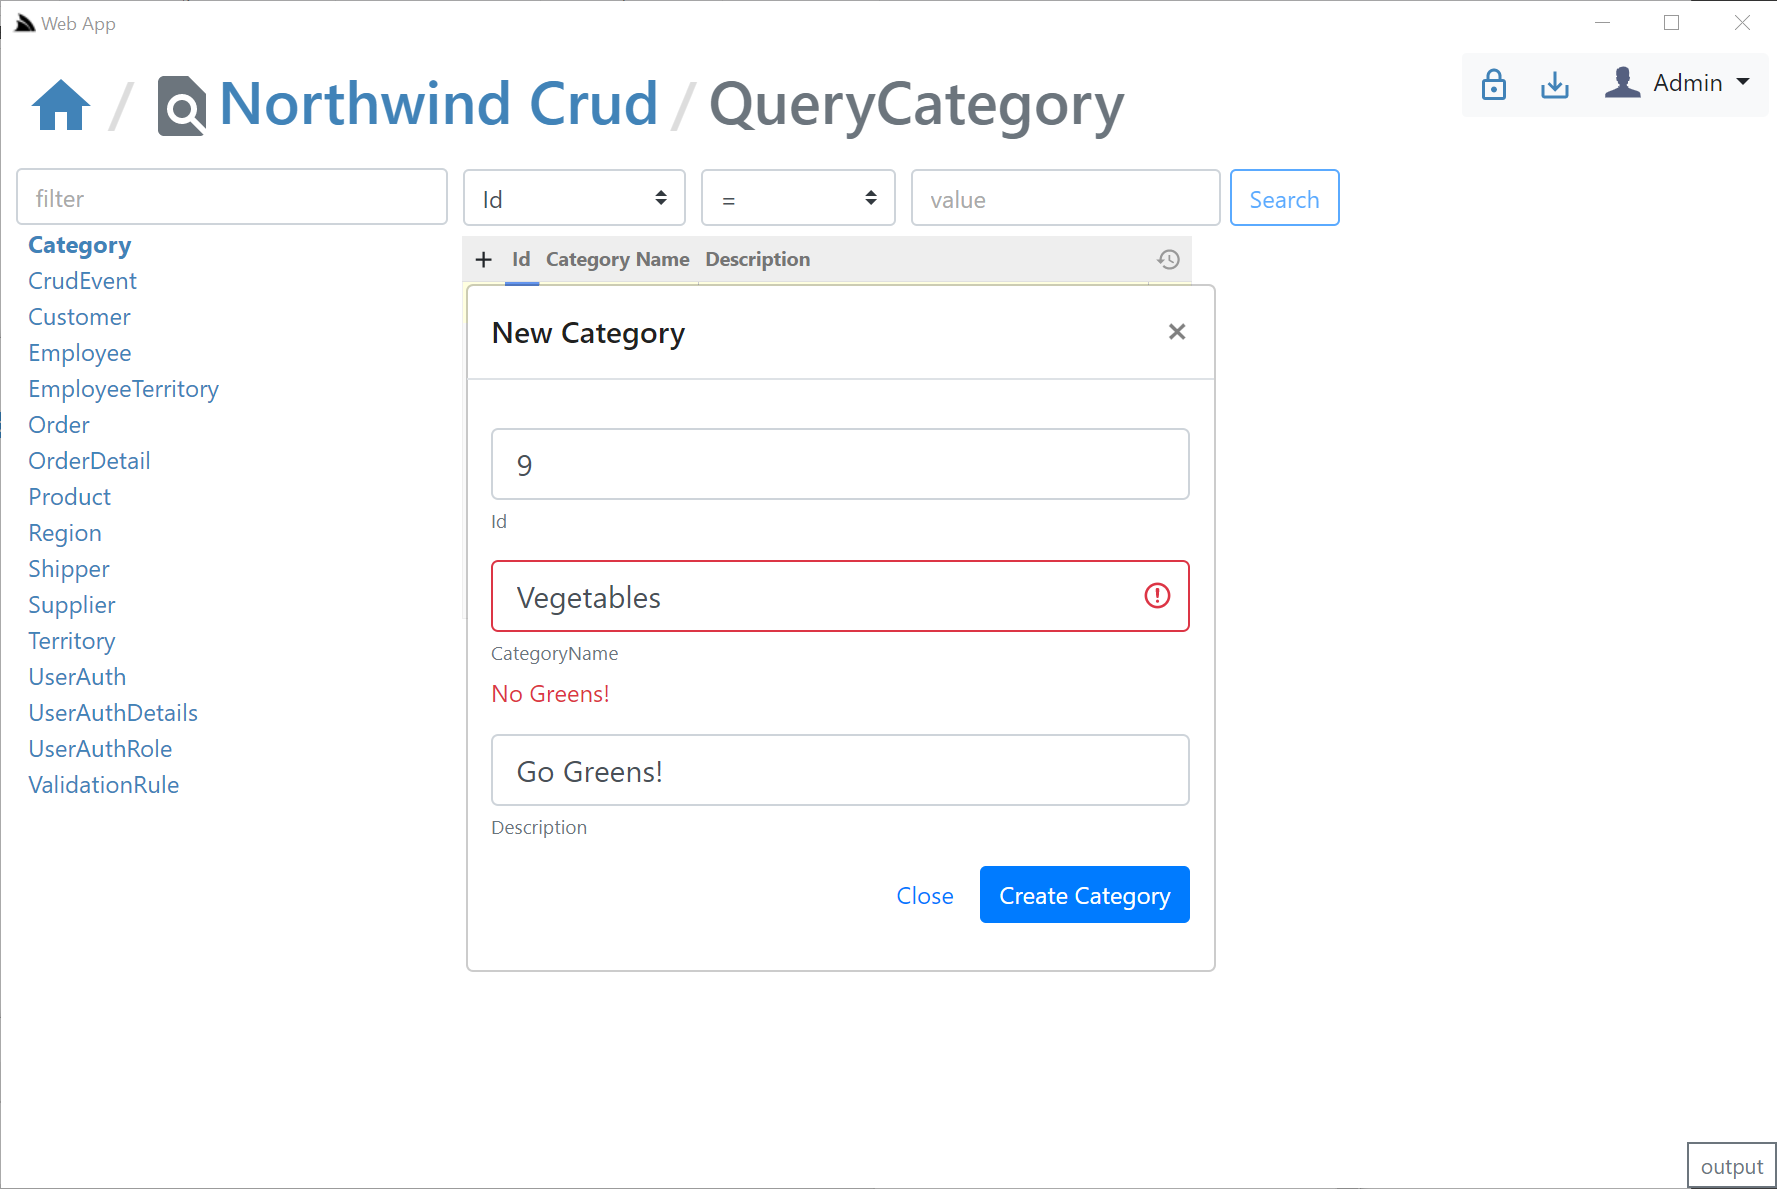
If the user has access to the ICreateDb<Table> Service they'll be able to add records by clicking the + icon on the top-right of the resultset which brings up the Create Entity modal:

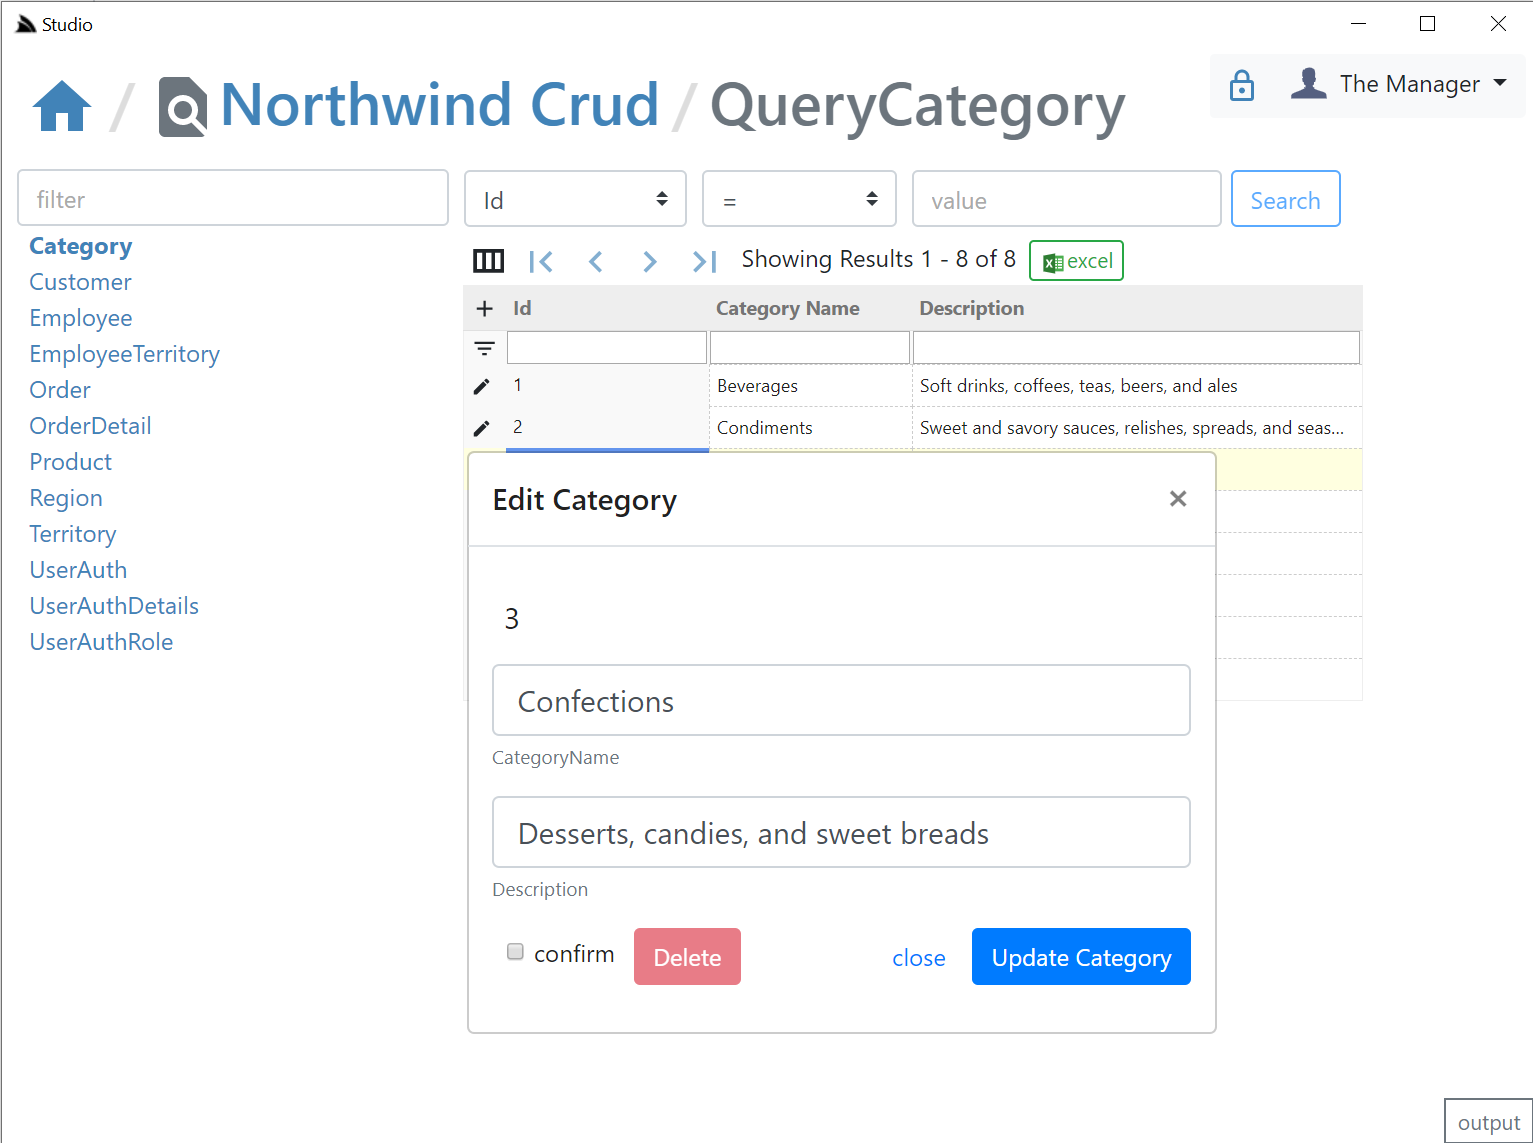
If the user has access to the IUpdateDb<Table> Service they'll be able to update records by clicking on the edit icon which will bring up the Edit Entity dialog. If they have access to the IDeleteDb<Table> Service they'll also be able to delete the entity from the same screen:
All API Requests the UI makes to remote ServiceStack instances are made via a generic .NET Core back-end Service Proxy which attaches the Signed In Authentication Info to each Request. Each API Request Studio makes is recorded in the log viewer at the bottom, showing the Verb and Parameters each API was called with:
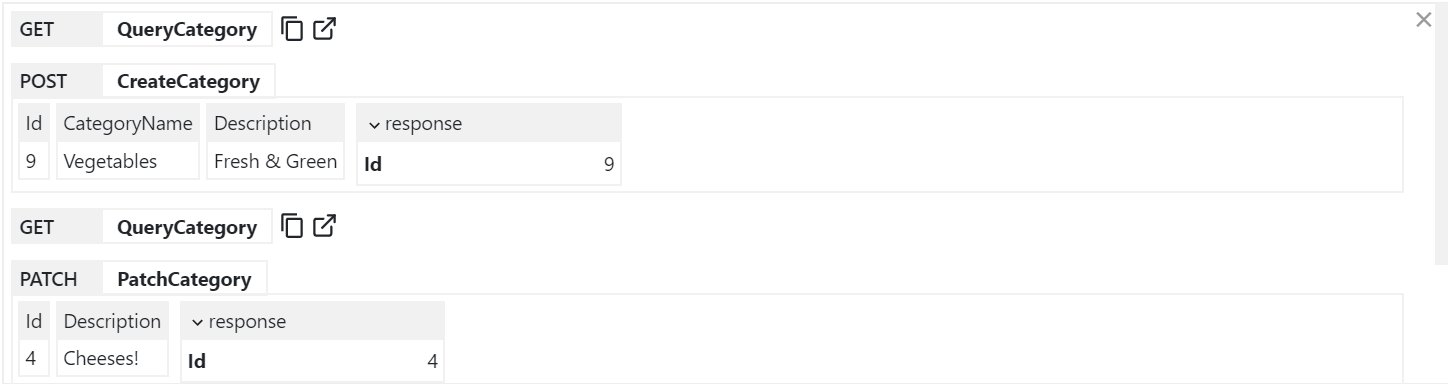
You can copy the URL from GET API Requests or open them up in a new browser to view it in isolation.
If you Sign In as the Admin User (i.e. using AuthSecret=zsecret) you'll get super user access to access the other protected features like being able to view an Audit History of updates made to each record via AutoQuery that's enabled in NorthwindCrud with:
// Add support for auto capturing executable audit history for AutoCrud Services
container.AddSingleton<ICrudEvents>(c => new OrmLiteCrudEvents(c.Resolve<IDbConnectionFactory>()));
container.Resolve<ICrudEvents>().InitSchema();
Where users in the AutoQueryFeature.AccessRole (default: Admin) role will be able to view the Audit history of each row:
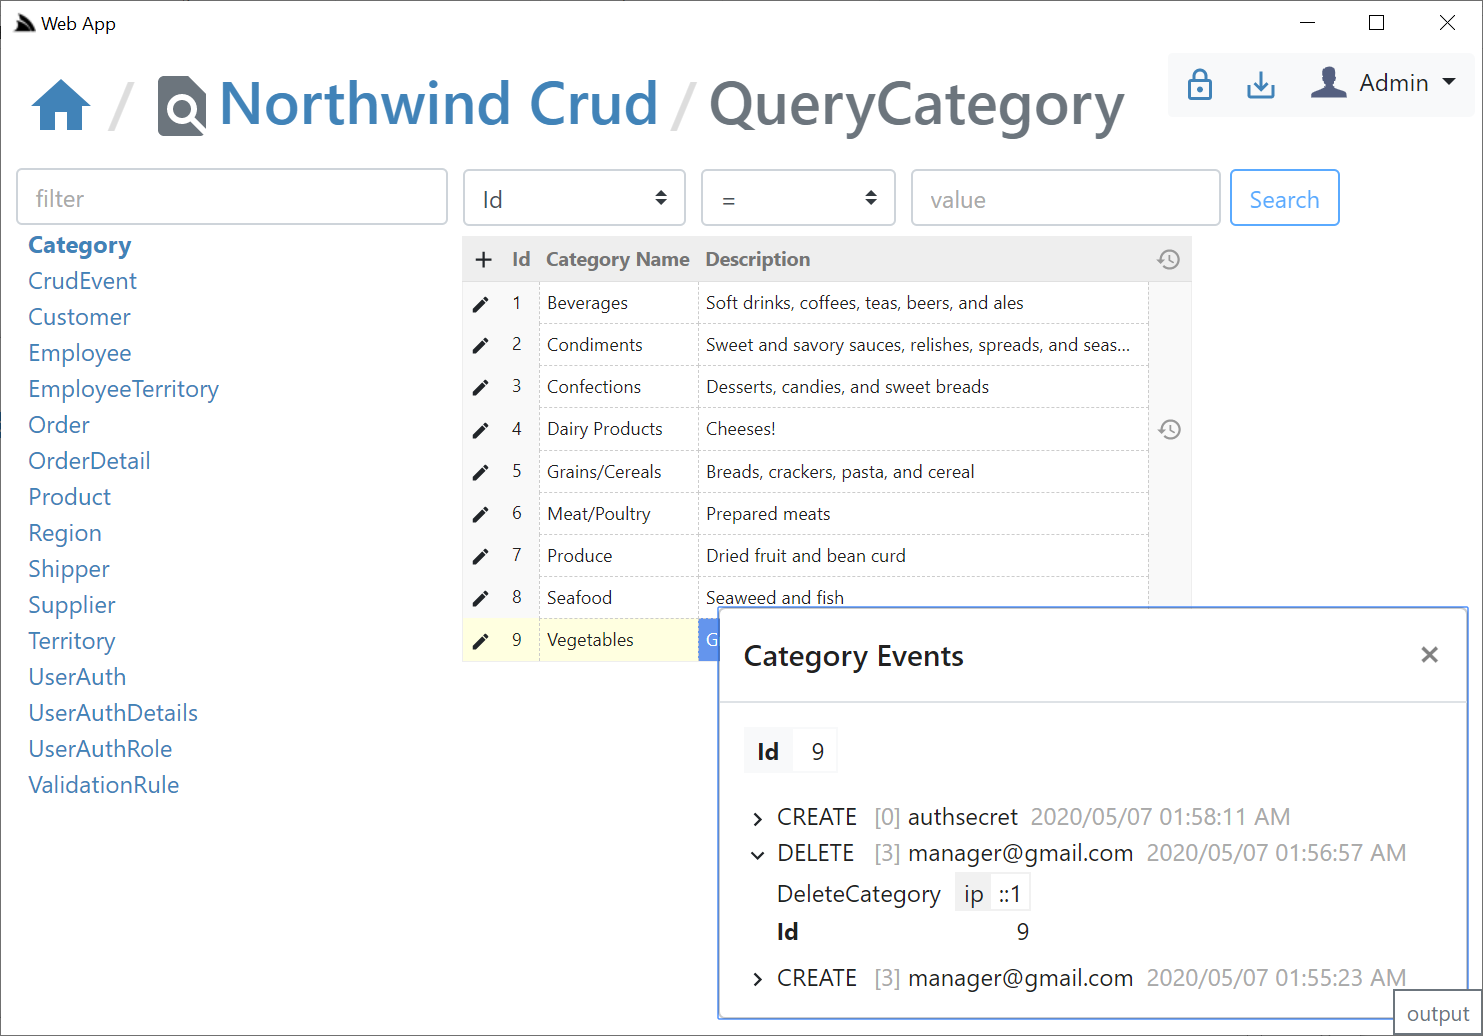
If creating & deleting an entity with the same Id, the Audit History of the previous entity will be retained & visible
As an Admin you'll also have access to the DB Validation Source Admin UI which will let you add declarative Type and Property Validators for each Request DTO in Studio. This is enabled in NorthwindCrud in Configure.Validation.cs:
// Add support for dynamically generated db rules
services.AddSingleton<IValidationSource>(c =>
    new OrmLiteValidationSource(c.Resolve<IDbConnectionFactory>()));

//...
appHost.Plugins.Add(new ValidationFeature());
appHost.Resolve<IValidationSource>().InitSchema();
Management of this feature is limited to users in the ValidationFeature.AccessRole (default: Admin).
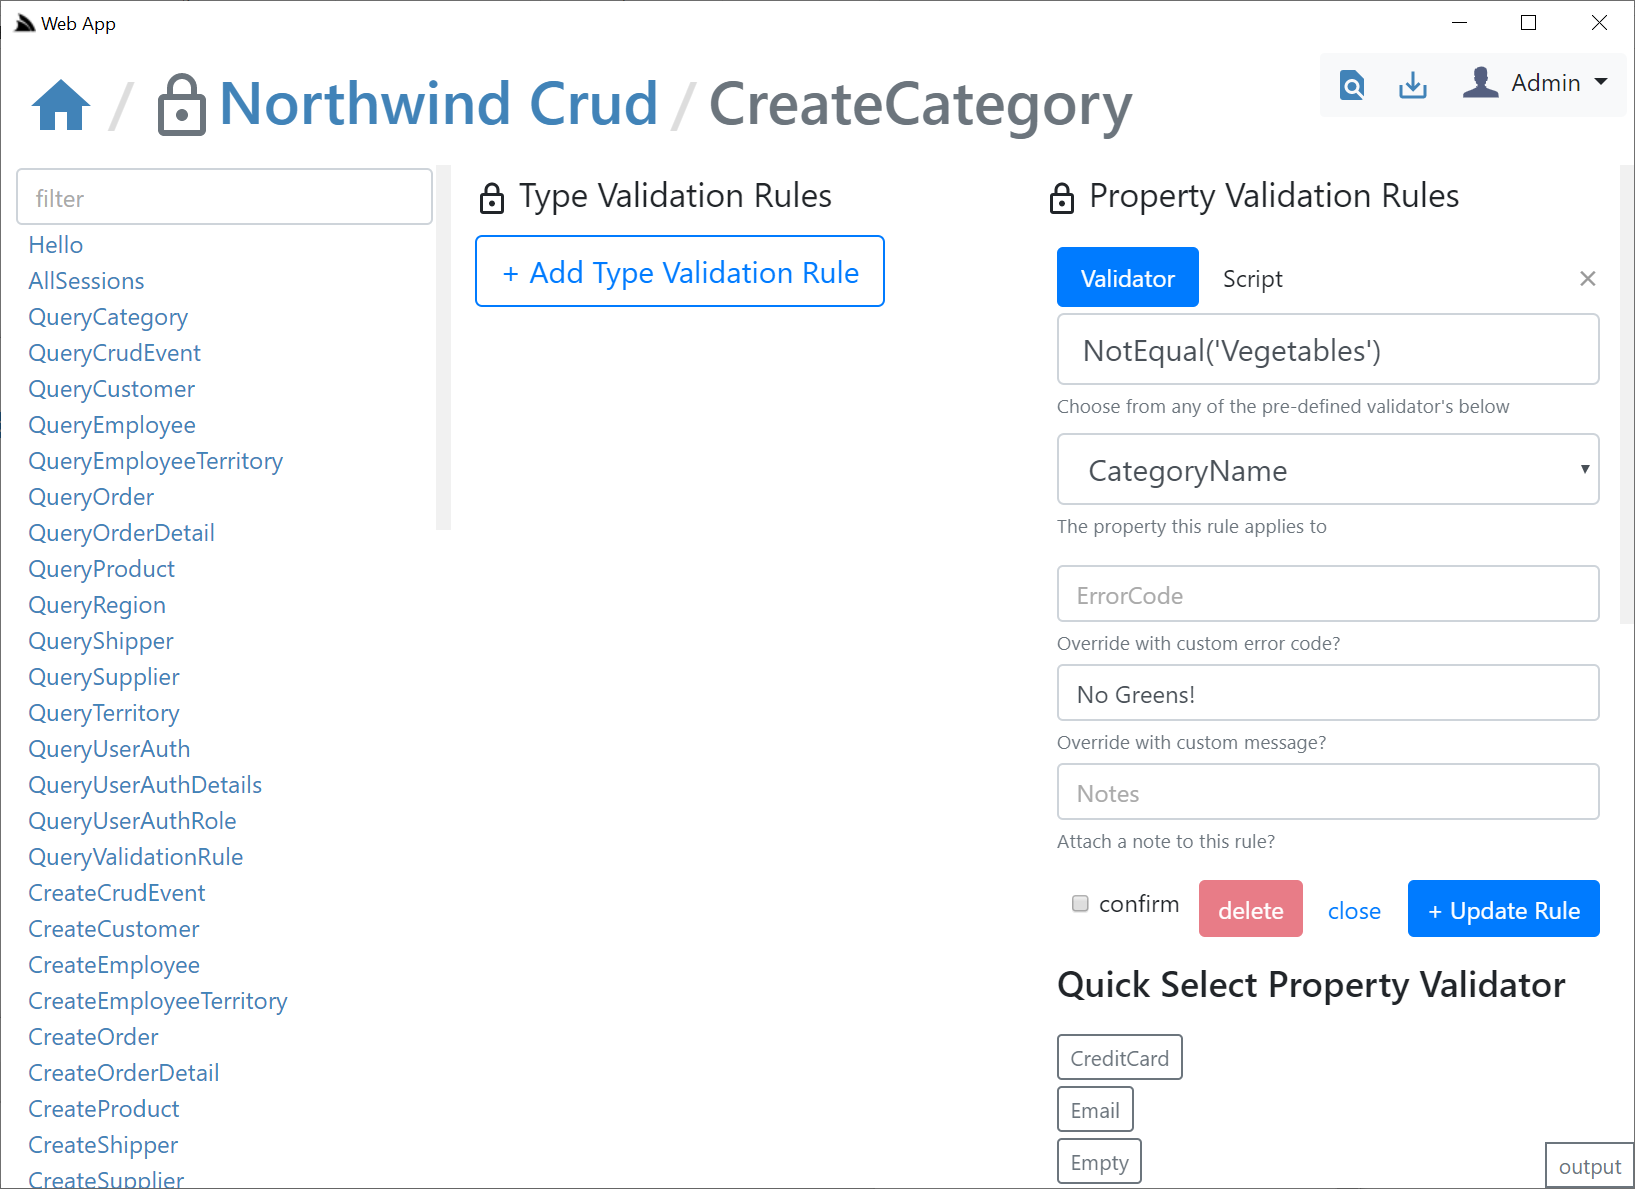
Clicking on the Validation Lock Icon on the top right will take you to the Validation Editor for that AutoQuery Request DTO which will include quick links to jump to different AutoQuery/Crud Services for the same Data Model.
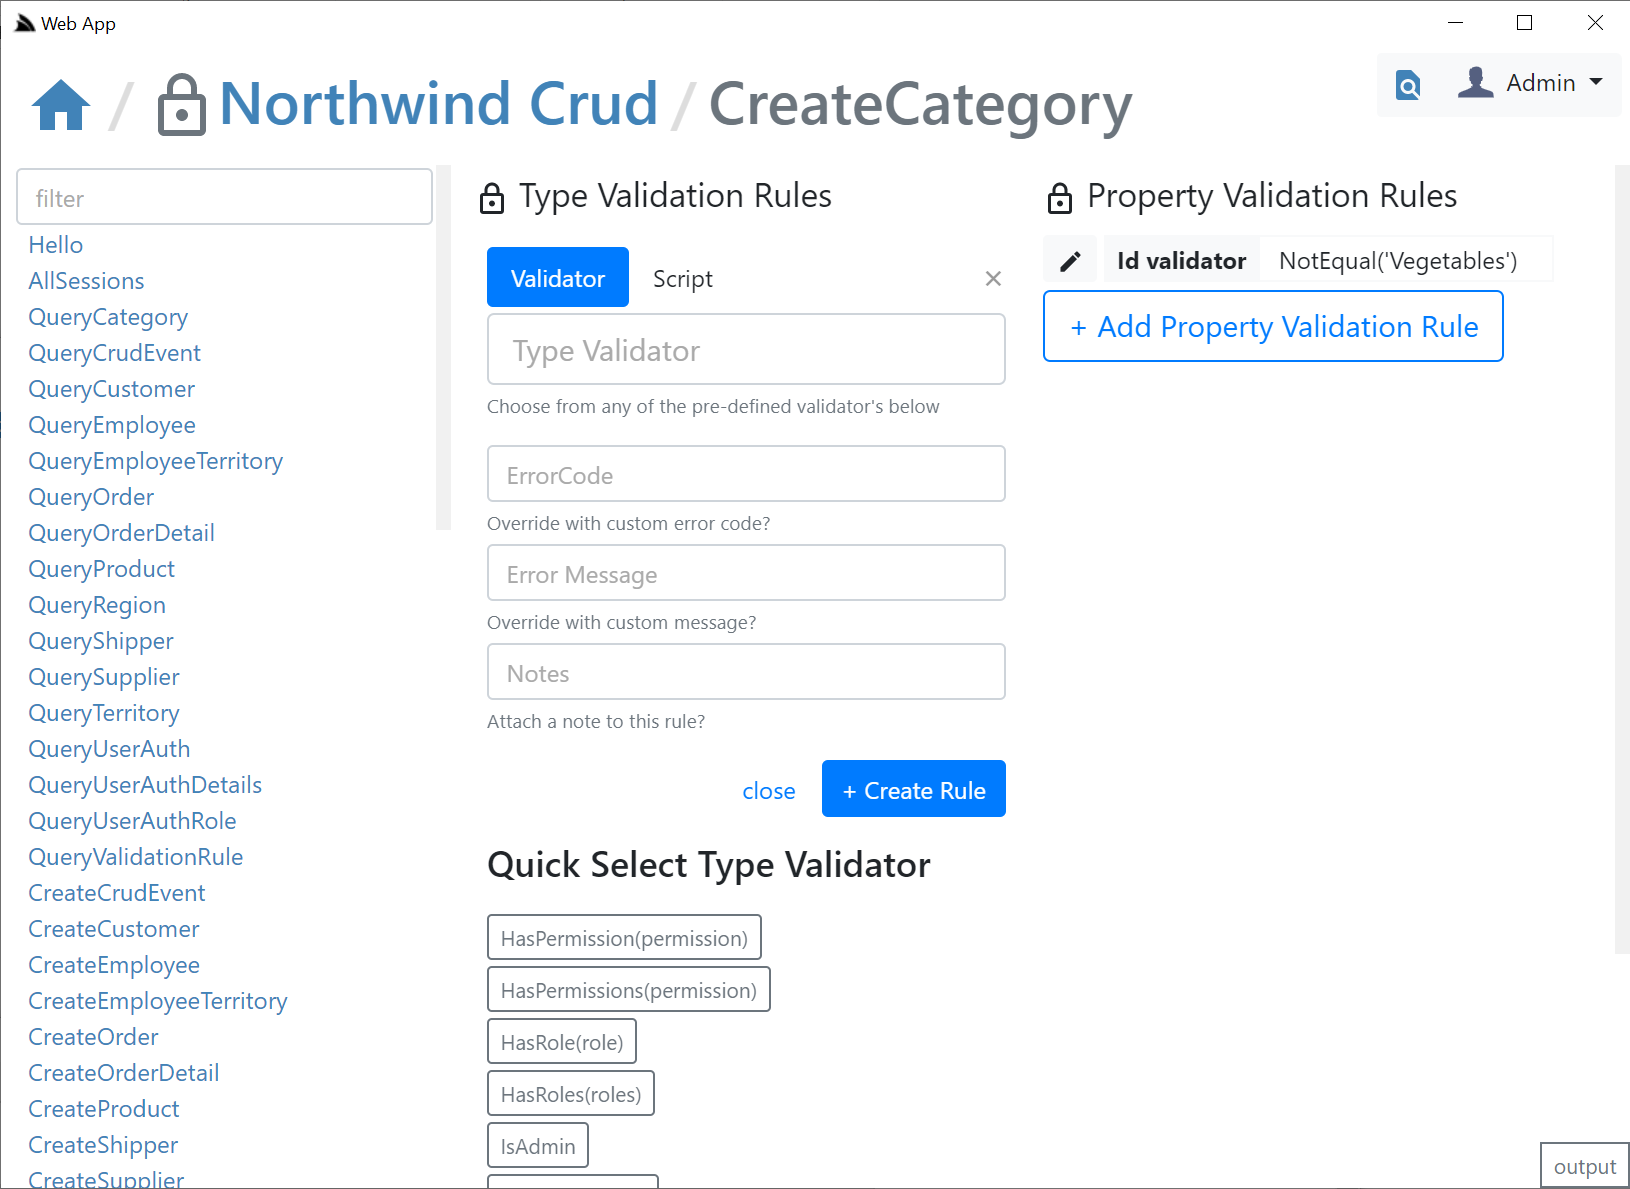
In the validation editor you'll be able to create Type and Property Validation Rules that either make use of an existing Validator or you can enter a custom #Script expression that must validate to true. The Validator UI is smart and will list all built-in and Custom Script Methods returning ITypeValidator or IPropertyValidator that's registered in the remote instance. The pre-defined list of validators are displayed in a list of "quick pick" buttons that enables fast adding/editing of validation rules.
The ModifyValidationRules Service that Studio calls performs a lot of validation to ensure the Validation rule is accurate including executing the validator to make sure it returns the appropriate validator type and checking the syntax on any Script validation rules to ensure it's valid.
The ModifyValidationRules back-end Service also takes care of invalidating the validation rule cache so that any saved Validators are immediately applied.
Despite being sourced from a DB, after the first access the validation rules are cached in memory where they'd have similar performance to validators declaratively added on Request DTOs in code.
After you add your validation rules you will be able to click the AutoQuery icon on the top right to return to the AutoQuery editor. Be mindful of what Validation Rule you're adding to which DTO, e.g. a validation rule added to CreateCategory Service will only be applied to that Service which is used when creating entities, e,g. not for full entity or partial field updates.
The way a generic capability-based Admin UI's like Studio is possible is via the /metadata/app API descriptor which describes what plugins and features are enabled on the remote ServiceStack instance. All built-in plugins which provide functionality that can be remotely accessed add their info to the App's metadata.
This functionality is also available to your own plugins should you wish to attach info about your plugin where you can use the AddToAppMetadata extension method to return a populated CustomPlugin DTO describing the features made available by your plugin:
public class MyPlugin : IPlugin
{
    public void Register(IAppHost appHost)
    {
        appHost.AddToAppMetadata(meta => {
            meta.CustomPlugins[nameof(MyPlugin)] = new CustomPlugin {
                AccessRole = RoleNames.AllowAnyUser,                   // Required Role to access Services
                ServiceRoutes = new Dictionary<string, string[]> {
                    { nameof(MyPluginService), new[] { "/myplugin/{Id}" } }, // Available Plugin Services
                },
                Enabled = new List<string> { "feature1", "feature2" }, // What plugin features are enabled
                Meta = new Dictionary<string, string> {
                    ["custom"] = "meta" // additional custom metadata you want returned for this plugin
                }
            };
        });
    }
}The primary limitations with ServiceStack Admin was its deployment model where it had to be explicitly registered as a plugin in each ServiceStack instance, this means it could only be used on ServiceStack instances that explicitly had it registered, also it maintained the long release cadence of ServiceStack major releases which means the UI couldn't be updated frequently resulting in a stale long feedback loop.
To overcome this ServiceStack Studio is delivered as a Gist Desktop App which, like a website will be running the latest version each time it's run. To reduce its download footprint the app and x dotnet tools now include the new ServiceStack.Desktop project which includes the common framework libraries that most Vue & React Apps use which saves it from needing to be included in each Download. It also includes Google Material Design Icons SVGs & a copy of fontawesome free icons that all Desktop Apps will be able to use without the bandwidth cost for using them.
ServiceStack/Studio is a vue-lite App that only uses SVG icons as they're small, high-quality at every scale, are customizable & have built-in css classes making them easy to use declaratively where it takes advantage of ServiceStack's built-in SVG support which allows optimal css bundles containing only the SVGs your App's use. All SVG icons used in Studio are defined in its _init.ss startup script which defines which Material Design SVG to make available under which css bundle. It also registers its own custom SVG icons not contained in ServiceStack.Desktop's embedded resources and includes them as part of its /css/app.css bundle.
As a result of its architecture Studio gets bundled down to a 55kb .zip which includes its 46kb (Uncompressed) Studio.dll plugin containing all its C# back-end logic (thanks to all ServiceStack .dll's being deployed with the dotnet tools as well). As it's published as a Gist it adds a bit more overhead (and Gist APIs aren't particularly fast) so there's a slight delay in loading from a Gist but still is able to load its home page in around 2-3s, which includes the start time of the ServiceStack .NET Core App and the Chromium CEF Browser. The number of restarts should be minimal thanks to Studio being designed as a single UI to manage all your ServiceStack instances so you can reuse the same running Desktop App to manage multiple remote ServiceStack instances.