This is the Unity SDK of Adjust™. It supports iOS, Android, Windows Store 8.1, Windows Phone 8.1 and Windows 10 targets. You can read more about Adjust™ at adjust.com.
Note: As of version 4.12.0, Adjust Unity SDK is compatible with Unity 5 and newer versions.
- Basic integration
- Additional features
- Troubleshooting
- License
These are the minimal steps required to integrate the Adjust SDK into your Unity project.
Download the latest version from our releases page.
Open your project in the Unity Editor and navigate to Assets → Import Package → Custom Package and select the downloaded Unity package file.

Add the prefab located at Assets/Adjust/Adjust.prefab to the first scene.
Edit the parameters of the Adjust script in the Inspector menu of the added prefab.
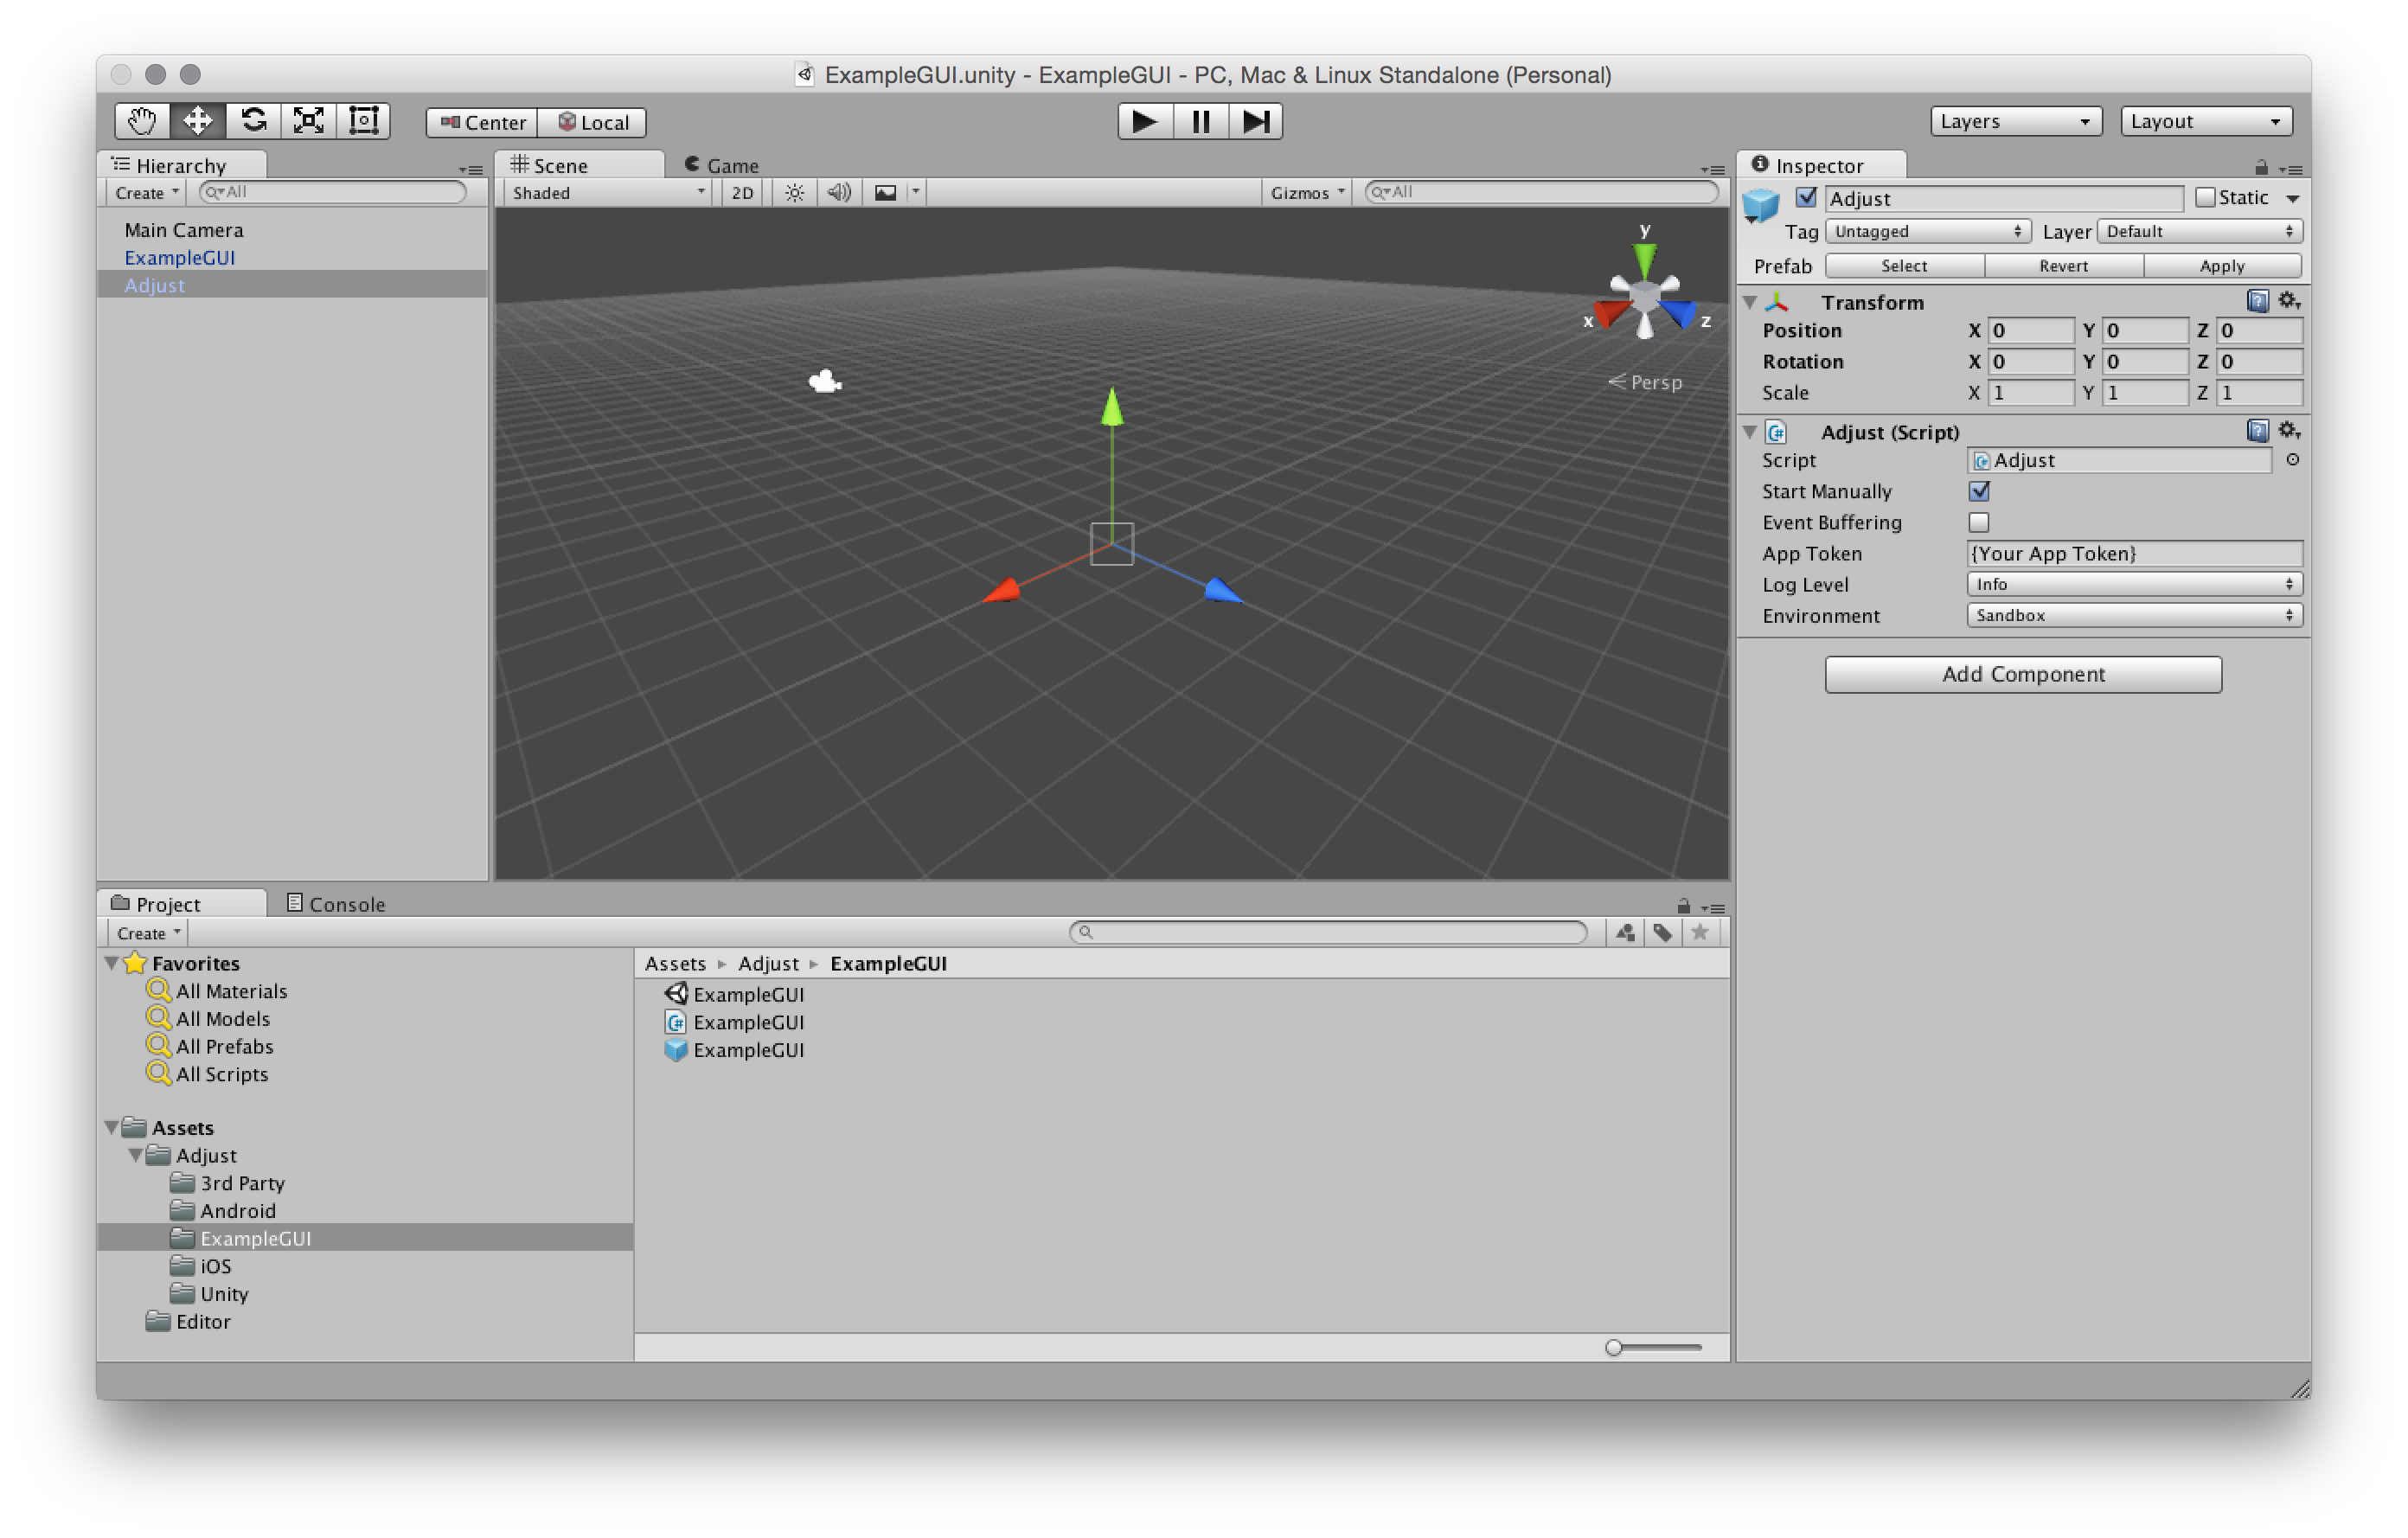
You have the possibility to set up the following options on the Adjust prefab:
- Start Manually
- Event Buffering
- Send In Background
- Launch Deferred Deep Link
- App Token
- Log Level
- Environment
Replace {YourAppToken} with your actual App Token. You can find in your dashboard.
'Sandbox'
'Production'
Important: This value should be set to Sandbox if, and only if, you or someone else is testing your app. Make sure to set the environment to Production just before you publish the app. Set it back to Sandbox when you start testing it again.
We use this environment to distinguish between real traffic and artificial traffic from test devices. It is very important that you keep this value meaningful at all times! Especially if you are tracking revenue.
For an example of scene with of a button menu with these options and others, open the example scene located at Assets/Adjust/ExampleGUI/ExampleGUI.unity. The source for this scene is located at Assets/Adjust/ExampleGUI/ExampleGUI.cs.
You can increase or decrease the amount of logs you see by changing the value of Log Level to one of the following:
Verbose- enable all loggingDebug- enable more loggingInfo- the defaultWarn- disable info loggingError- disable warnings as wellAssert- disable errors as wellSuppress- disable all logging
If want all your log output to be disabled, and if you are initialising the Adjust SDK manually from code, beside setting the log level to suppress, you should also use constructor for AdjustConfig object, which gets a boolean parameter indicating whether the suppress log level should be supported or not:
string appToken = "{YourAppToken}";
string environment = AdjustEnvironment.Sandbox;

AdjustConfig config = new AdjustConfig(appToken, environment, true);
config.setLogLevel(AdjustLogLevel.Suppress);

Adjust.start(config);
If your target is Windows-based, to see the compiled logs from our library in released mode, it is necessary to redirect the log output to your app while it's being tested in debug mode.
Call the method setLogDelegate in the AdjustConfig instance before starting the sdk.
//...
adjustConfig.setLogDelegate(msg => Debug.Log(msg));
//...
Adjust.start(adjustConfig);Since August 1st, 2014, apps in the Google Play Store must use the Google Advertising ID to uniquely identify devices. To allow the Adjust SDK to use the Google Advertising ID, you must integrate Google Play Services. If you haven't done this yet, you should copy google-play-services_lib folder into the Assets/Plugins/Android folder of your Unity project, and after building your app, Google Play Services should be integrated.
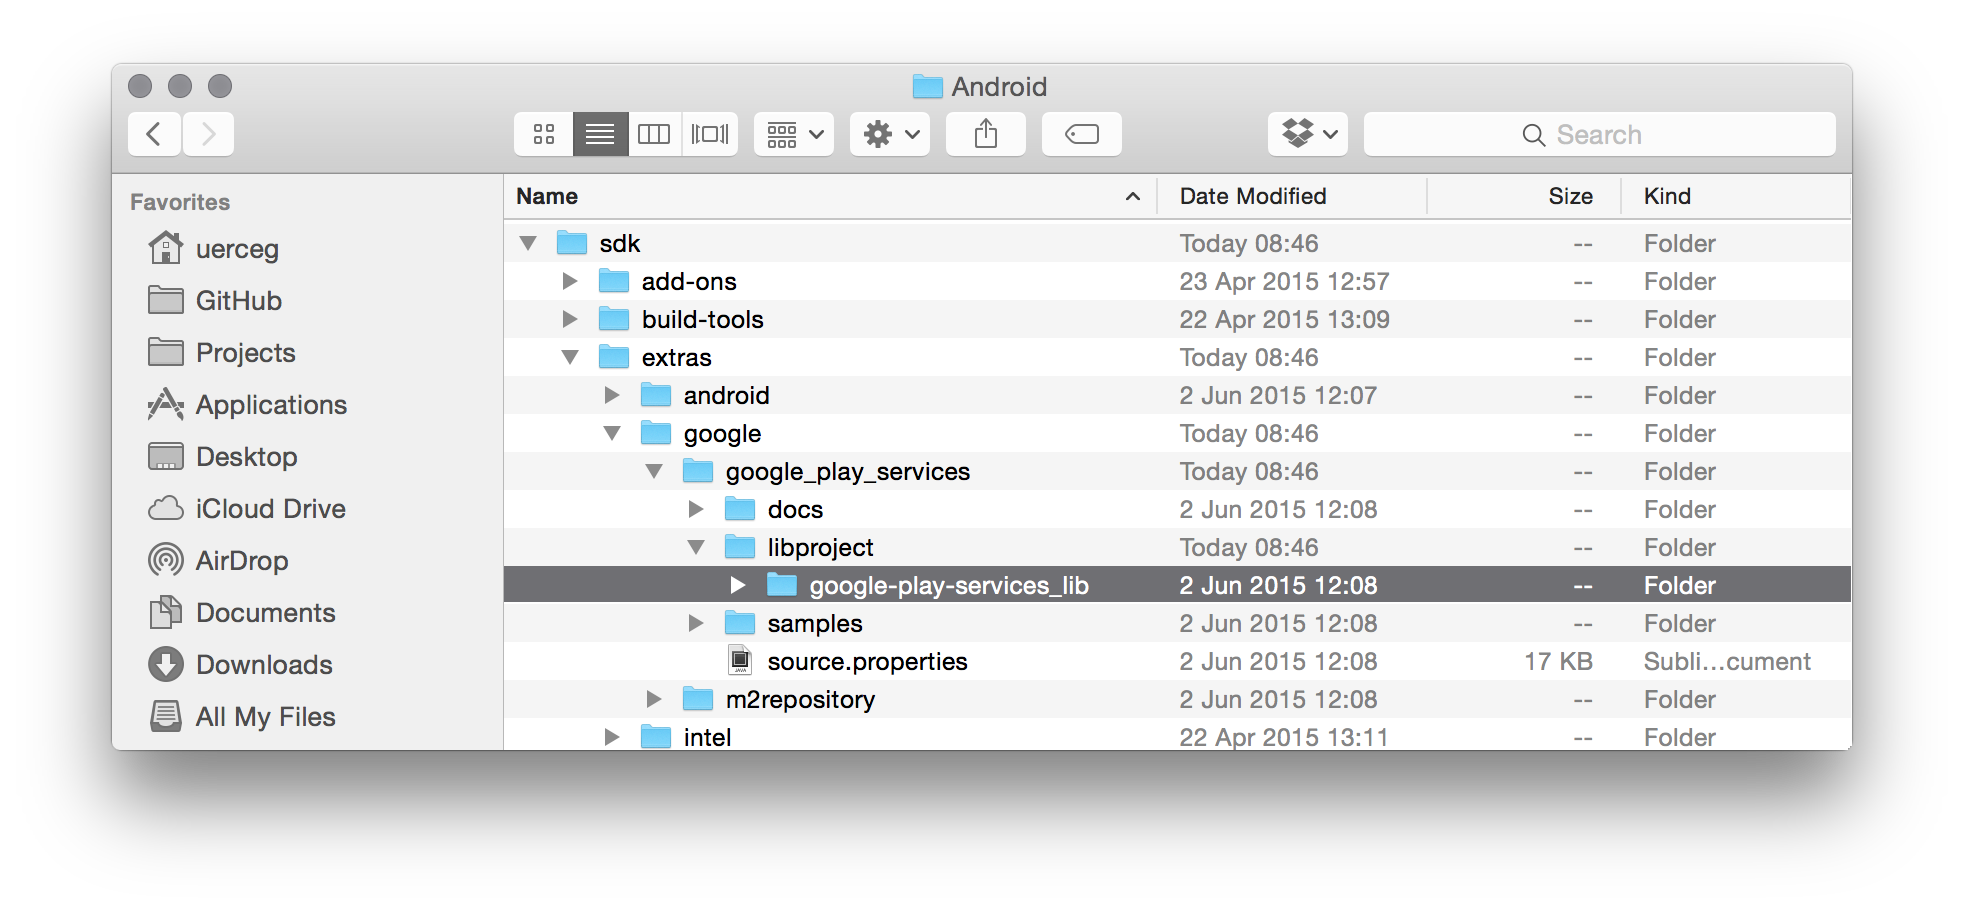
google-play-services_lib is part of the Android SDK, which you may already have installed.
There are two main ways to download the Android SDK. If you are using any tool which has the Android SDK Manager, you should download Android SDK Tools. Once installed, you can find the libraries in the SDK_FOLDER/extras/google/google_play_services/libproject/ folder.
If you are not using any tool which has Android SDK Manager, you should download the standalone version of Android SDK from official page. By downloading this, you will have only a basic version of the Android SDK which doesn't include the Android SDK Tools. There are more detailed instructions on how to download these in the readme file provided by Google, called SDK Readme.txt, which is placed in Android SDK folder.
Update: In case you are having newer Android SDK version installed, Google has changed the structure of the Google Play Services folders inside of the root SDK folder. Structure described above is changed and now it looks like this:
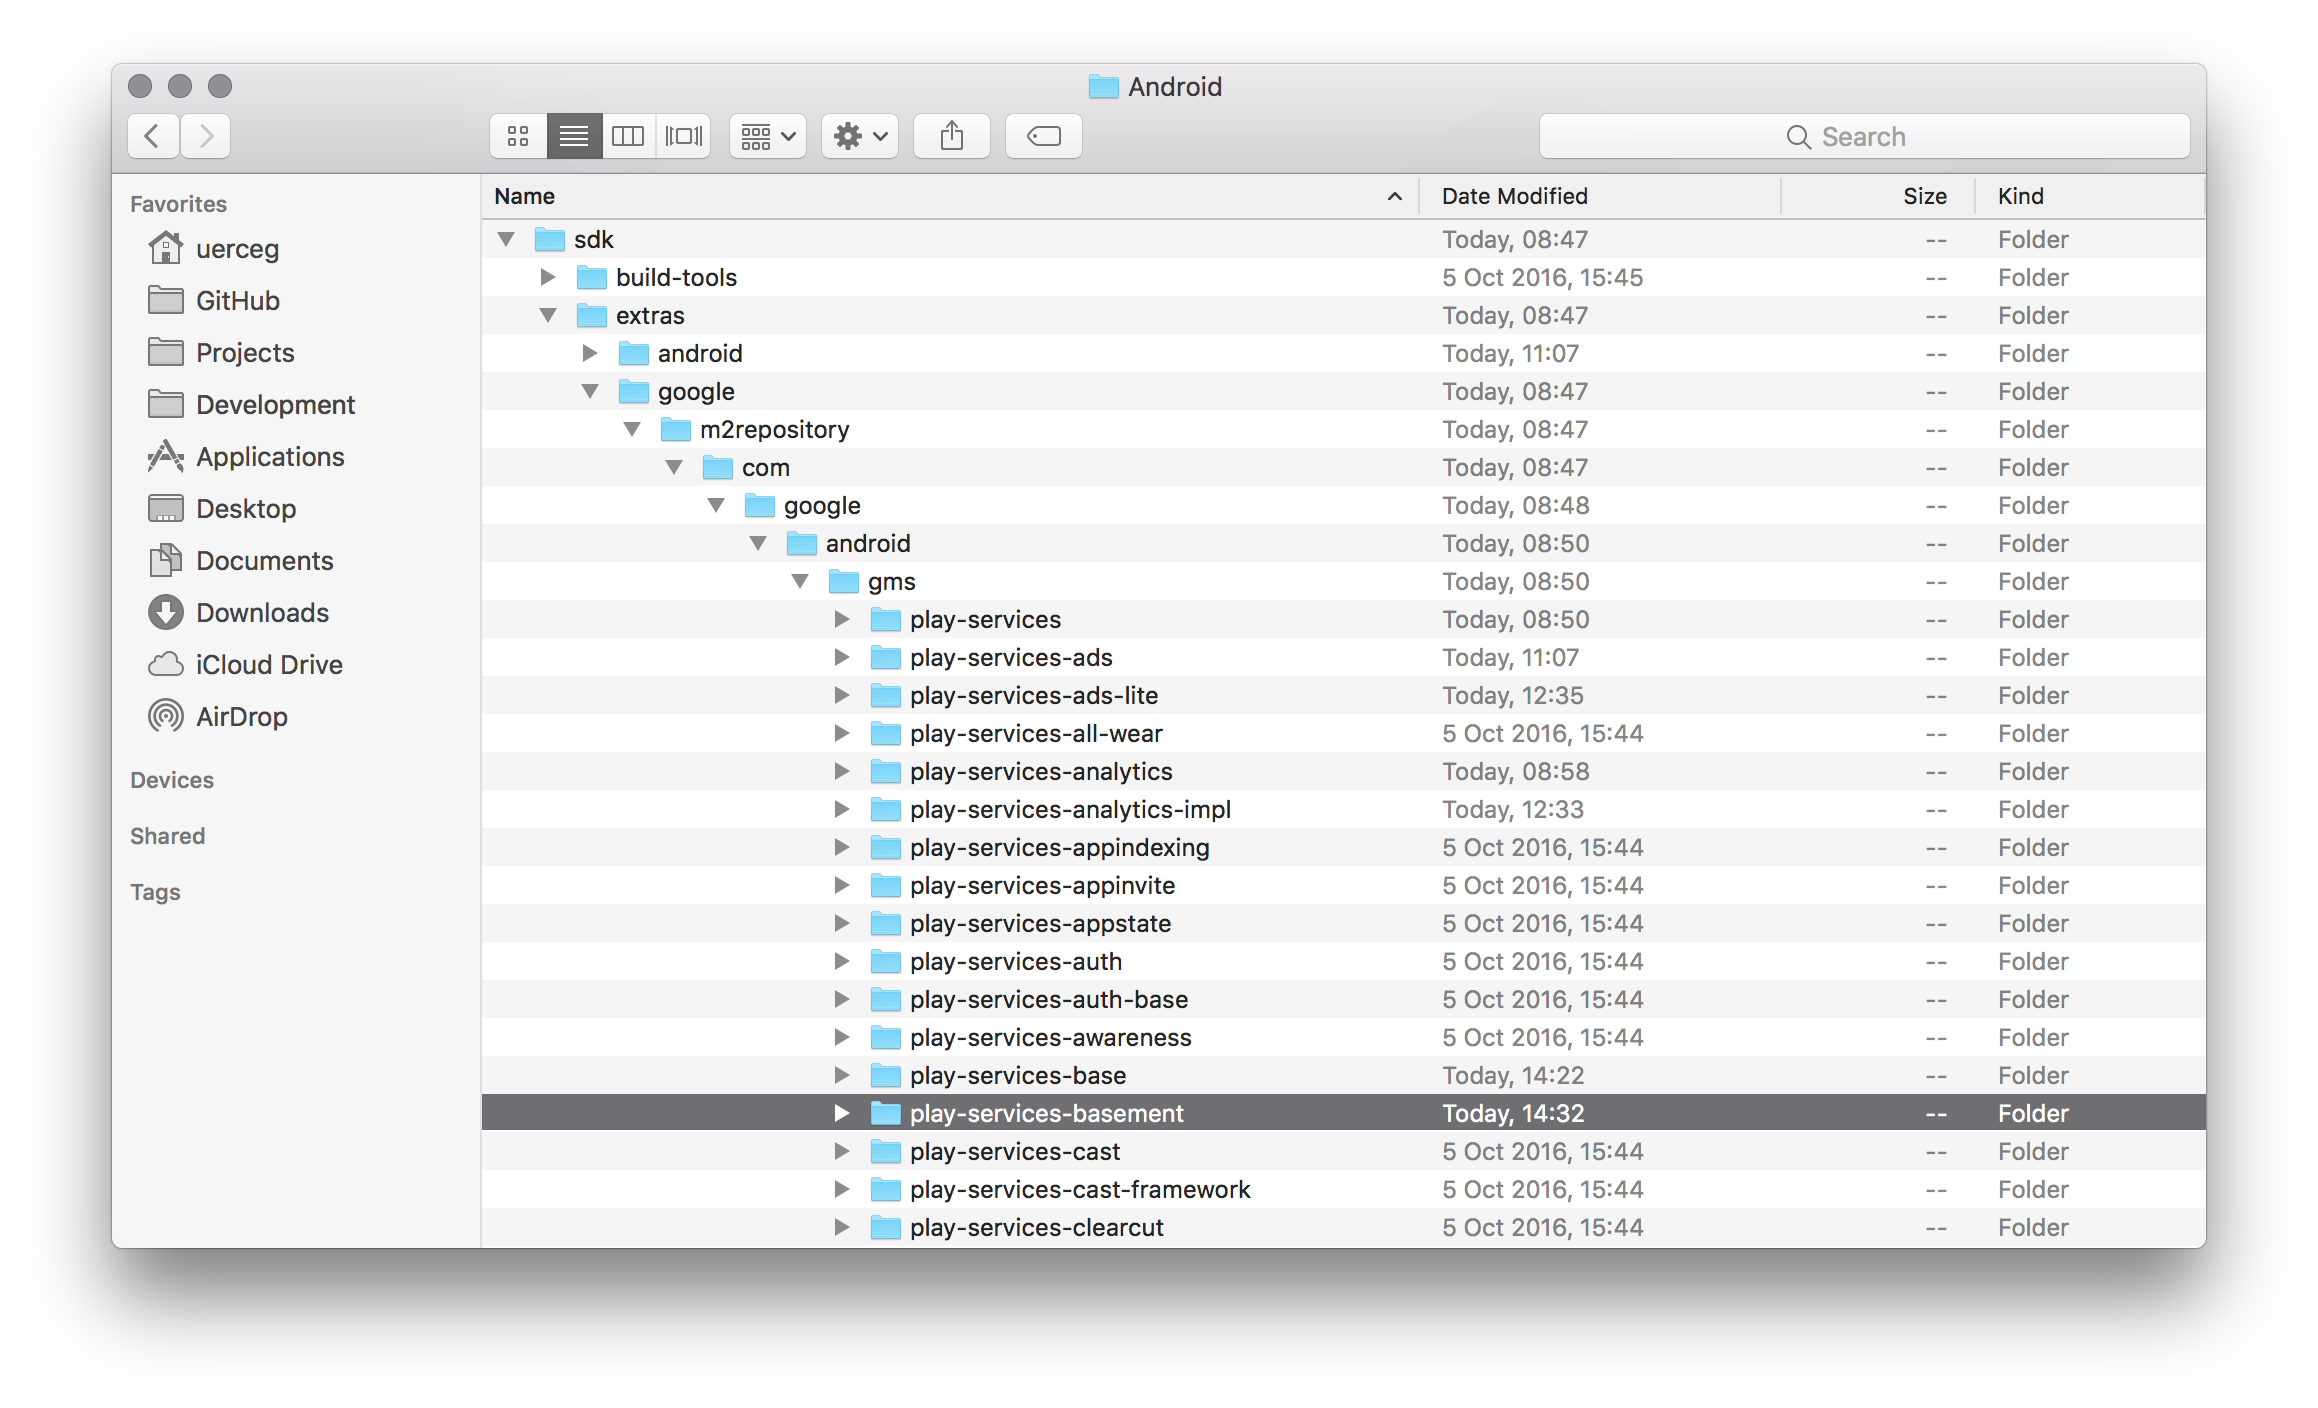
Since now you have possibility to access separate parts of the Google Play Services library and not just the whole library like before, you can add just the part of the Google Play Services library which Adjust SDK needs - the basement part. Add the play-services-basement-x.y.z.aar file to your Assets/Plugins/Android folder and Google Play Services needed by the Adjust SDK should be successfully integrated.
If you are using Proguard, add these lines to your Proguard file:
-keep public class com.adjust.sdk.** { *; }
-keep class com.google.android.gms.common.ConnectionResult {
    int SUCCESS;
}
-keep class com.google.android.gms.ads.identifier.AdvertisingIdClient {
    com.google.android.gms.ads.identifier.AdvertisingIdClient$Info getAdvertisingIdInfo(android.content.Context);
}
-keep class com.google.android.gms.ads.identifier.AdvertisingIdClient$Info {
    java.lang.String getId();
    boolean isLimitAdTrackingEnabled();
}
-keep class dalvik.system.VMRuntime {
    java.lang.String getRuntime();
}
-keep class android.os.Build {
    java.lang.String[] SUPPORTED_ABIS;
    java.lang.String CPU_ABI;
}
-keep class android.content.res.Configuration {
    android.os.LocaleList getLocales();
    java.util.Locale locale;
}
-keep class android.os.LocaledList {
    java.util.Locale get(int);
}
-keep public class com.android.installreferrer.** { *; }
In order to correctly attribute an install of your Android app to its source, Adjust needs information about the install referrer. This can be obtained by using the Google Play Referrer API or by catching the Google Play Store intent with a broadcast receiver. Adjust post build process takes care for you that scenario with Google Play Store intent is automatically supported, but in order to add support for new Google Play Referrer API, you need to do some additional steps on your own.
Important: The Google Play Referrer API is newly introduced by Google with the express purpose of providing a more reliable and secure way of obtaining install referrer information and to aid attribution providers in the fight against click injection. It is strongly advised that you support this in your application. The Google Play Store intent is a less secure way of obtaining install referrer information. It will continue to exist in parallel with the new Google Play Referrer API temporarily, but it is set to be deprecated in future.
To add support for it, download install referrer library from Maven repository. Place AAR file into your Plugins/Android folder and that's it. Adjust post build process will take care of needed AndroidManifest.xml adjustments.
To facilitate the build process, post build process will be performed by the Adjust unity package in order to enable the Adjust SDK to work properly.
This process is going to be performed by OnPostprocessBuild method in AdjustEditor.cs. In order for iOS post build process to be executed properly, your Unity 5 or later should have iOS build support installed.
The script writes the log output messages to the Unity IDE console output window.
iOS post build process is performing the following changes in your generated Xcode projet:
- Adds the
iAd.framework(needed for Apple Search Ads tracking). - Adds the
AdSupport.framework(needed for reading IDFA). - Adds the
CoreTelephony.framework(needed for reading MMC and MNC). - Adds the other linker flag
-ObjC(needed for Adjust Objective-C categories to be recognized during build time). - Enables
Objective-C exceptions.
Android post build process is performing changes in AndroidManifest.xml file located at Assets/Plugins/Android/.
Android post build process initially checks for the presence of AndroidManifest.xml file in the Android plugins folder. If there is no AndroidManifest.xml file in Assets/Plugins/Android/ it creates a copy from our compatible manifest file AdjustAndroidManifest.xml. If there is already an AndroidManifest.xml file, it checks and changes the following:
- Adds the
INTERNETpermission (needed for Internet connection). - Adds the
ACCESS_WIFI_STATEpermission (needed in case you are not distributing your app via Play Store). - Adds the
ACCESS_NETWORK_STATEpermission (needed for reading MMC and MNC). - Adds the
BIND_GET_INSTALL_REFERRER_SERVICEpermission (needed for new Google install referrer API to work). - Adds the Adjust broadcast receiver (needed for obtaining install referrer information via Google Play Store intent). For more details, consult the official Android SDK README. Please, have in mind that if you are using your own broadcast receiver which handles
INSTALL_REFERRERintent, you don't need the Adjust broadcast receiver to be added in your manifest file. Remove it, but inside your own receiver add the call to the Adjust broadcast receiver like described in Android guide.
Once you integrated the Adjust SDK into your project, you can take advantage of the following features.
You can tell Adjust about any event you wish. Suppose you want to track every tap on a button. You would just need to create a new Event Token in your dashboard. Let's say that Event Token is abc123. In your button's click handler method you could then add the following lines to track the click:
AdjustEvent adjustEvent = new AdjustEvent("abc123");
Adjust.trackEvent(adjustEvent);If your users can generate revenue by tapping on advertisements or making In-App Purchases you can track those revenues with events. Let's say a tap is worth one Euro cent. You could then track the revenue event like this:
AdjustEvent adjustEvent = new AdjustEvent("abc123");
adjustEvent.setRevenue(0.01, "EUR");
Adjust.trackEvent(adjustEvent);You can also add an optional transaction ID to avoid tracking duplicated revenues. The last ten transaction IDs are remembered, and revenue events with duplicated transaction IDs are skipped. This is especially useful for In-App Purchase tracking. You can see an example below.
If you want to track in-app purchases, please make sure to call the trackEvent only if the transaction is finished and item is purchased. That way you can avoid tracking revenue that is not actually being generated.
AdjustEvent adjustEvent = new AdjustEvent("abc123");

adjustEvent.setRevenue(0.01, "EUR");
adjustEvent.setTransactionId("transactionId");

Adjust.trackEvent(adjustEvent);If you want to check the validity of In-App Purchases made in your app using Purchase Verification, Adjust's server side receipt verification tool, then check out our Unity purchase SDK and read more about it here.
You can also register a callback URL for that event in your dashboard and we will send a GET request to that URL whenever the event gets tracked. In that case you can also put some key-value pairs in an object and pass it to the trackEvent method. We will then append these named parameters to your callback URL.
For example, suppose you have registered the URL http://www.adjust.com/callback for your event with Event Token abc123 and execute the following lines:
AdjustEvent adjustEvent = new AdjustEvent("abc123");

adjustEvent.addCallbackParameter("key", "value");
adjustEvent.addCallbackParameter("foo", "bar");

Adjust.trackEvent(adjustEvent);
In that case we would track the event and send a request to:
http://www.adjust.com/callback?key=value&foo=bar
It should be mentioned that we support a variety of placeholders like {idfa} for iOS or {gps_adid} for Android that can be used as parameter values. In the resulting callback, the {idfa} placeholder would be replaced with the ID for advertisers of the current device for iOS and the {gps_adid} would be replaced with the Google Play Services ID of the current device for Android. Also note that we don't store any of your custom parameters, but only append them to your callbacks. If you haven't registered a callback for an event, these parameters won't even be read.
You can also add parameters to be transmitted to network partners, for the integrations that have been activated in your Adjust dashboard.
This works similarly to the callback parameters mentioned above, but can be added by calling the addPartnerParameter method on your AdjustEvent instance.
AdjustEvent adjustEvent = new AdjustEvent("abc123");

adjustEvent.addPartnerParameter("key", "value");
adjustEvent.addPartnerParameter("foo", "bar");

Adjust.trackEvent(adjustEvent);
You can read more about special partners and these integrations in our guide to special partners.
Some parameters are saved to be sent in every event and session of the Adjust SDK. Once you have added any of these parameters once, you don't need to add them every time, since they will be saved locally. If you add the same parameter twice, there will be no effect.
These session parameters can be called before the Adjust SDK is launched to make sure they are sent even on install. If you need to send them with an install, but can only obtain the needed values after launch, it's possible to delay the first launch of the Adjust SDK to allow this behaviour.
The same callback parameters that are registered for events can also be saved to be sent in every event or session of the Adjust SDK.
The session callback parameters have a similar interface to the event callback parameters. Instead of adding the key and it's value to an event, it's added through a call to addSessionCallbackParameter method of the Adjust instance.
Adjust.addSessionCallbackParameter("foo", "bar");The session callback parameters will be merged with the callback parameters added to an event. The callback parameters added to an event have precedence over the session callback parameters. Meaning that, when adding a callback parameter to an event with the same key to one added from the session, the value that prevails is the callback parameter added to the event.
It's possible to remove a specific session callback parameter by passing the desiring key to the removeSessionCallbackParameter method of the Adjust instance.
Adjust.removeSessionCallbackParameter("foo");If you wish to remove all key and values from the session callback parameters, you can reset it with the method resetSessionCallbackParameters of the Adjust instance.
Adjust.resetSessionCallbackParameters();In the same way that there are session callback parameters that are sent every in event or session of the Adjust SDK, there is also session partner parameters.
These will be transmitted to network partners, for whom the integrations have been activated in your Adjust dashboard.
The session partner parameters have a similar interface to the event partner parameters. Instead of adding the key and it's value to an event, it's added through a call to addSessionPartnerParameter method of the Adjust instance.
Adjust.addSessionPartnerParameter("foo", "bar");The session partner parameters will be merged with the partner parameters added to an event. The partner parameters added to an event have precedence over the session partner parameters. Meaning that, when adding a partner parameter to an event with the same key to one added from the session, the value that prevails is the partner parameter added to the event.
It's possible to remove a specific session partner parameter by passing the desiring key to the removeSessionPartnerParameter method of the Adjust instance.
Adjust.removeSessionPartnerParameter("foo");If you wish to remove all key and values from the session partner parameters, you can reset it with the resetSessionPartnerParameters method of the Adjust instance.
Adjust.resetSessionPartnerParameters();Delaying the start of the Adjust SDK allows your app some time to obtain session parameters, such as unique identifiers, to be send on install.
Set the initial delay time in seconds with the method setDelayStart in the AdjustConfig instance:
adjustConfig.setDelayStart(5.5);In this case the Adjust SDK not send the initial install session and any event created for 5.5 seconds. After this time is expired or if you call Adjust.sendFirstPackages() in the meanwhile, every session parameter will be added to the delayed install session and events and the Adjust SDK will resume as usual.
The maximum delay start time of the Adjust SDK is 10 seconds.
You can register a callback to be notified of tracker attribution changes. Due to the different sources considered for attribution, this information cannot be provided synchronously. Follow these steps to implement the optional callback in your application:
Please make sure to consider applicable attribution data policies.
-
Create a method with the signature of the delegate
Action<AdjustAttribution>. -
After creating the
AdjustConfigobject, call theadjustConfig.setAttributionChangedDelegatewith the previously created method. It is also be possible to use a lambda with the same signature. -
If instead of using the
Adjust.prefab, theAdjust.csscript was added to anotherGameObject. Don't forget to pass the name of thatGameObjectas the second parameter ofAdjustConfig.setAttributionChangedDelegate.
As the callback is configured using the AdjustConfig instance, you should call adjustConfig.setAttributionChangedDelegate before calling Adjust.start.
The callback function will get called when the SDK receives final attribution data. Within the callback function you have access to the attribution parameter. Here is a quick summary of its properties:
string trackerTokenthe tracker token of the current attribution.string trackerNamethe tracker name of the current attribution.string networkthe network grouping level of the current attribution.string campaignthe campaign grouping level of the current attribution.string adgroupthe ad group grouping level of the current attribution.string creativethe creative grouping level of the current attribution.string clickLabelthe click label of the current attribution.string adidthe Adjust device identifier.
using com.adjust.sdk;

public class ExampleGUI : MonoBehaviour {
    void OnGUI() {
        if (GUI.Button(new Rect(0, 0, Screen.width, Screen.height), "callback")) {
            AdjustConfig adjustConfig = new AdjustConfig("{Your App Token}", AdjustEnvironment.Sandbox);
            adjustConfig.setLogLevel(AdjustLogLevel.Verbose);
            adjustConfig.setAttributionChangedDelegate(this.attributionChangedDelegate);

            Adjust.start(adjustConfig);
        }
    }

    public void attributionChangedDelegate(AdjustAttribution attribution) {
        Debug.Log("Attribution changed");

        // ...
    }
}You can register a callback to be notified of successful and failed events and/or sessions.
Follow the same steps to implement the following callback function for successful tracked events:
// ...

AdjustConfig adjustConfig = new AdjustConfig("{Your App Token}", AdjustEnvironment.Sandbox);
adjustConfig.setLogLevel(AdjustLogLevel.Verbose);
adjustConfig.setEventSuccessDelegate(EventSuccessCallback);

Adjust.start(adjustConfig);

// ...

public void EventSuccessCallback(AdjustEventSuccess eventSuccessData) {
    // ...
}
The following callback function for failed tracked events:
// ...

AdjustConfig adjustConfig = new AdjustConfig("{Your App Token}", AdjustEnvironment.Sandbox);
adjustConfig.setLogLevel(AdjustLogLevel.Verbose);
adjustConfig.setEventFailureDelegate(EventFailureCallback);

Adjust.start(adjustConfig);

// ...

public void EventFailureCallback(AdjustEventFailure eventFailureData) {
    // ...
}
For successful tracked sessions:
// ...

AdjustConfig adjustConfig = new AdjustConfig("{Your App Token}", AdjustEnvironment.Sandbox);
adjustConfig.setLogLevel(AdjustLogLevel.Verbose);
adjustConfig.setSessionSuccessDelegate(SessionSuccessCallback);

Adjust.start(adjustConfig);

// ...

public void SessionSuccessCallback (AdjustSessionSuccess sessionSuccessData) {
    // ...
}
And for failed tracked sessions:
// ...

AdjustConfig adjustConfig = new AdjustConfig("{Your App Token}", AdjustEnvironment.Sandbox);
adjustConfig.setLogLevel(AdjustLogLevel.Verbose);
adjustConfig.setSessionFailureDelegate(SessionFailureCallback);

Adjust.start(adjustConfig);

// ...

public void SessionFailureCallback (AdjustSessionFailure sessionFailureData) {
    // ...
}
The callback functions will be called after the SDK tries to send a package to the server. Within the callback you have access to a response data object specifically for the callback. Here is a quick summary of the session response data properties:
string Messagethe message from the server or the error logged by the SDK.string Timestamptimestamp from the server.string Adida unique device identifier provided by Adjust.Dictionary<string, object> JsonResponsethe JSON object with the response from the server.
Both event response data objects contain:
string EventTokenthe event token, if the package tracked was an event.
And both event and session failed objects also contain:
bool WillRetryindicates there will be an attempt to resend the package at a later time.
You can disable the Adjust SDK from tracking by invoking the method setEnabled with the enabled parameter as false. This setting is remembered between sessions, but it can only be activated after the first session.
Adjust.setEnabled(false);You can verify if the Adjust SDK is currently active with the method isEnabled. It is always possible to activate the Adjust SDK by invoking setEnabled with the enabled parameter set to true.
You can put the Adjust SDK in offline mode to suspend transmission to our servers, while retaining tracked data to be sent later. When in offline mode, all information is saved in a file, so be careful not to trigger too many events.
You can activate offline mode by calling setOfflineMode with the parameter true.
Adjust.setOfflineMode(true);Conversely, you can deactivate offline mode by calling setOfflineMode with false. When the Adjust SDK is put back in online mode, all saved information is send to our servers with the correct time information.
Unlike disabling tracking, this setting is not remembered between sessions. This means that the SDK is in online mode whenever it is started, even if the app was terminated in offline mode.
If your app makes heavy use of event tracking, you might want to delay some HTTP requests in order to send them in one batch every minute. You can enable event buffering with your AdjustConfig instance:
AdjustConfig adjustConfig = new AdjustConfig("{YourAppToken}", "{YourEnvironment}");

adjustConfig.setEventBufferingEnabled(true);

Adjust.start(adjustConfig);
If nothing is set, event buffering is disabled by default.
An account manager must activate the Adjust SDK signature. Contact Adjust support (support@adjust.com) if you are interested in using this feature.
If the SDK signature has already been enabled on your account and you have access to App Secrets in your Adjust Dashboard, please use the method below to integrate the SDK signature into your app.
An App Secret is set by passing all secret parameters (secretId, info1, info2, info3, info4) to setAppSecret method of AdjustConfig instance:
AdjustConfig adjustConfig = new AdjustConfig("{YourAppToken}", "{YourEnvironment}");

adjustConfig.setAppSecret(secretId, info1, info2, info3, info4);

Adjust.start(adjustConfig);The default behaviour of the Adjust SDK is to pause sending HTTP requests while the app is in the background. You can change this in your AdjustConfig instance:
AdjustConfig adjustConfig = new AdjustConfig("{YourAppToken}", "{YourEnvironment}");

adjustConfig.setSendInBackground(true);

Adjust.start(adjustConfig);Certain services (such as Google Analytics) require you to coordinate Device and Client IDs in order to prevent duplicate reporting.
To obtain the IDFA, call the function getIdfa of the Adjust instance:
string idfa = Adjust.getIdfa();If you need to obtain the Google Advertising ID, There is a restriction that only allows it to be read in a background thread. If you call the method getGoogleAdId of the Adjust instance with an Action<string> delegate, it will work in any situation:
Adjust.getGoogleAdId((string googleAdId) => {
    // ...
});
You will have access to the Google Advertising ID as the variable googleAdId.
If you need to obtain the Amazon advertising ID, you can call the getAmazonAdId method on Adjust instance:
string amazonAdId = Adjust.getAmazonAdId();For each device with your app installed on it, Adjust backend generates unique Adjust device identifier (adid). In order to obtain this identifier, you can make a call to following method on Adjust instance:
String adid = Adjust.getAdid();Note: Information about adid is available after app installation has been tracked by the Adjust backend. From that moment on, the Adjust SDK has information about your device adid and you can access it with this method. So, it is not possible to access the adid value before the SDK has been initialised and installation of your app has been successfully tracked.
As described in the attribution callback section, this callback is triggered, providing you with information about a new attribution whenever it changes. If you want to access information about a user's current attribution whenever you need it, you can make a call to the following method of the Adjust instance:
AdjustAttribution attribution = Adjust.getAttribution();Note: Information about current attribution is available after app installation has been tracked by the Adjust backend and the attribution callback has been initially triggered. From that moment on, the Adjust SDK has information about a user's attribution and you can access it with this method. So, it is not possible to access a user's attribution value before the SDK has been initialized and an attribution callback has been triggered.
To send us the push notification token, please call setDeviceToken method on the Adjust instance when you obtain your app's push notification token and when ever it changes it's value:
Adjust.setDeviceToken("YourPushNotificationToken");Push tokens are used for Audience Builder and client callbacks, and they are required for the upcoming uninstall tracking feature.
If you are distributing your Android app outside of the Google Play Store and would like to track additional device identifiers (IMEI and MEID), you need to explicitly instruct the Adjust SDK to do so. You can do that by calling the setReadMobileEquipmentIdentity method of the AdjustConfig instance. The Adjust SDK does not collect these identifiers by default.
AdjustConfig adjustConfig = new AdjustConfig("{YourAppToken}", "{YourEnvironment}");

adjustConfig.setReadMobileEquipmentIdentity(true);

Adjust.start(adjustConfig);
You will also need to add the READ_PHONE_STATE permission to your AndroidManifest.xml file:
<uses-permission android:name="android.permission.READ_PHONE_STATE"/>In order to use this feature, additional steps are required within your Adjust Dashboard. For more information, please contact your dedicated account manager or write an email to support@adjust.com.
If you want to use the Adjust SDK to recognize users that found your app pre-installed on their device, follow these steps.
- Create a new tracker in your dashboard.
- Set the default tracker of your
AdjustConfig:
AdjustConfig adjustConfig = new AdjustConfig(appToken, environment);
adjustConfig.setDefaultTracker("{TrackerToken}");
Adjust.start(adjustConfig);
Replace {TrackerToken} with the tracker token you created in step 2. Please note that the dashboard displays a tracker
URL (including http://app.adjust.com/). In your source code, you should specify only the six-character token and not
the entire URL.
-
Build and run your app. You should see a line like the following in the log output:
Default tracker: 'abc123'
Deep linking is supported only on iOS and Android platforms.
If you are using the Adjust tracker URL with an option to deep link into your app from the URL, there is the possibility to get information about the deep link URL and its content. Hitting the URL can happen when the user already has your app installed (standard deep linking scenario) or if they don't have the app on their device (deferred deep linking scenario). In the standard deep linking scenario, the Android platform natively offers the possibility for you to get the information about the deep link content. The deferred deep linking scenario is something that the Android platform doesn't support out of the box; in this case, the Adjust SDK will offer you the mechanism to get the information about the deep link content.
You need to set up deep linking handling in your app on native level - in your generated Xcode project (for iOS) and Android Studio / Eclipse project (for Android).
Unfortunately, in this scenario the information about the deep link can not be delivered to you in your Unity C# code. Once you enable your app to handle deep linking, you will get information about the deep link on native level. For more information check our chapters below on how to enable deep linking for Android and iOS apps.
In order to get information about the URL content in a deferred deep linking scenario, you should set a callback method on the AdjustConfig object which will receive one string parameter where the content of the URL will be delivered. You should set this method on the config object by calling the method setDeferredDeeplinkDelegate:
// ...

private void DeferredDeeplinkCallback(string deeplinkURL) {
   Debug.Log("Deeplink URL: " + deeplinkURL);

   // ...
}

AdjustConfig adjustConfig = new AdjustConfig("{YourAppToken}", "{YourEnvironment}");

adjustConfig.setDeferredDeeplinkDelegate(DeferredDeeplinkCallback);

Adjust.start(adjustConfig);// ...
private void DeferredDeeplinkCallback(string deeplinkURL) {
Debug.Log ("Deeplink URL: " + deeplinkURL);
// ...
}
AdjustConfig adjustConfig = new AdjustConfig("{YourAppToken}", "{YourEnvironment}");
adjustConfig.setLaunchDeferredDeeplink(true);
adjustConfig.setDeferredDeeplinkDelegate(DeferredDeeplinkCallback);
Adjust.start(adjustConfig);If nothing is set, the Adjust SDK will always try to launch the URL by default.
To enable your apps to support deep linking, you should set up schemes for each supported platform.
This should be done in native Android Studio / Eclipse project.
To set up your Android app to handle deep linking on native level, please follow our guide in the official Android SDK README.
This should be done in native Xcode project.
To set up your iOS app to handle deep linking on native level, please follow our guide in the official iOS SDK README.
Even with the post build script it is possible that the project is not ready to run out of the box.
If needed, disable dSYM File. In the Project Navigator, select the Unity-iPhone project. Click the Build Settings tab and search for debug information. There should be an Debug Information Format or DEBUG_INFORMATION_FORMAT option. Change it from DWARF with dSYM File to DWARF.
The file mod_pbxproj.py is licensed under the Apache License, Version 2.0 (the "License"). You may not use this file except in compliance with the License. You may obtain a copy of the License at http://www.apache.org/licenses/LICENSE-2.0
The Adjust SDK is licensed under the MIT License.
Copyright (c) 2012-2018 Adjust GmbH, http://www.adjust.com
Permission is hereby granted, free of charge, to any person obtaining a copy of this software and associated documentation files (the "Software"), to deal in the Software without restriction, including without limitation the rights to use, copy, modify, merge, publish, distribute, sublicense, and/or sell copies of the Software, and to permit persons to whom the Software is furnished to do so, subject to the following conditions:
The above copyright notice and this permission notice shall be included in all copies or substantial portions of the Software.
THE SOFTWARE IS PROVIDED "AS IS", WITHOUT WARRANTY OF ANY KIND, EXPRESS OR IMPLIED, INCLUDING BUT NOT LIMITED TO THE WARRANTIES OF MERCHANTABILITY, FITNESS FOR A PARTICULAR PURPOSE AND NONINFRINGEMENT. IN NO EVENT SHALL THE AUTHORS OR COPYRIGHT HOLDERS BE LIABLE FOR ANY CLAIM, DAMAGES OR OTHER LIABILITY, WHETHER IN AN ACTION OF CONTRACT, TORT OR OTHERWISE, ARISING FROM, OUT OF OR IN CONNECTION WITH THE SOFTWARE OR THE USE OR OTHER DEALINGS IN THE SOFTWARE.